In this Mentee Showcase, get to know Laela Russell, Associate II Environment Artist at Obsidian Entertainment.
Laela shares her experiences as a game artist, what it’s like to be part of the Vessel Forge community and breaks down her piece, “Fantasy Castle.”
Q: What is your area of focus? And which Vessel Forge program did you enroll in?
I am currently working at Obsidian Entertainment as an Associate Environment Artist. I’ll hit my two year anniversary at Obsidian in June! My area of focus is environment art, and I took the Environment Art Mentorship with Jonathan Benainous.
Q: Tell us about your background. Where did you learn your craft?
I attended a 4 year program to study Game Art at Ringling College of Art and Design and have a Bachelor’s Degree in art. I have always had a passion for digital arts; throughout high school, I attended classes at Gnomon and ArtCenter to learn 3D modeling and animation.
Q: What led you to pursue a career in video game art?
Art has always been an important part of my life for as long as I can remember. I began to seriously study it during high school when I was introduced to digital art. It wasn’t until after taking a lot of classes that I learned I wanted to do 3D modeling as a career. Originally planning to go into animation, I discovered Environment Art for video games around the time of my college applications and fell in love with the detailed and immersive environments I found in my favorite games.
Q: What do you enjoy about creating art for video games?
I enjoy the artistic side of game environments, such as creating high quality assets, compositions, and impactful scenes. A game environment holds the potential to tell a story and convey emotions without using a single word, which is super inspiring to me and a key part of developing environments for games. At the same time, I enjoy the technical challenges that come with making environments for games, including performance, optimization, and shader creation.
Q: What were some of your biggest takeaways from your Vessel Forge program?
My experience at Vessel Forge was incredibly beneficial to my career. I had already met Jonathan when he visited Ringling College a year earlier, and, being familiar with his work, I knew I wanted to pursue a mentorship to learn from him. Having such an experienced mentor means they know what hiring managers and art teams are looking for, how professionals in the industry go about creating environments from start to finish, and have the experience to point you in the right direction, starting with choosing the right project. Jonathan helped me every step of the way with planning what to tackle next in my scene, blocking it out, approaching sculpting my materials, and taking my scene to a final version. The Vessel Forge community is extremely friendly and helpful. I appreciate all the help I got from both other mentors and other mentees who were kind enough to give feedback on my work as well. The mentorship helped me to grow; Jonathan always pushed me to do better and would never settle for less. Hearing his feedback every week also helped me learn what to look for and how to reflect on my own artwork to continue pushing myself even when the mentorship was over.
One of the biggest takeaways from the mentorship was getting an insight into Jonathan’s workflow for creating an environment, as he has 20+ years of experience in the industry. Another key takeaway is how to analyze my portfolio and how to choose the right project to work on. The continuous access to the Vessel Forge community and the connections I made not only with Jonathan but with the other mentors as well will be helpful throughout my entire career. Finally, the opportunity to have my work shared on Vessel Forge’s social media is immensely helpful in getting eyes on not only my most recent project, but my portfolio as a whole.


Q: Why did you decide to apply for a Vessel Forge mentorship, and what is your plan going forward in your career?
I wanted to grow my skillset and make more connections within the industry. I also had met Jonathan before, and he gave me really great advice during a portfolio review. When I saw Vessel Forge on Instagram, I was really excited about the opportunity to connect with him again and learn from him.
I will continue to learn and develop my portfolio, building on the skills I learned during the mentorship to make my future projects more advanced and focused. And I would love to take another Vessel Forge mentorship to grow and expand my skill set in other areas!
Q: Where can people find your art?
https://www.artstation.com/laelarussell

Introduction
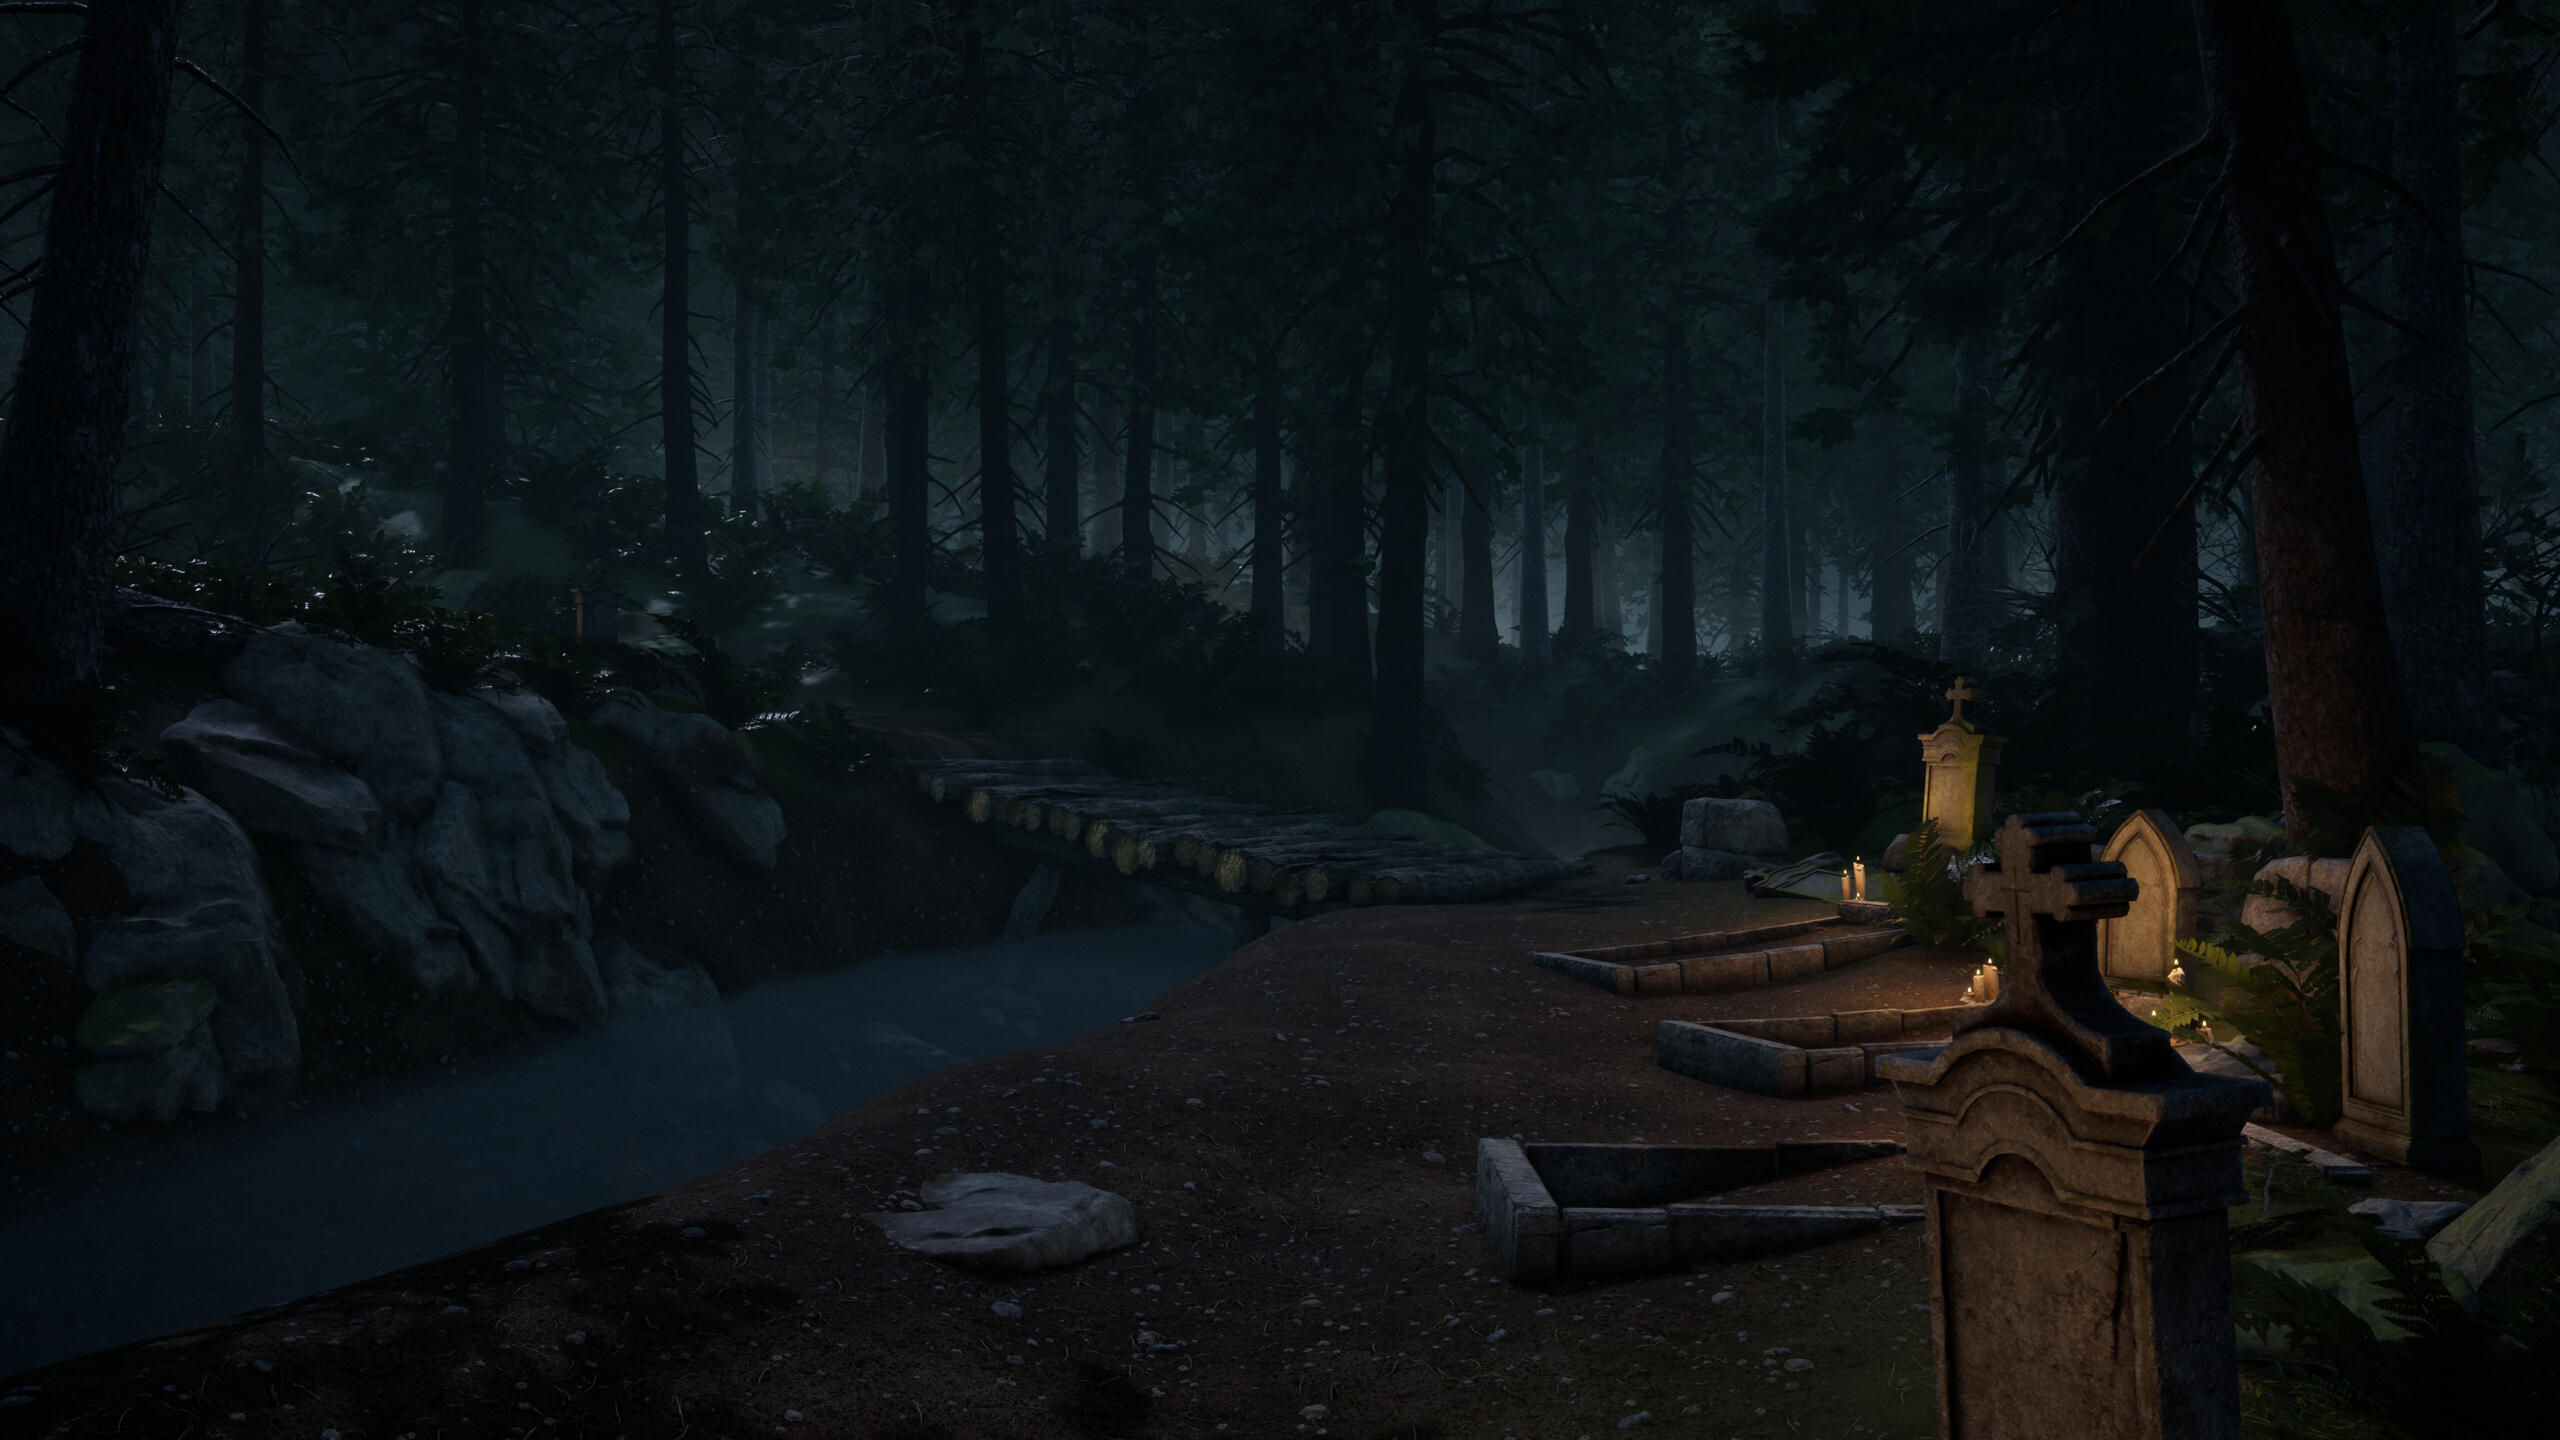
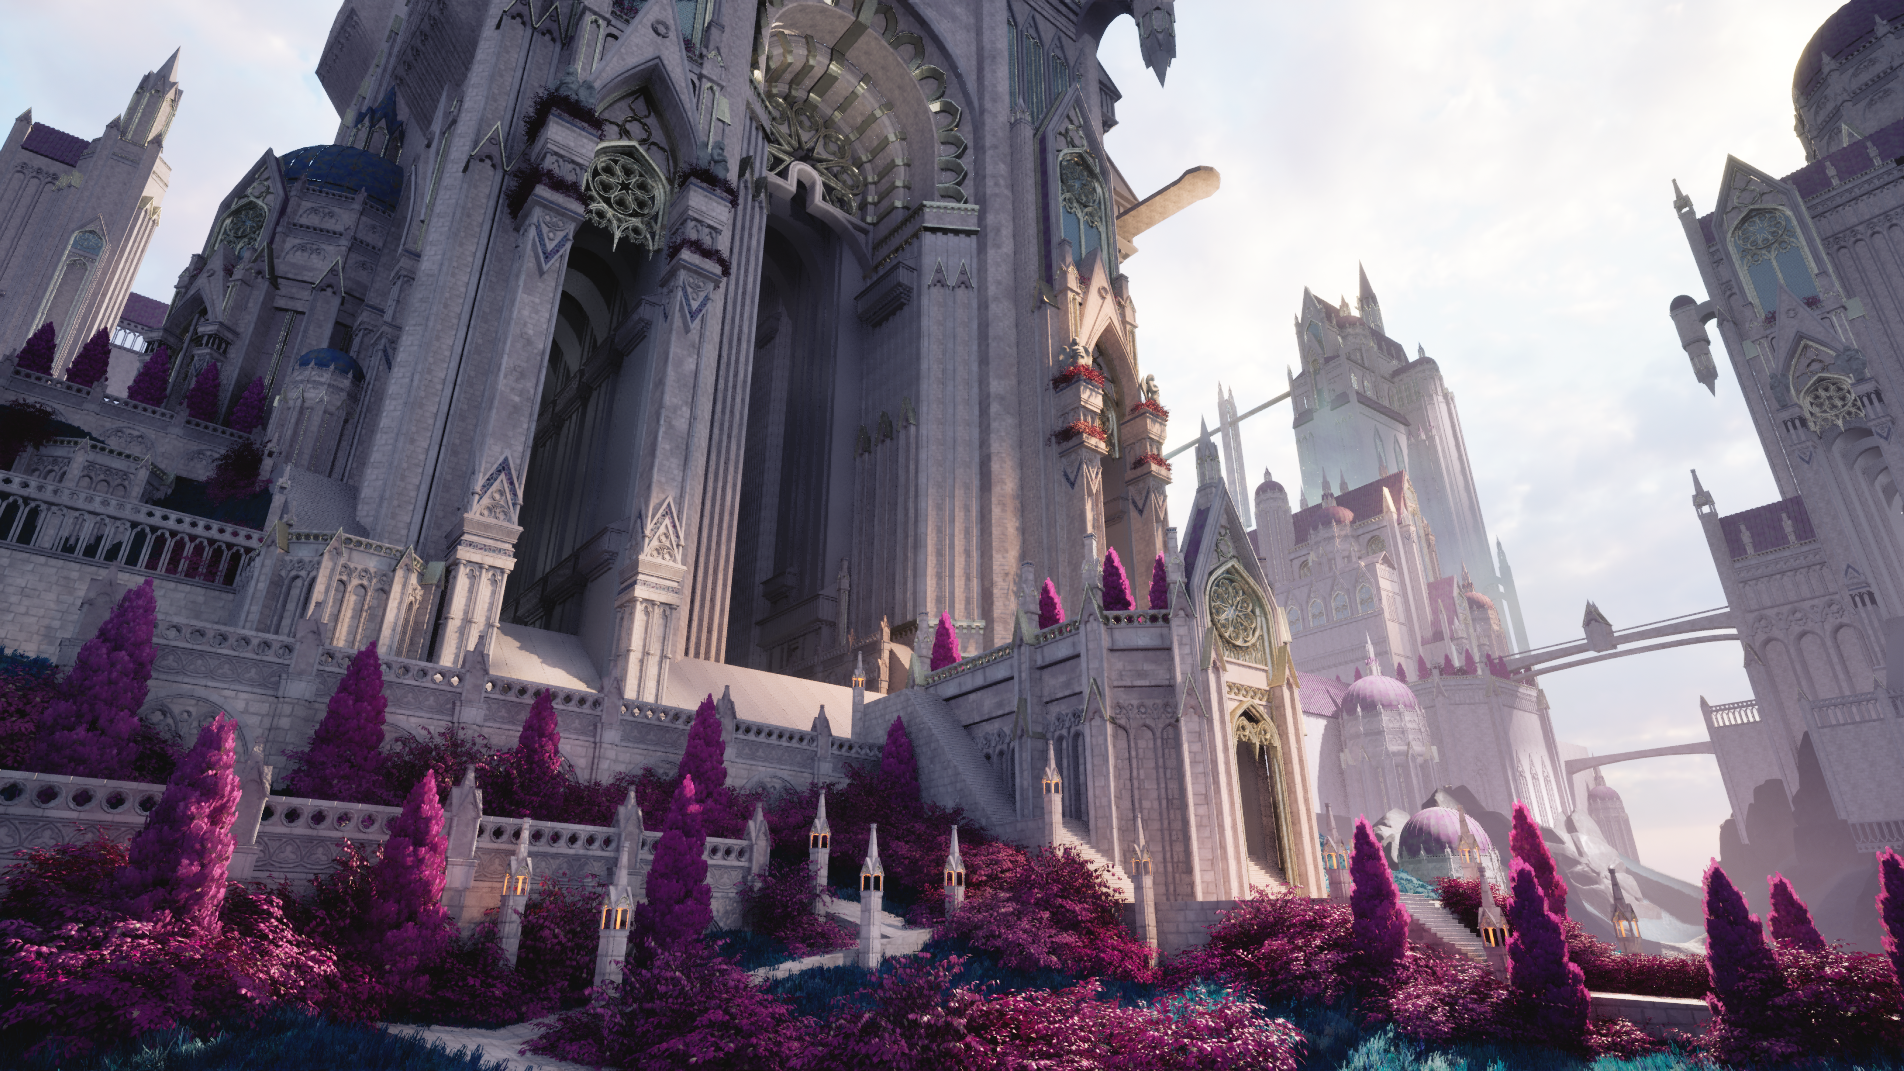
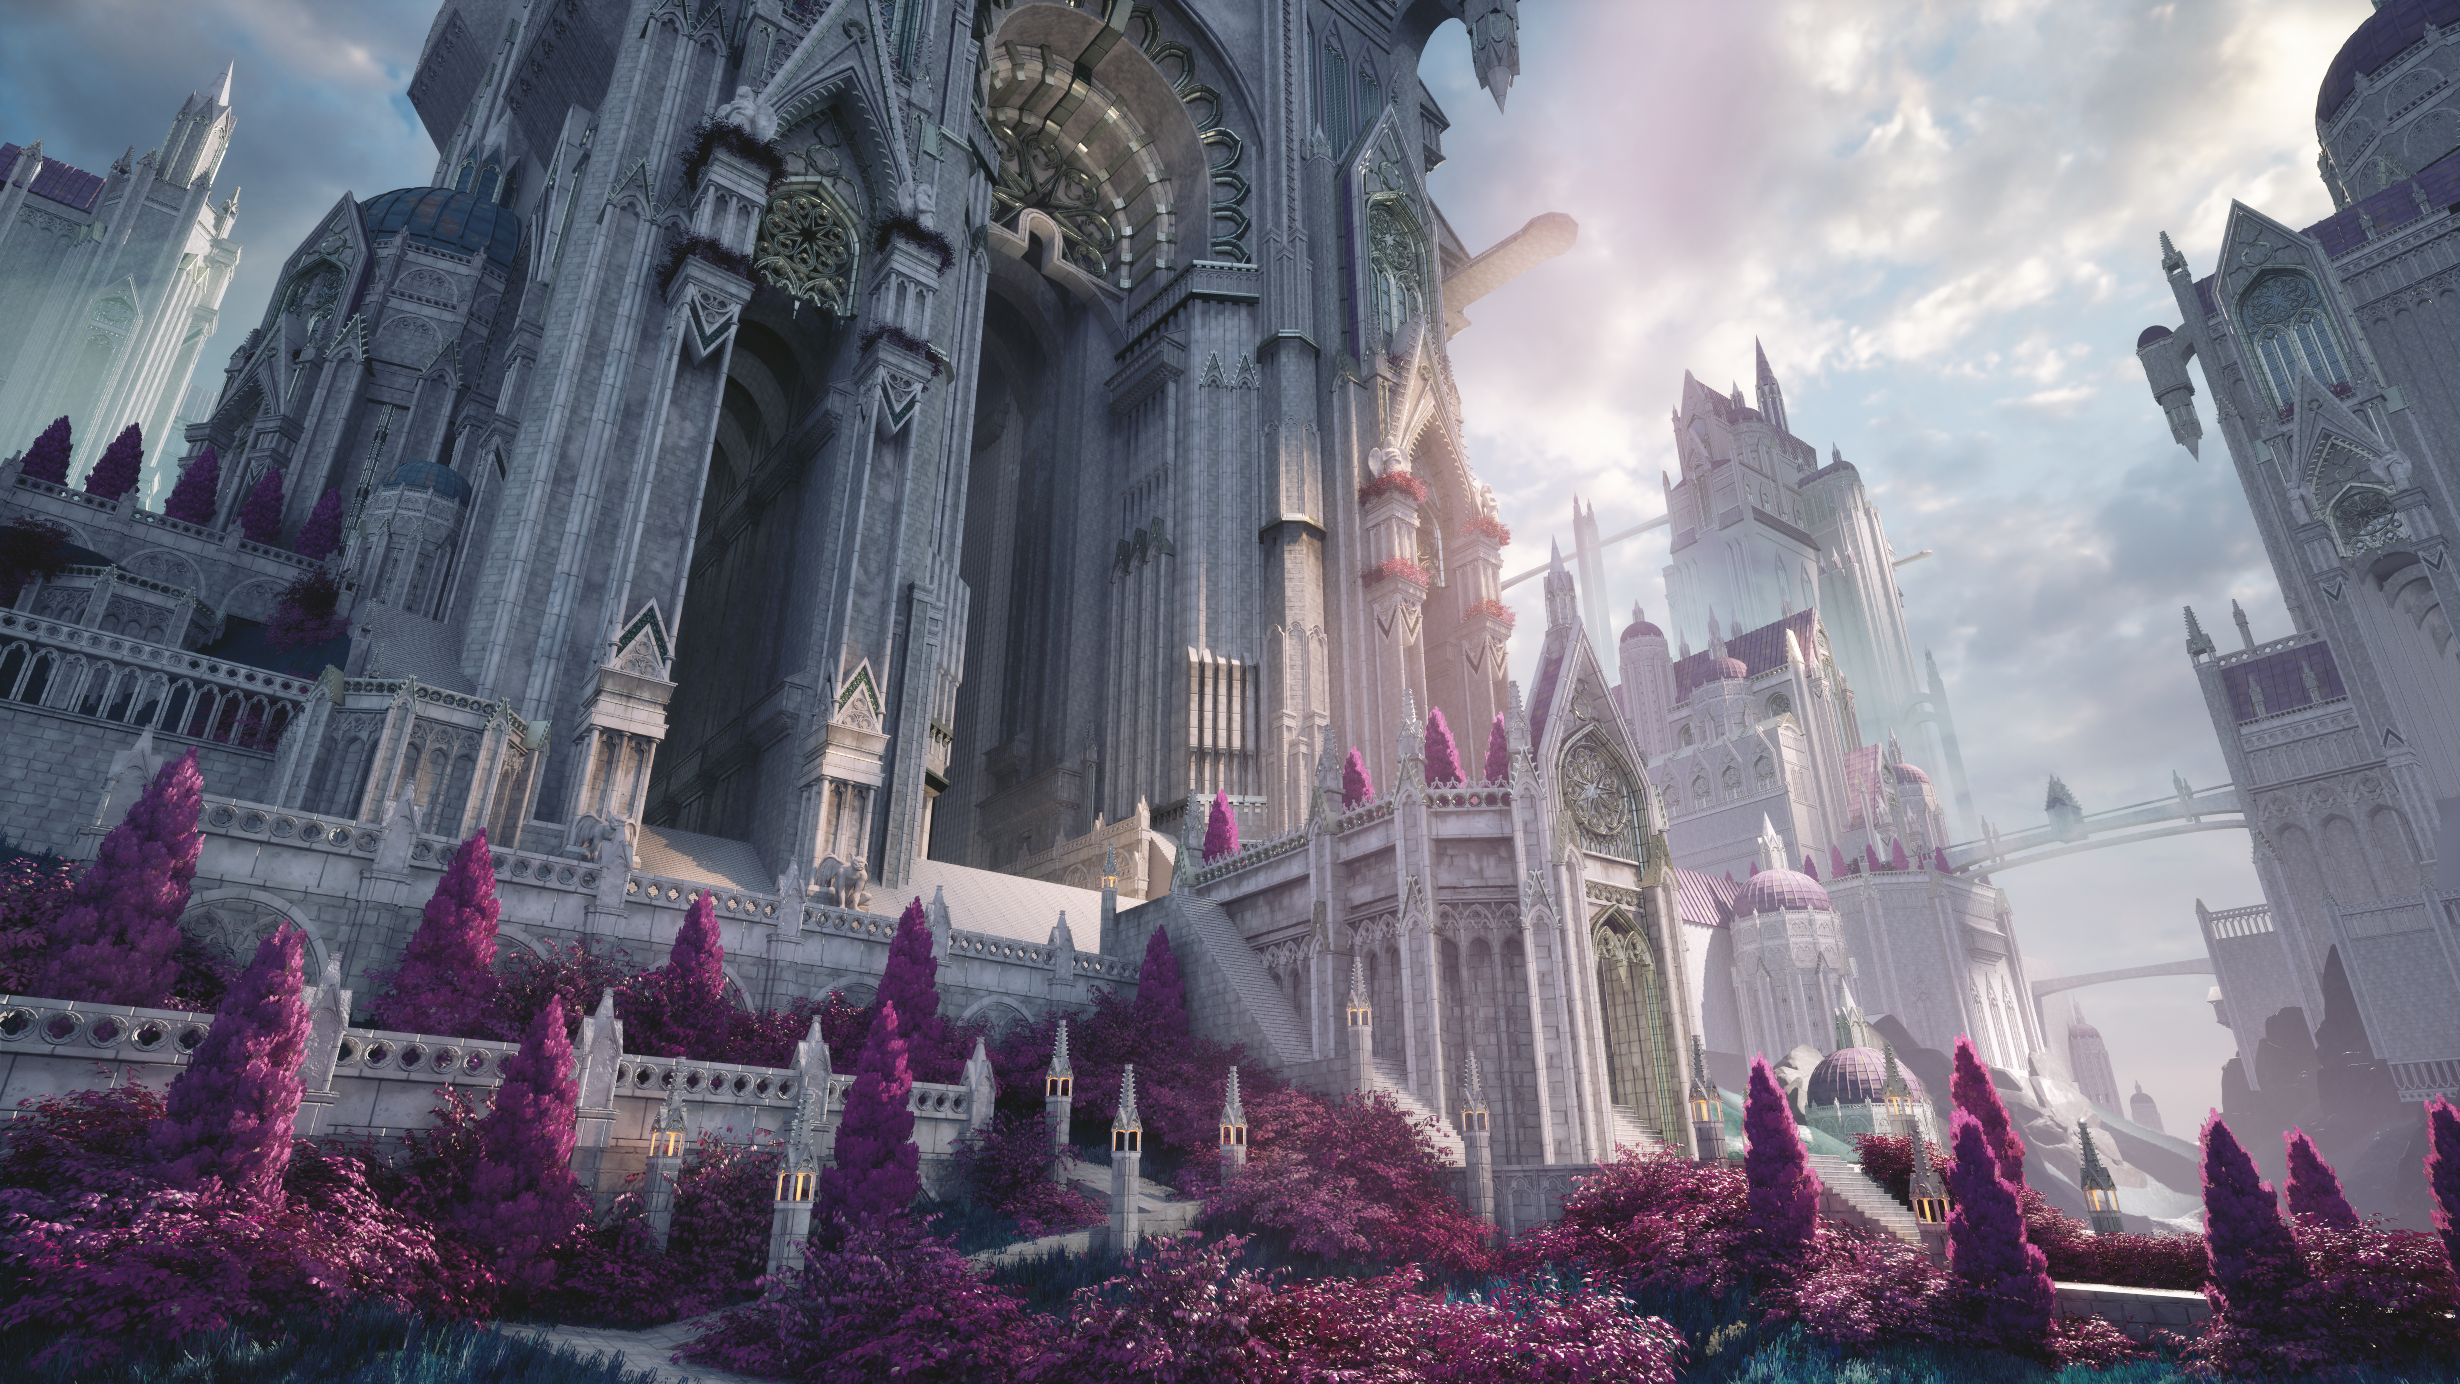
For my Vessel Forge project, I wanted to create a scene that would stand out from my current portfolio pieces and add variety to my portfolio. I was looking for something bright, colorful, and with plenty of opportunities for me to practice my sculpting skills. I settled on a concept piece, and my first step was to gather references. I focused on how I want my materials to read, foliage, and real-life cathedrals. I also began to study the concept and decide how I wanted to split the scene up into a modular kit.
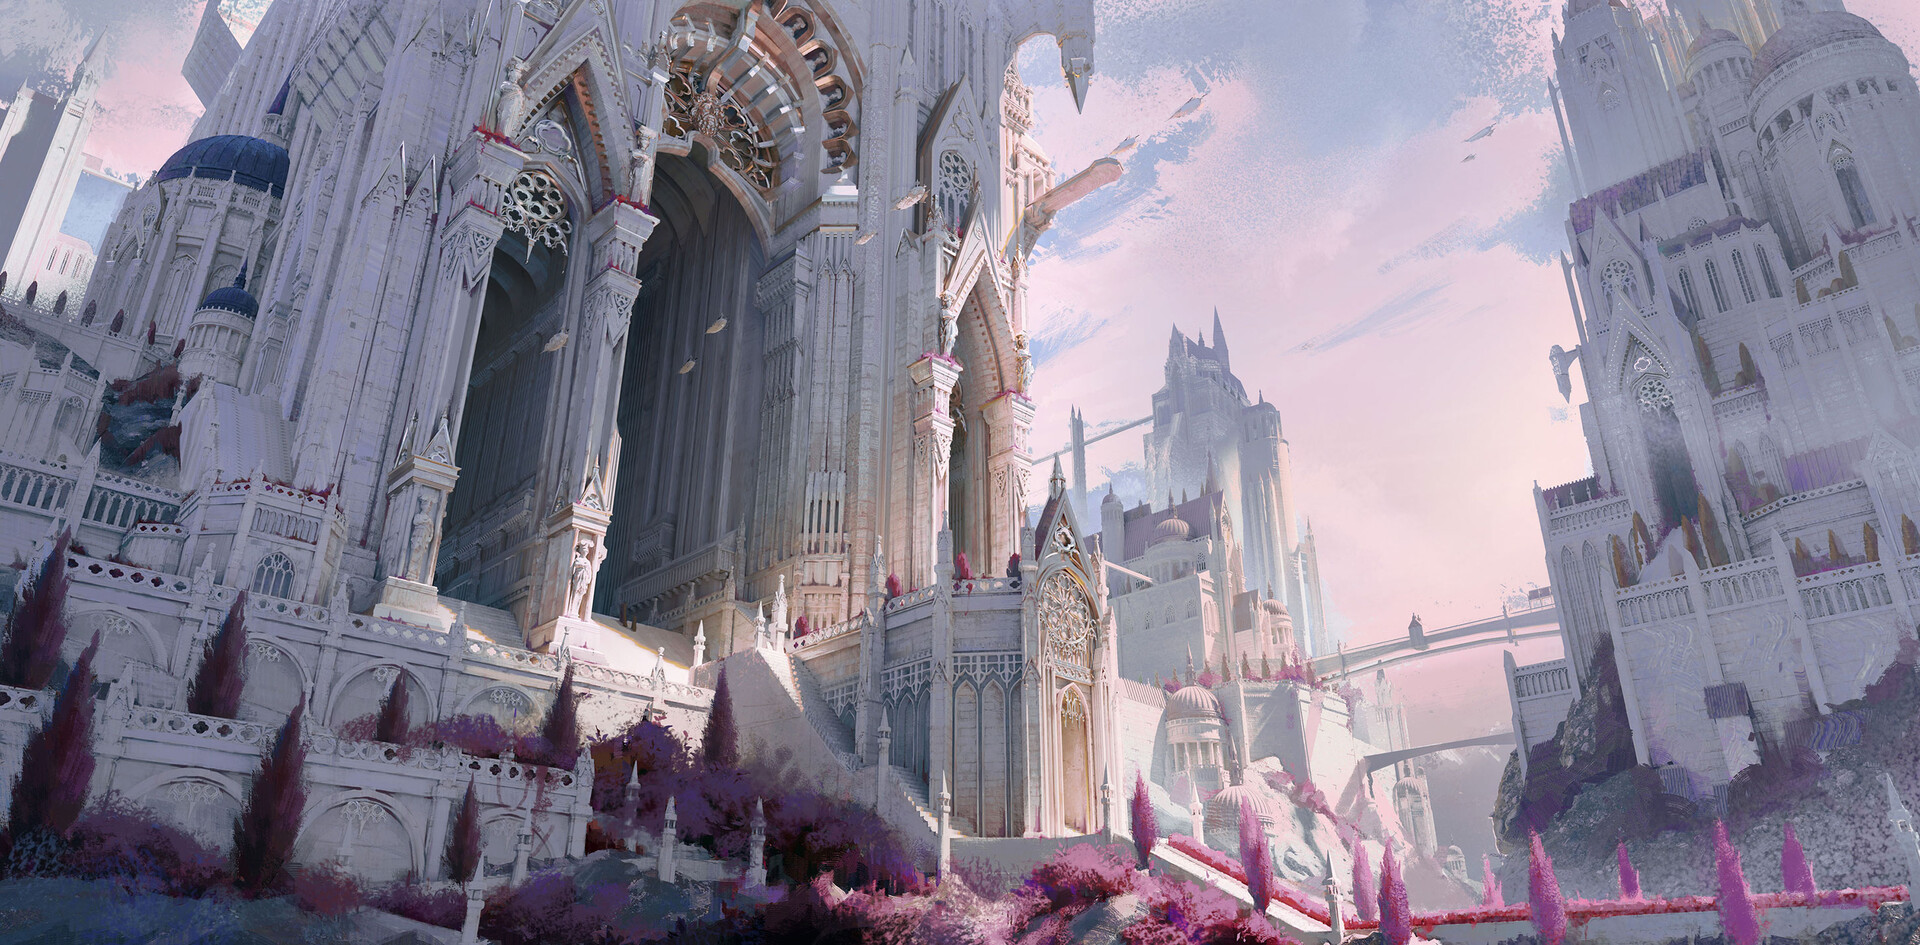
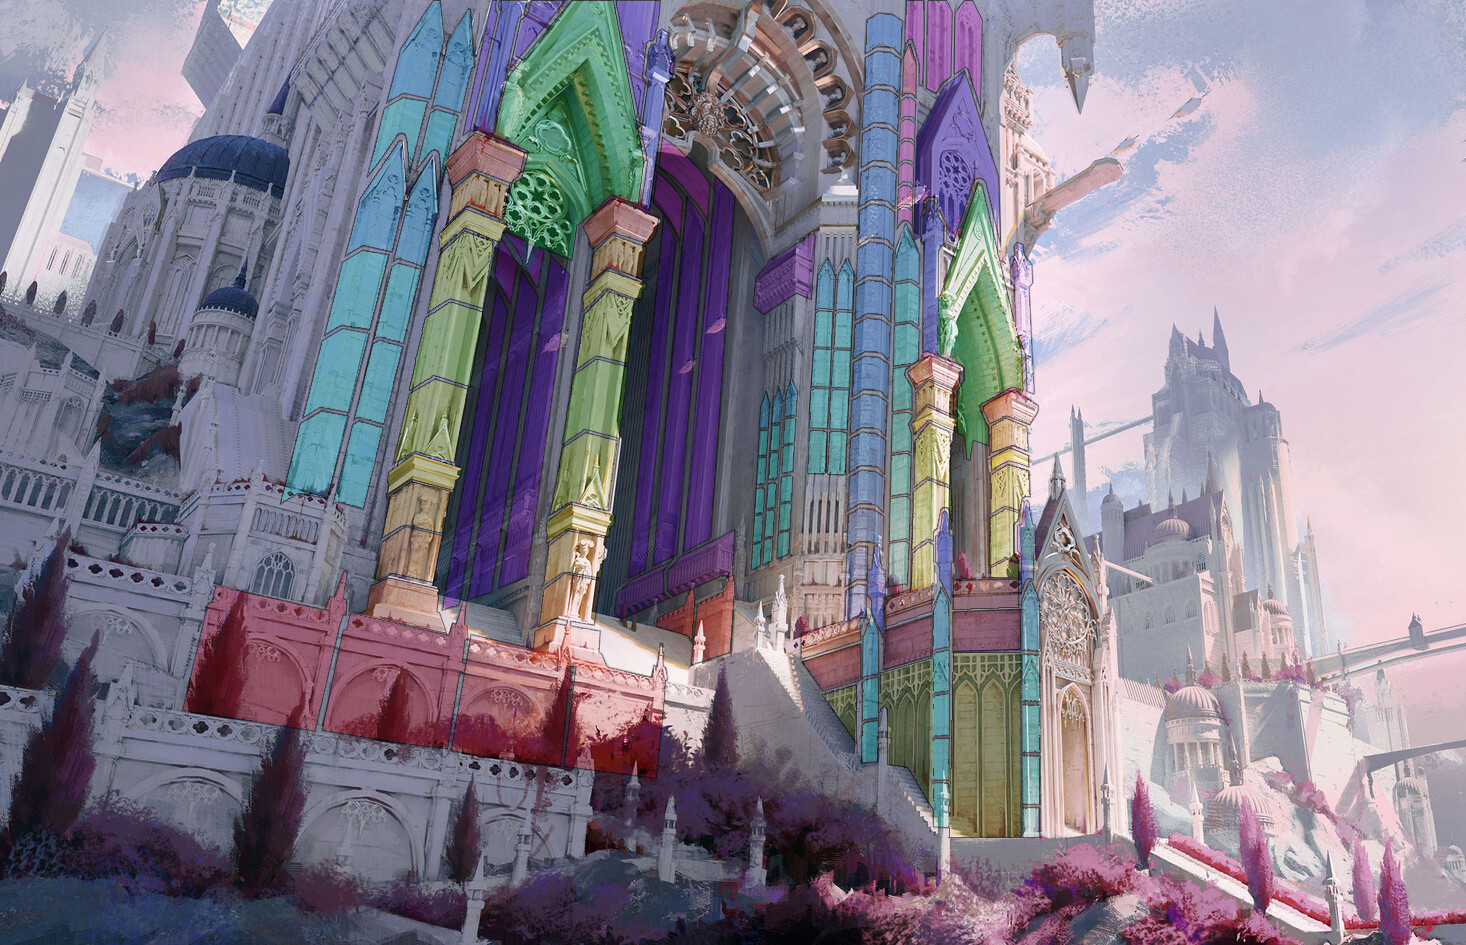
Concept image by “三叠色 Size” on Artstation; Modular Kit Breakdown.
Modular Kit
I started by blocking out my scene in Maya and Unreal Engine with simple block-out models for my kit. I tried to stretch my existing blockouts as far as I could before carefully expanding my kit only when needed. The fewer pieces I had, the more time I could focus on other parts of my scene, so I tried to be mindful about where I could reuse existing pieces. From there, I created very basic blockout materials with flat colors and a simple normal map to denote the brick and trim placements. I like doing this early on to make sure my scene isn’t too noisy. As my scene advanced, I created some packed Level Actors with my modular kit collections to quickly build out any repetitive structures in the background. This workflow saved me a lot of time and helped keep my level outliner organized.
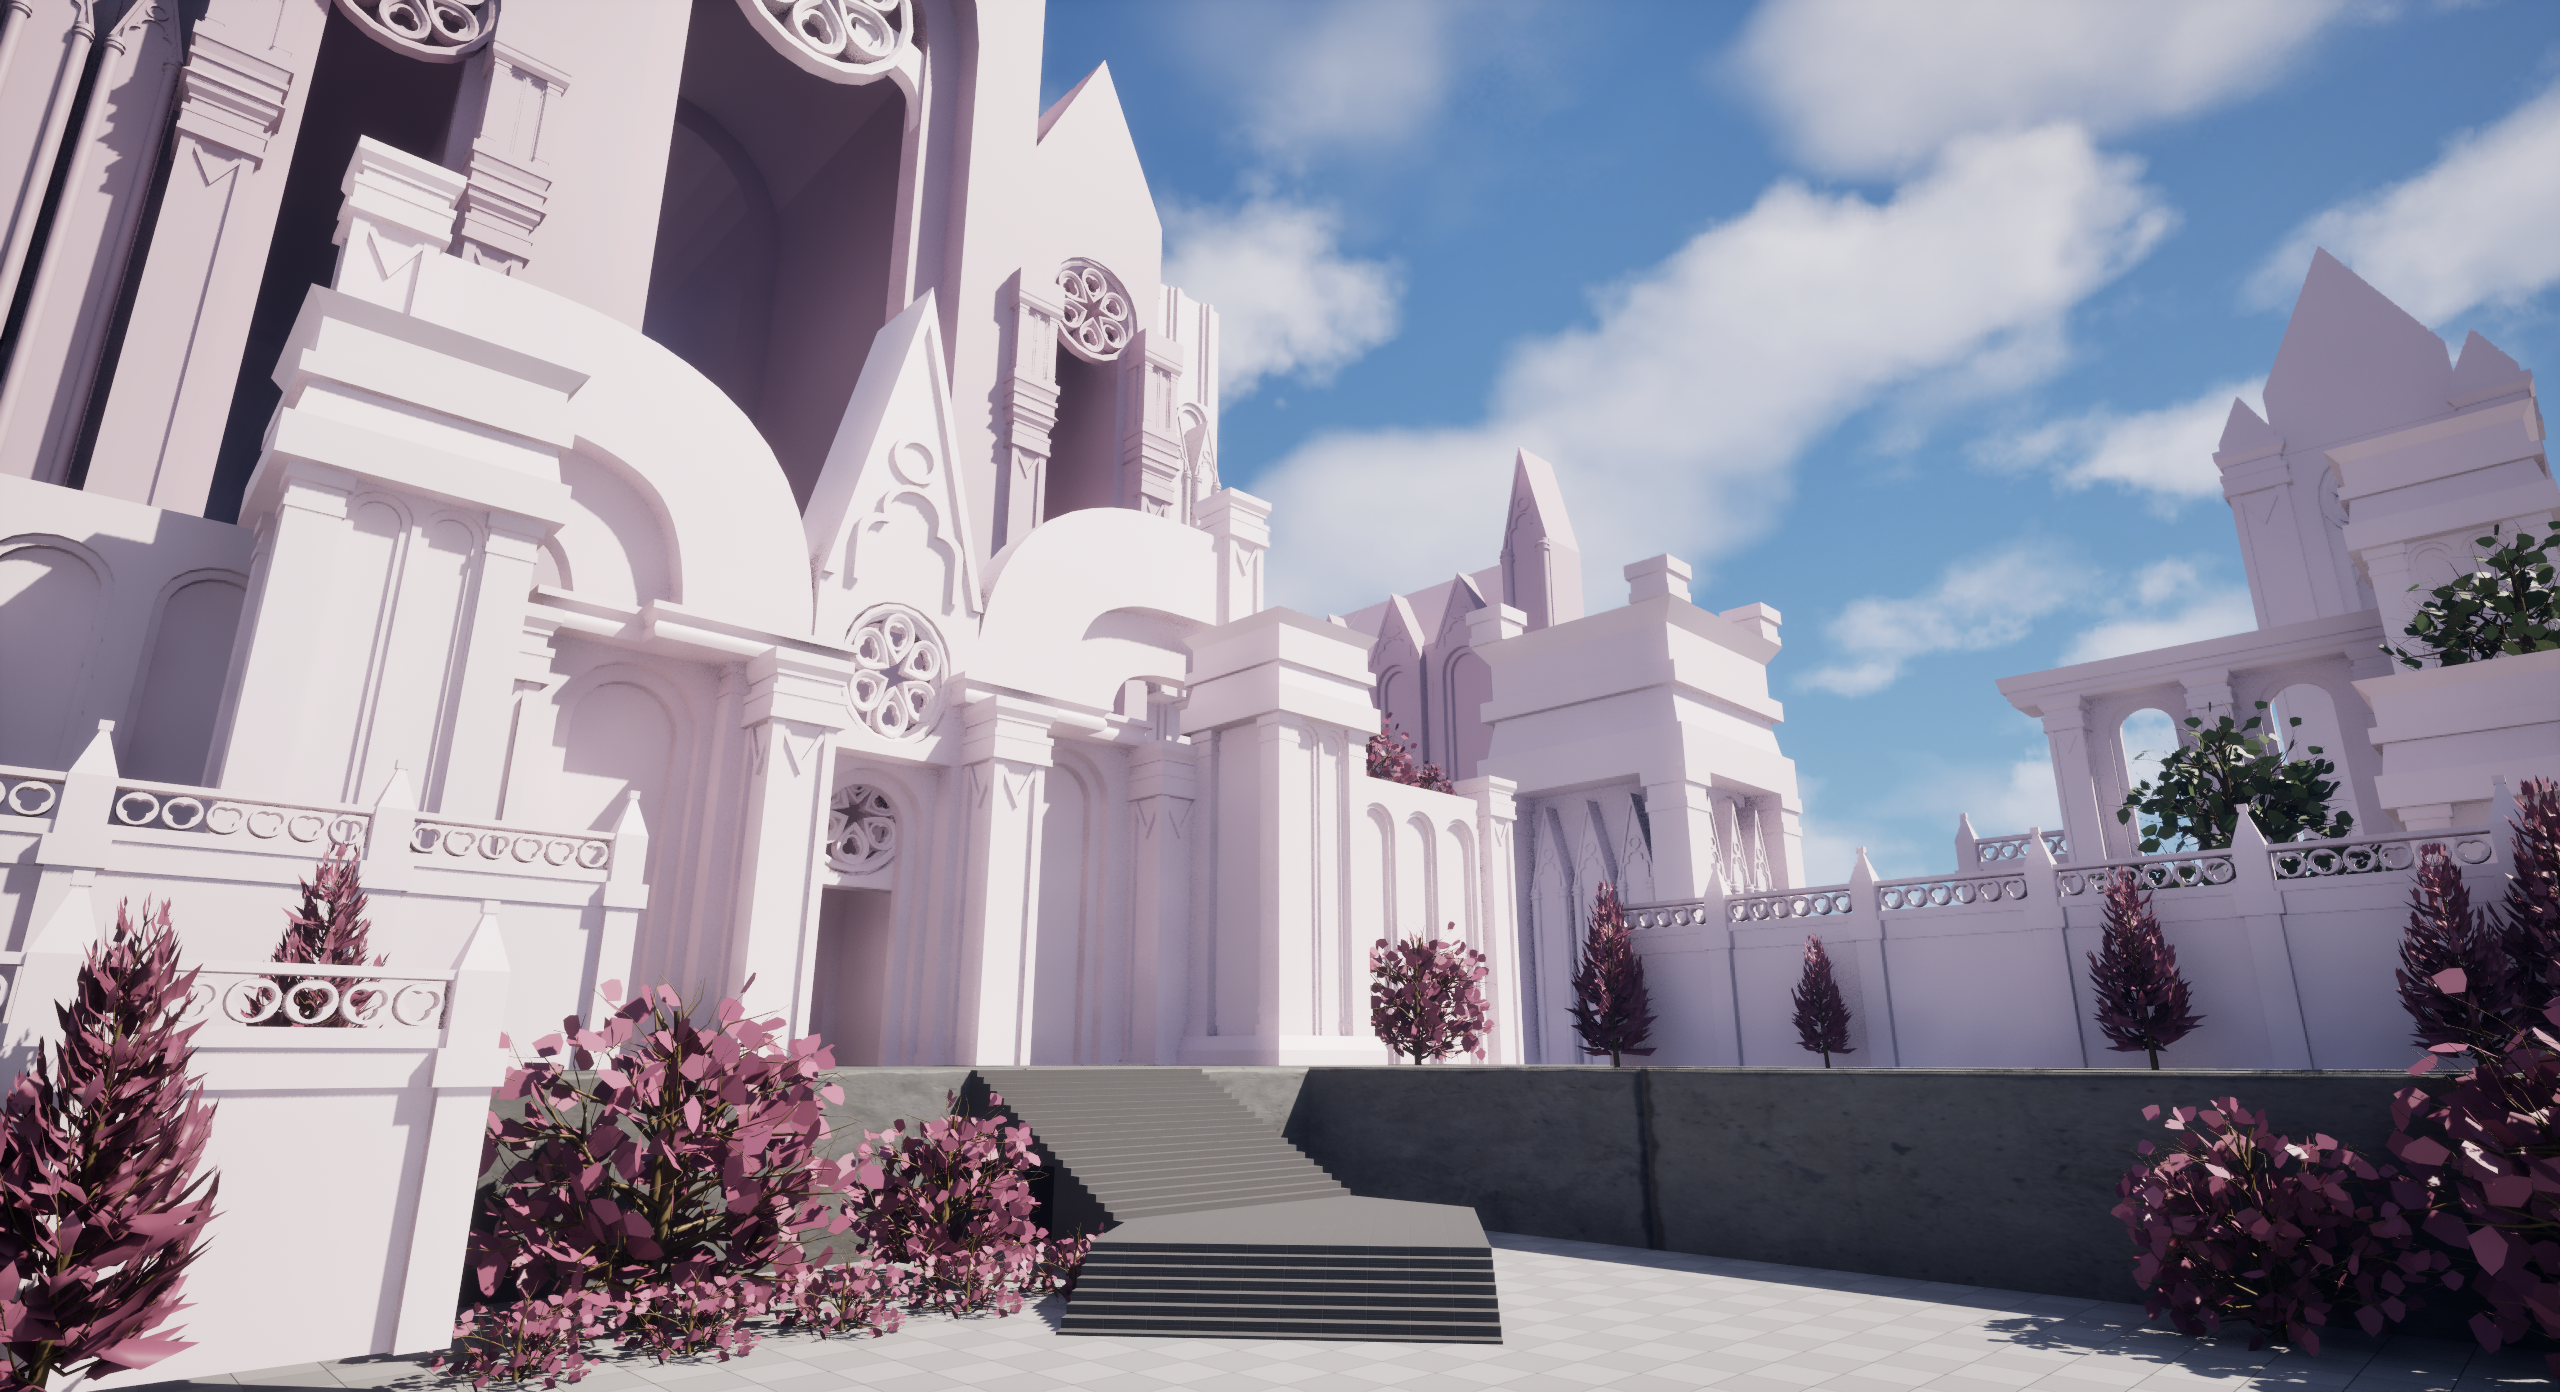
You’ll notice the composition of my early scene looks much different from the final. During the first few weeks of the mentorship, my goal was to merge two concepts together as they shared strong elements such as color palette, composition, and mood. During this blockout phase, I felt like the combination of the scenes was distracting from the main focal point I wanted in my environment – the castle. I reflected on which aspects could be improved, and I decided to remove some foreground elements to avoid the “cramped” feeling I was noticing. Ultimately, I learned to focus on my goals for the scene and with this clarity, I moved forward and finished up my modular kit based on my new vision.
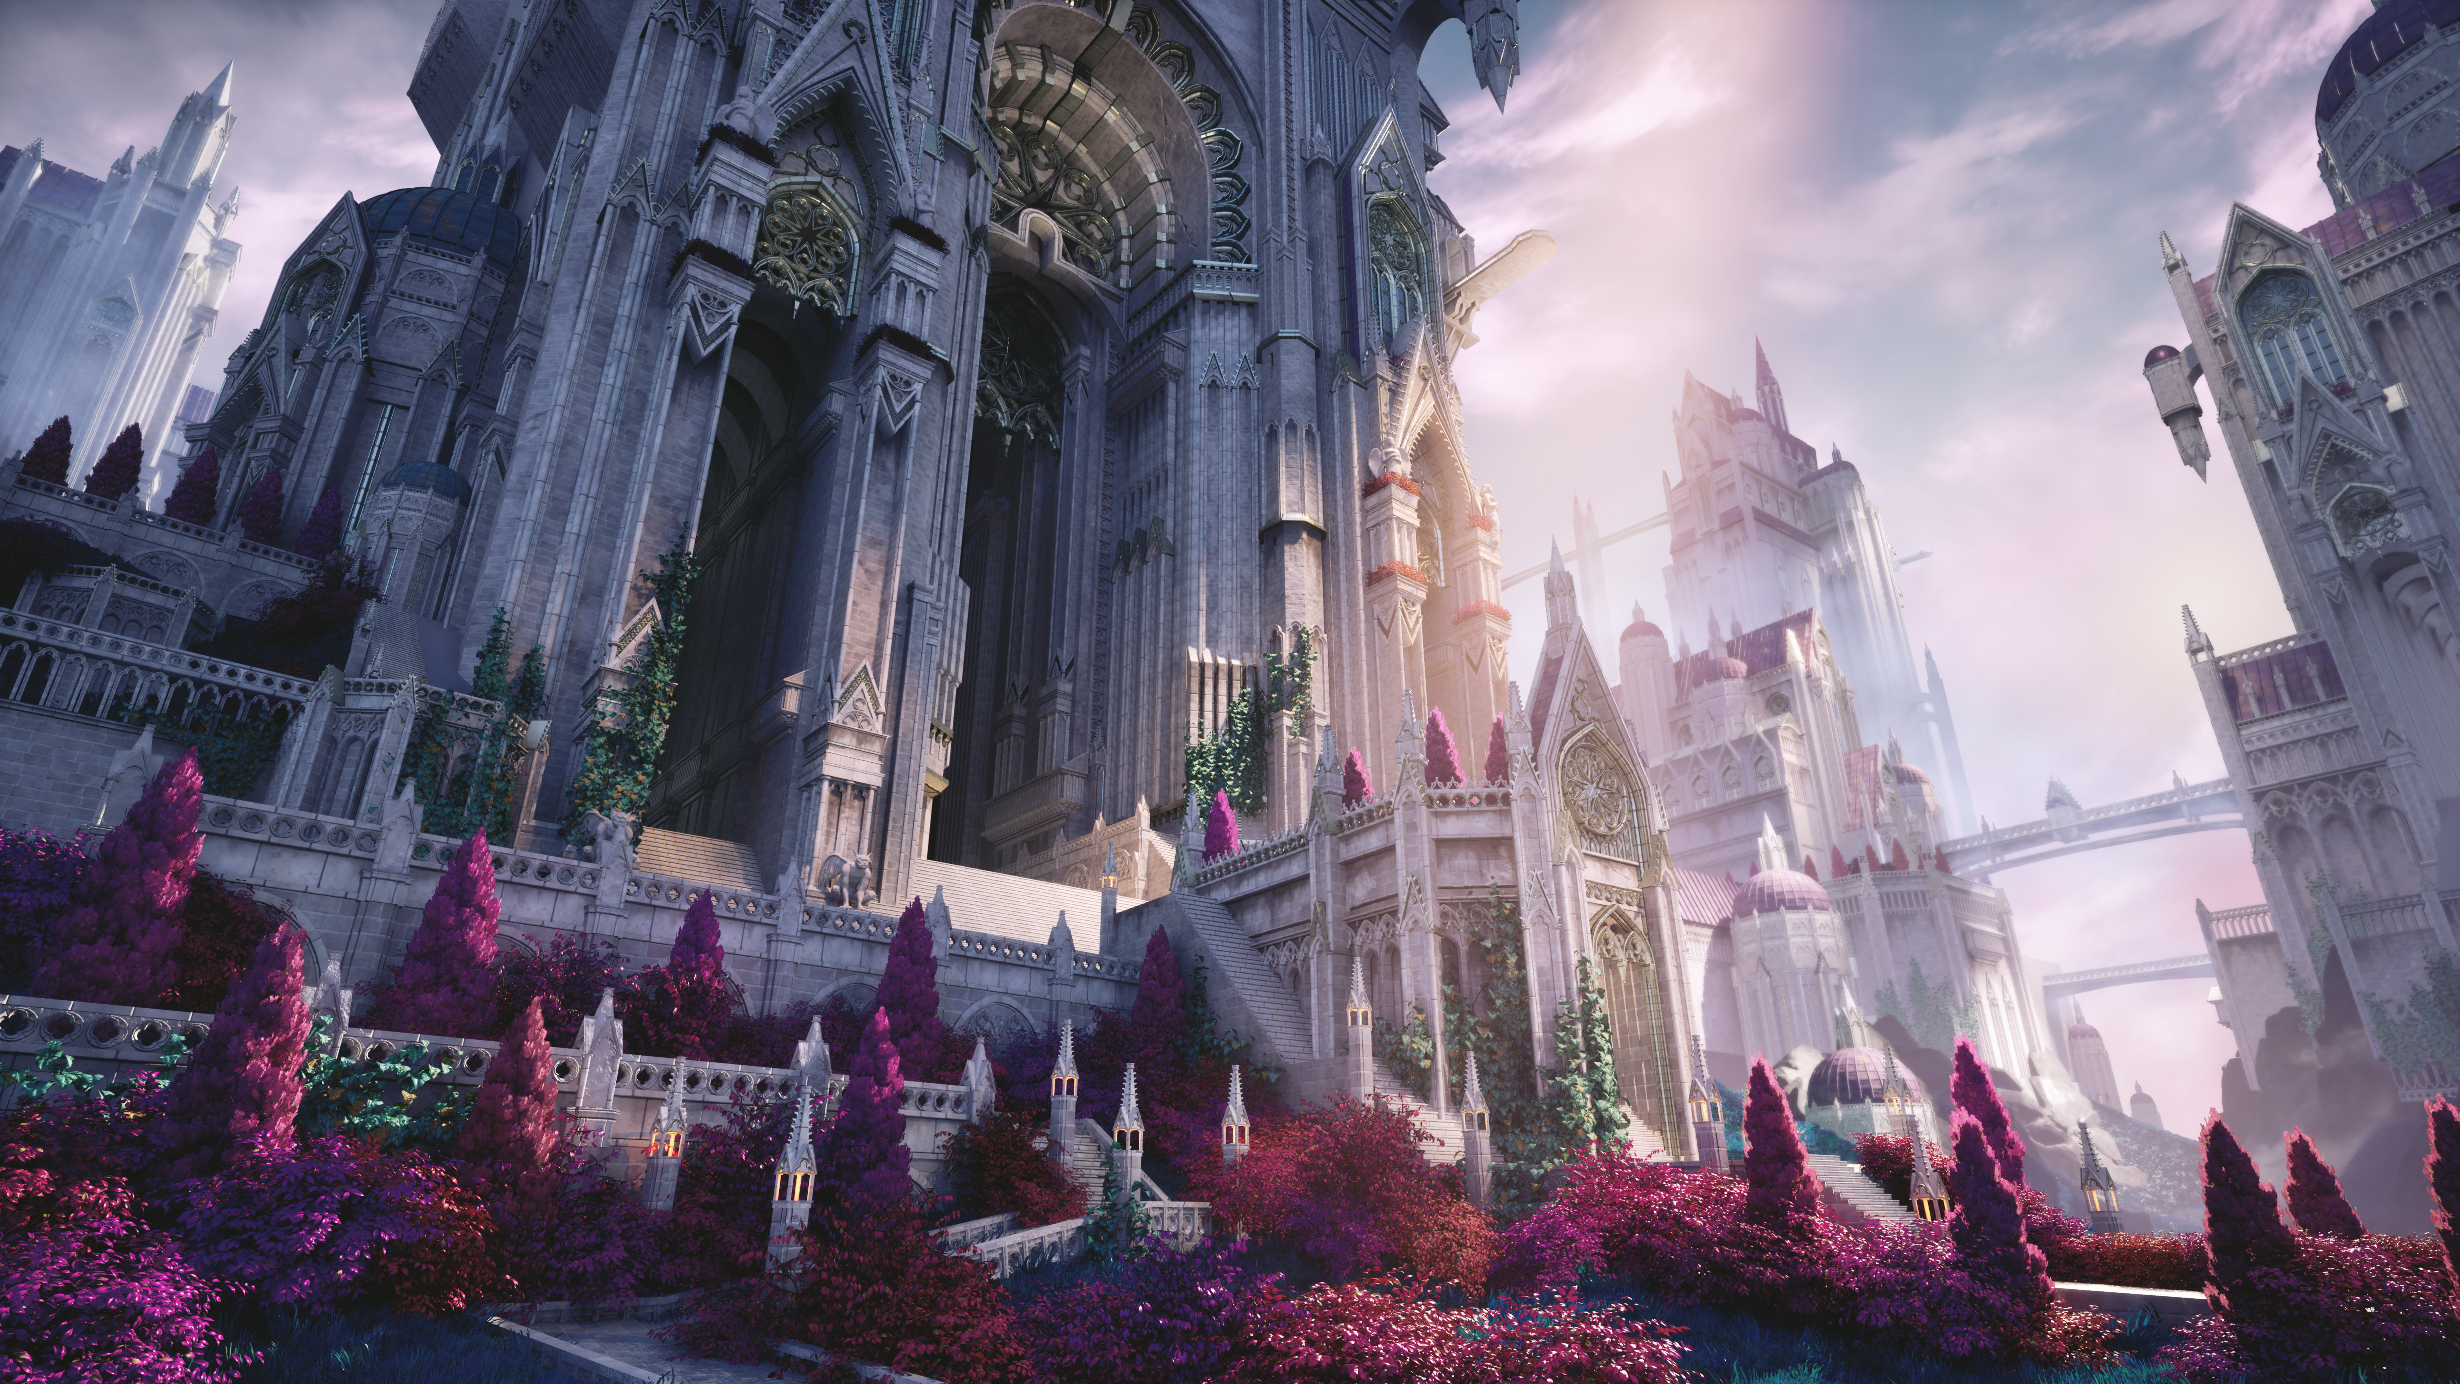
With the removal of the foreground elements, I decided to stick to one main concept as seen above.

Breakdown of the majority of my final modular kit.
Materials
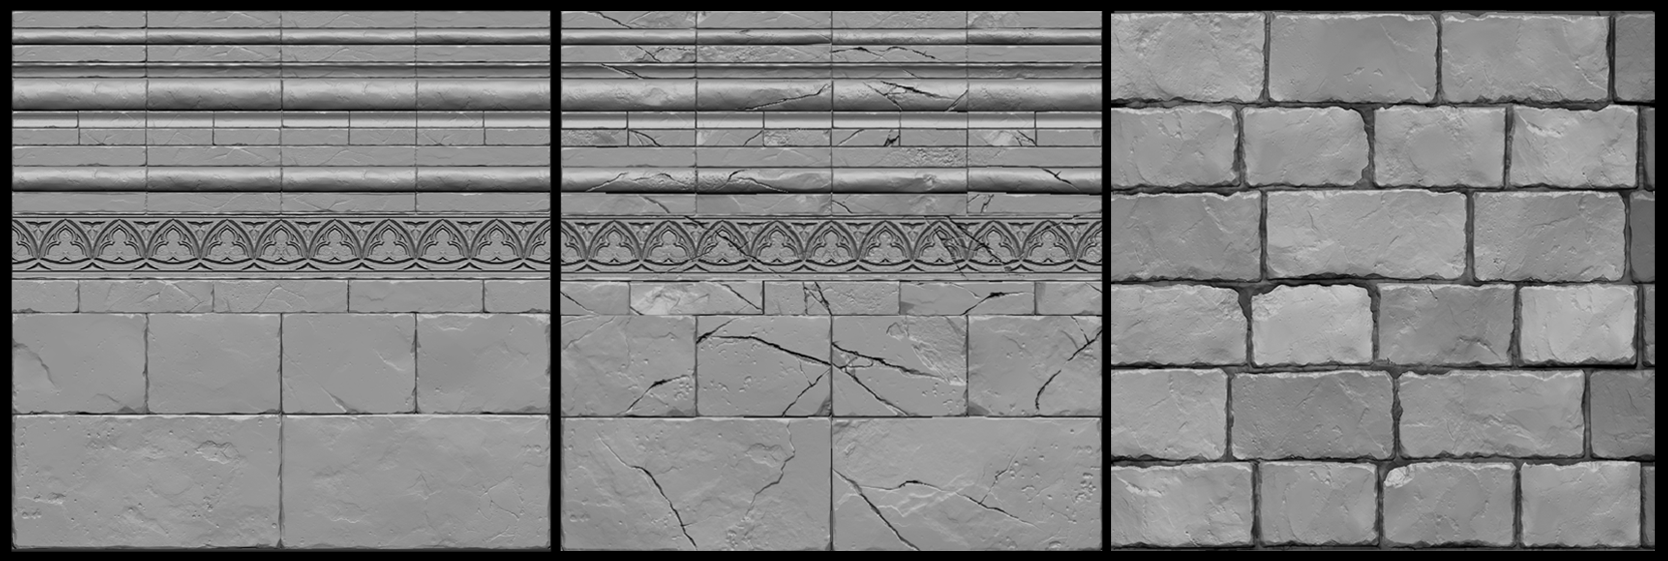
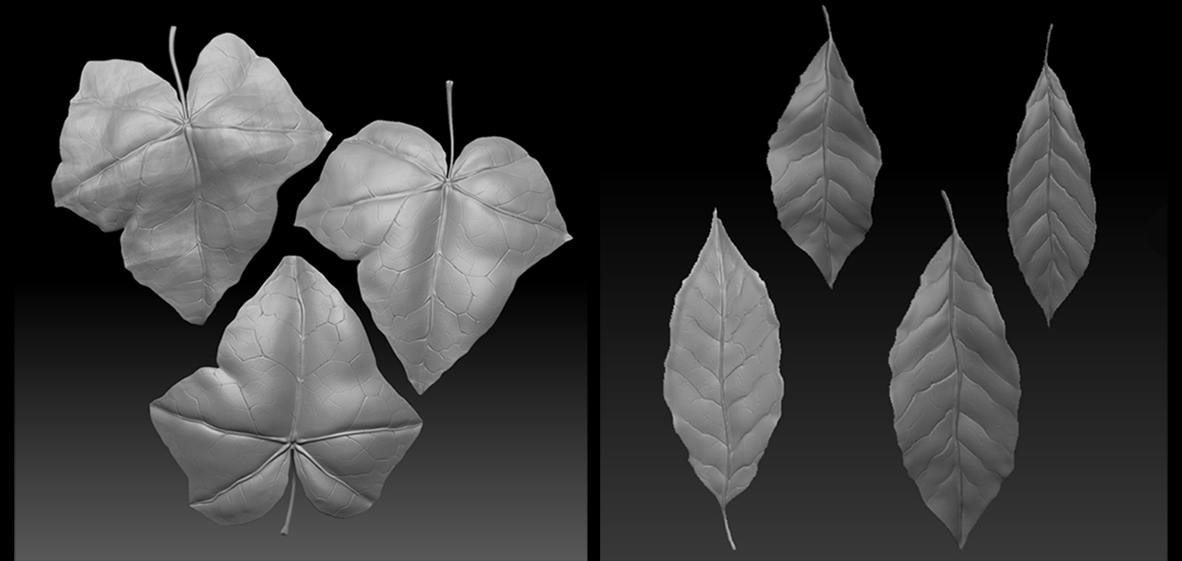
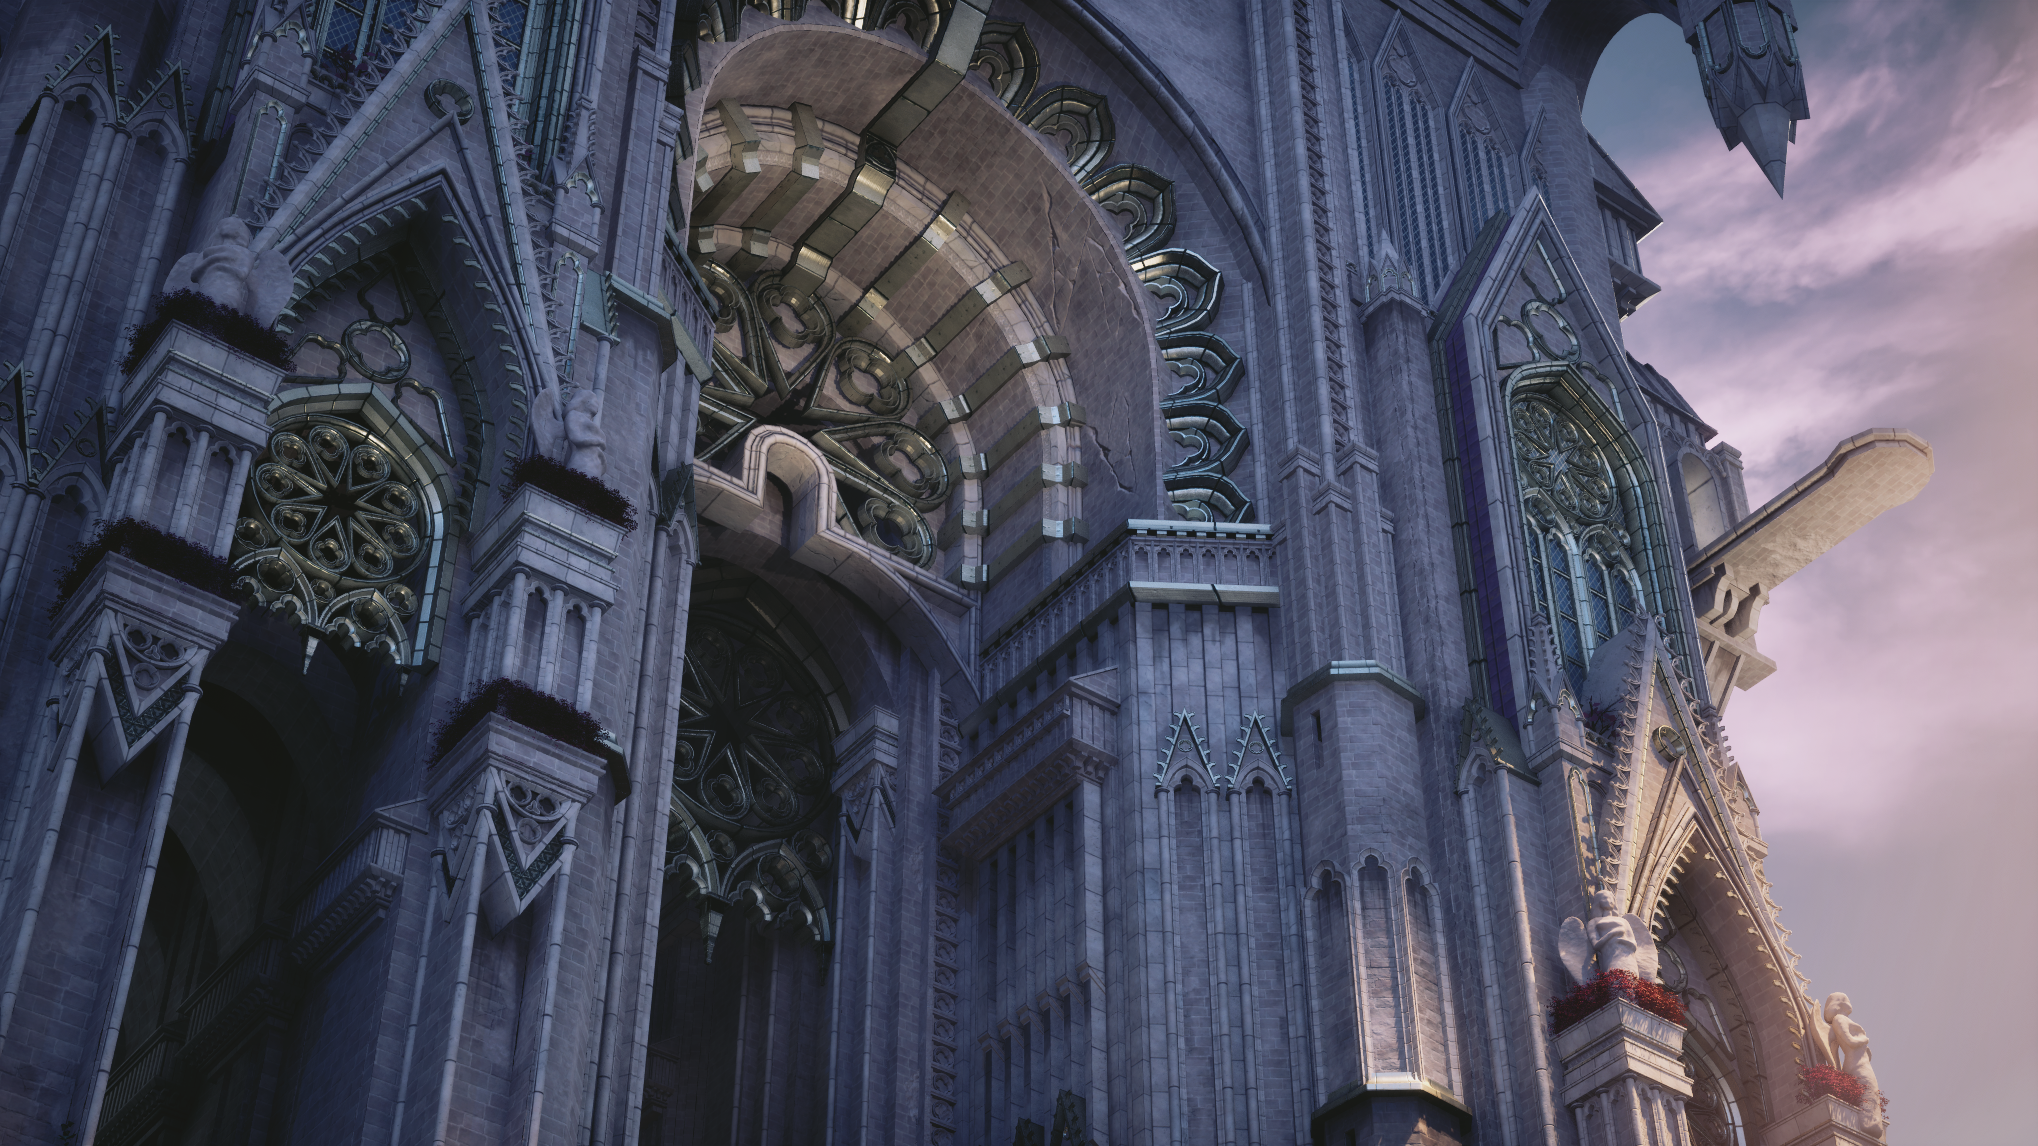
During the modeling phase, I also started sculpting my tiling bricks and my trim sheet. Sculpting my heightmap was a completely new workflow to me, so one of my main goals during this project was to practice my sculpting skills. I started with a sketch of my trim sheet, which I then made basic blockout models of in Maya and imported into ZBrush. From there I sculpted the stones and created a damaged version that I could vertex paint onto my buildings. For the bricks, I sculpted six different bricks and arranged them on a plane before doing a second sculpting pass to differentiate them. All of these sculpts were exported through a ZGrab and imported into Substance Designer to generate the final texture maps.

Landscape & Foliage
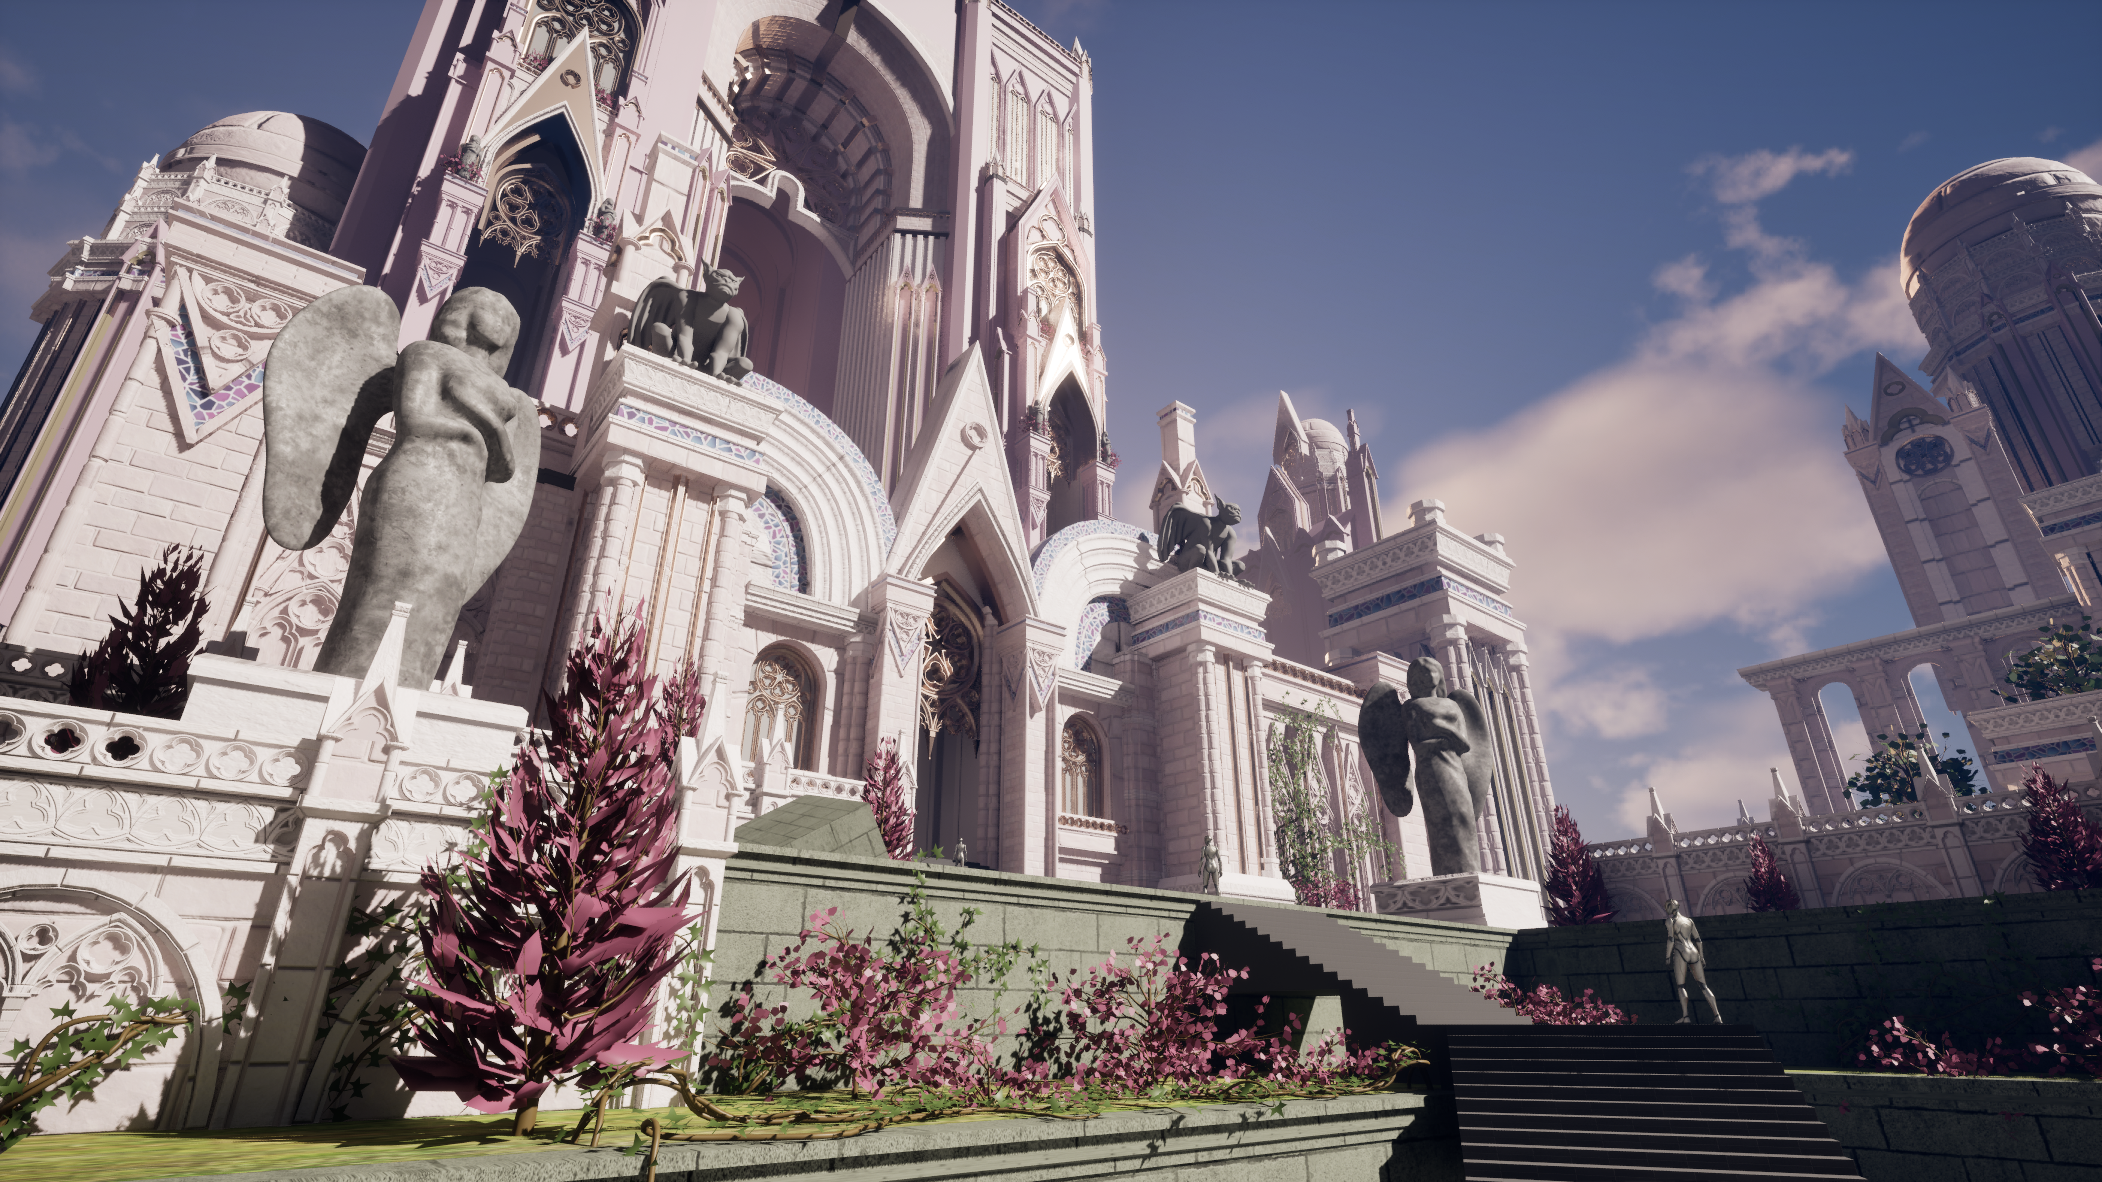
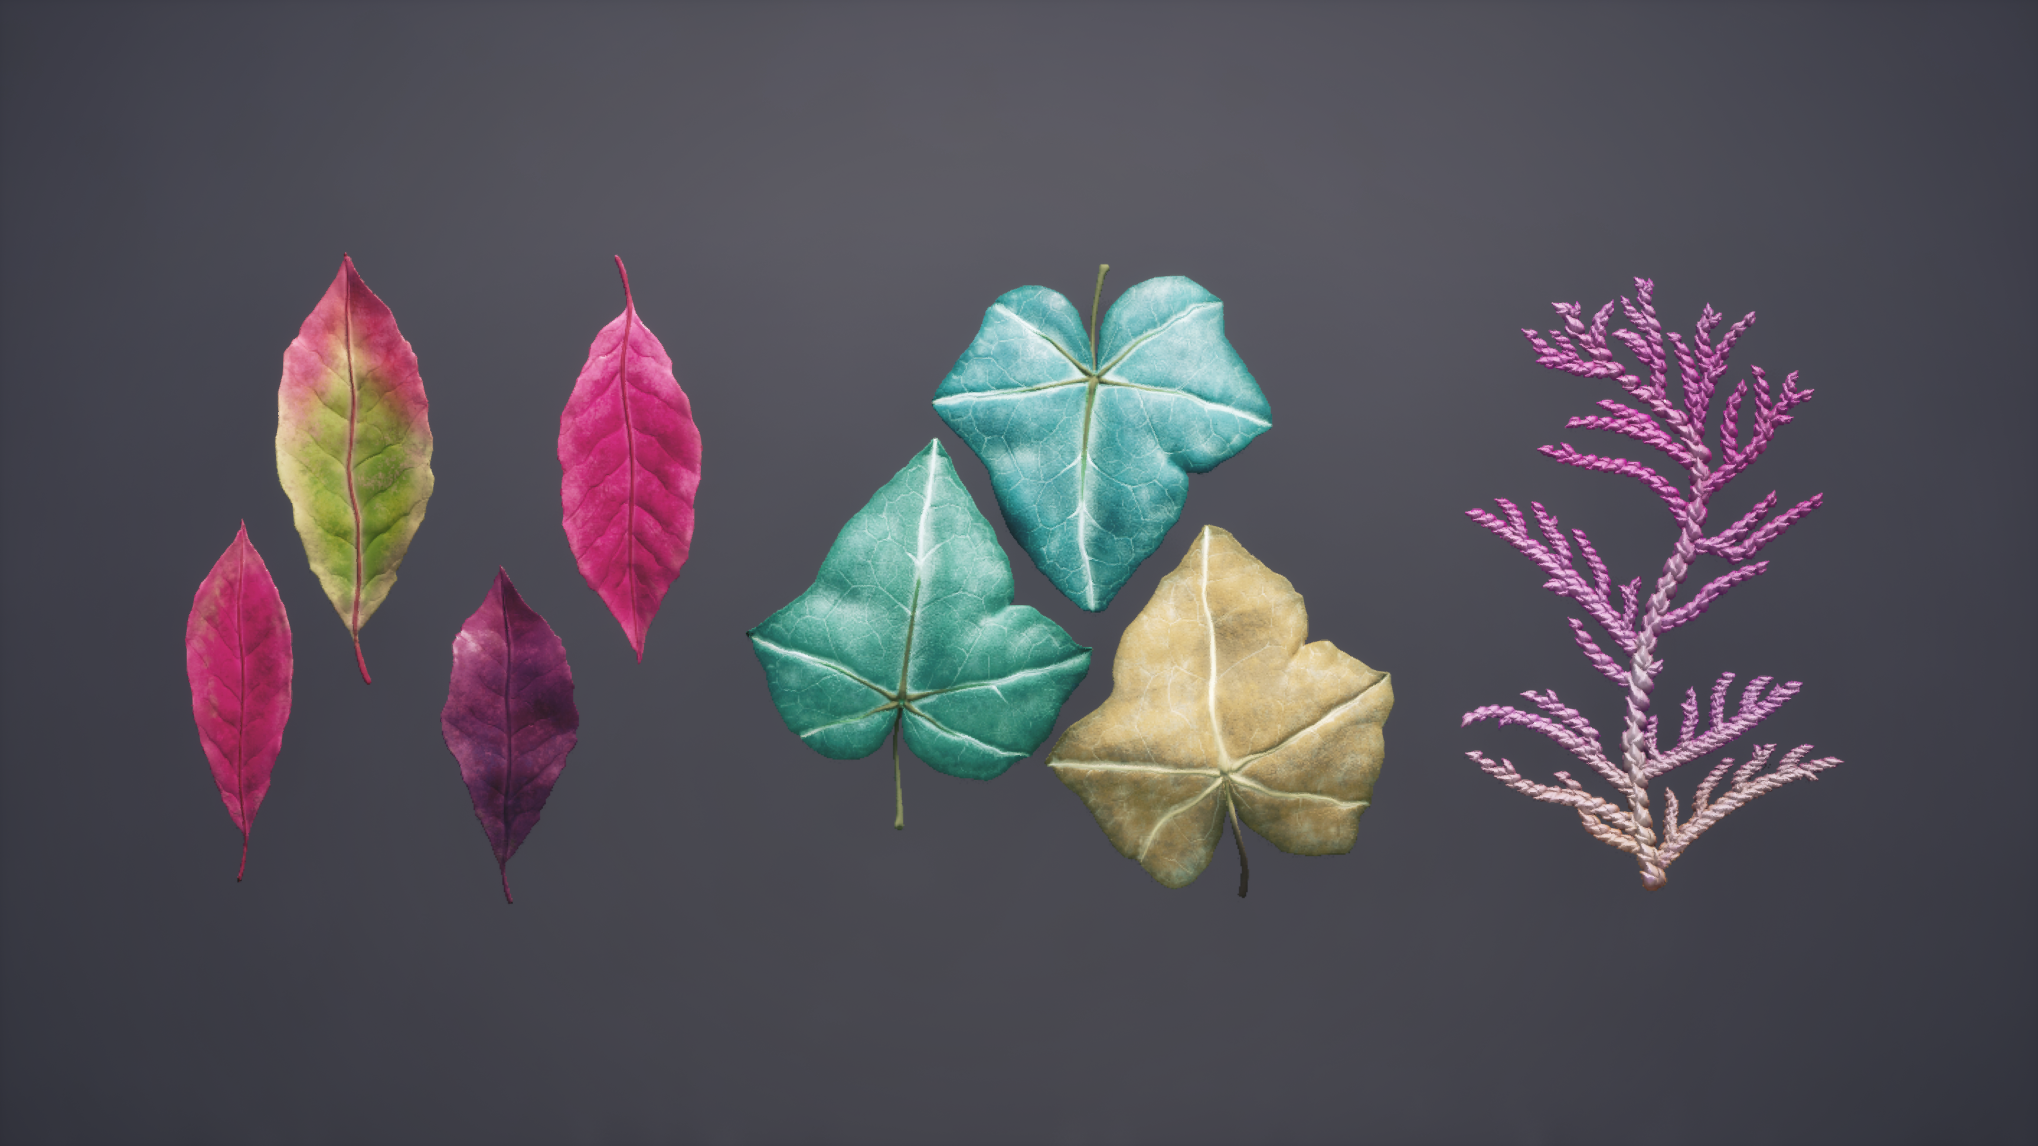
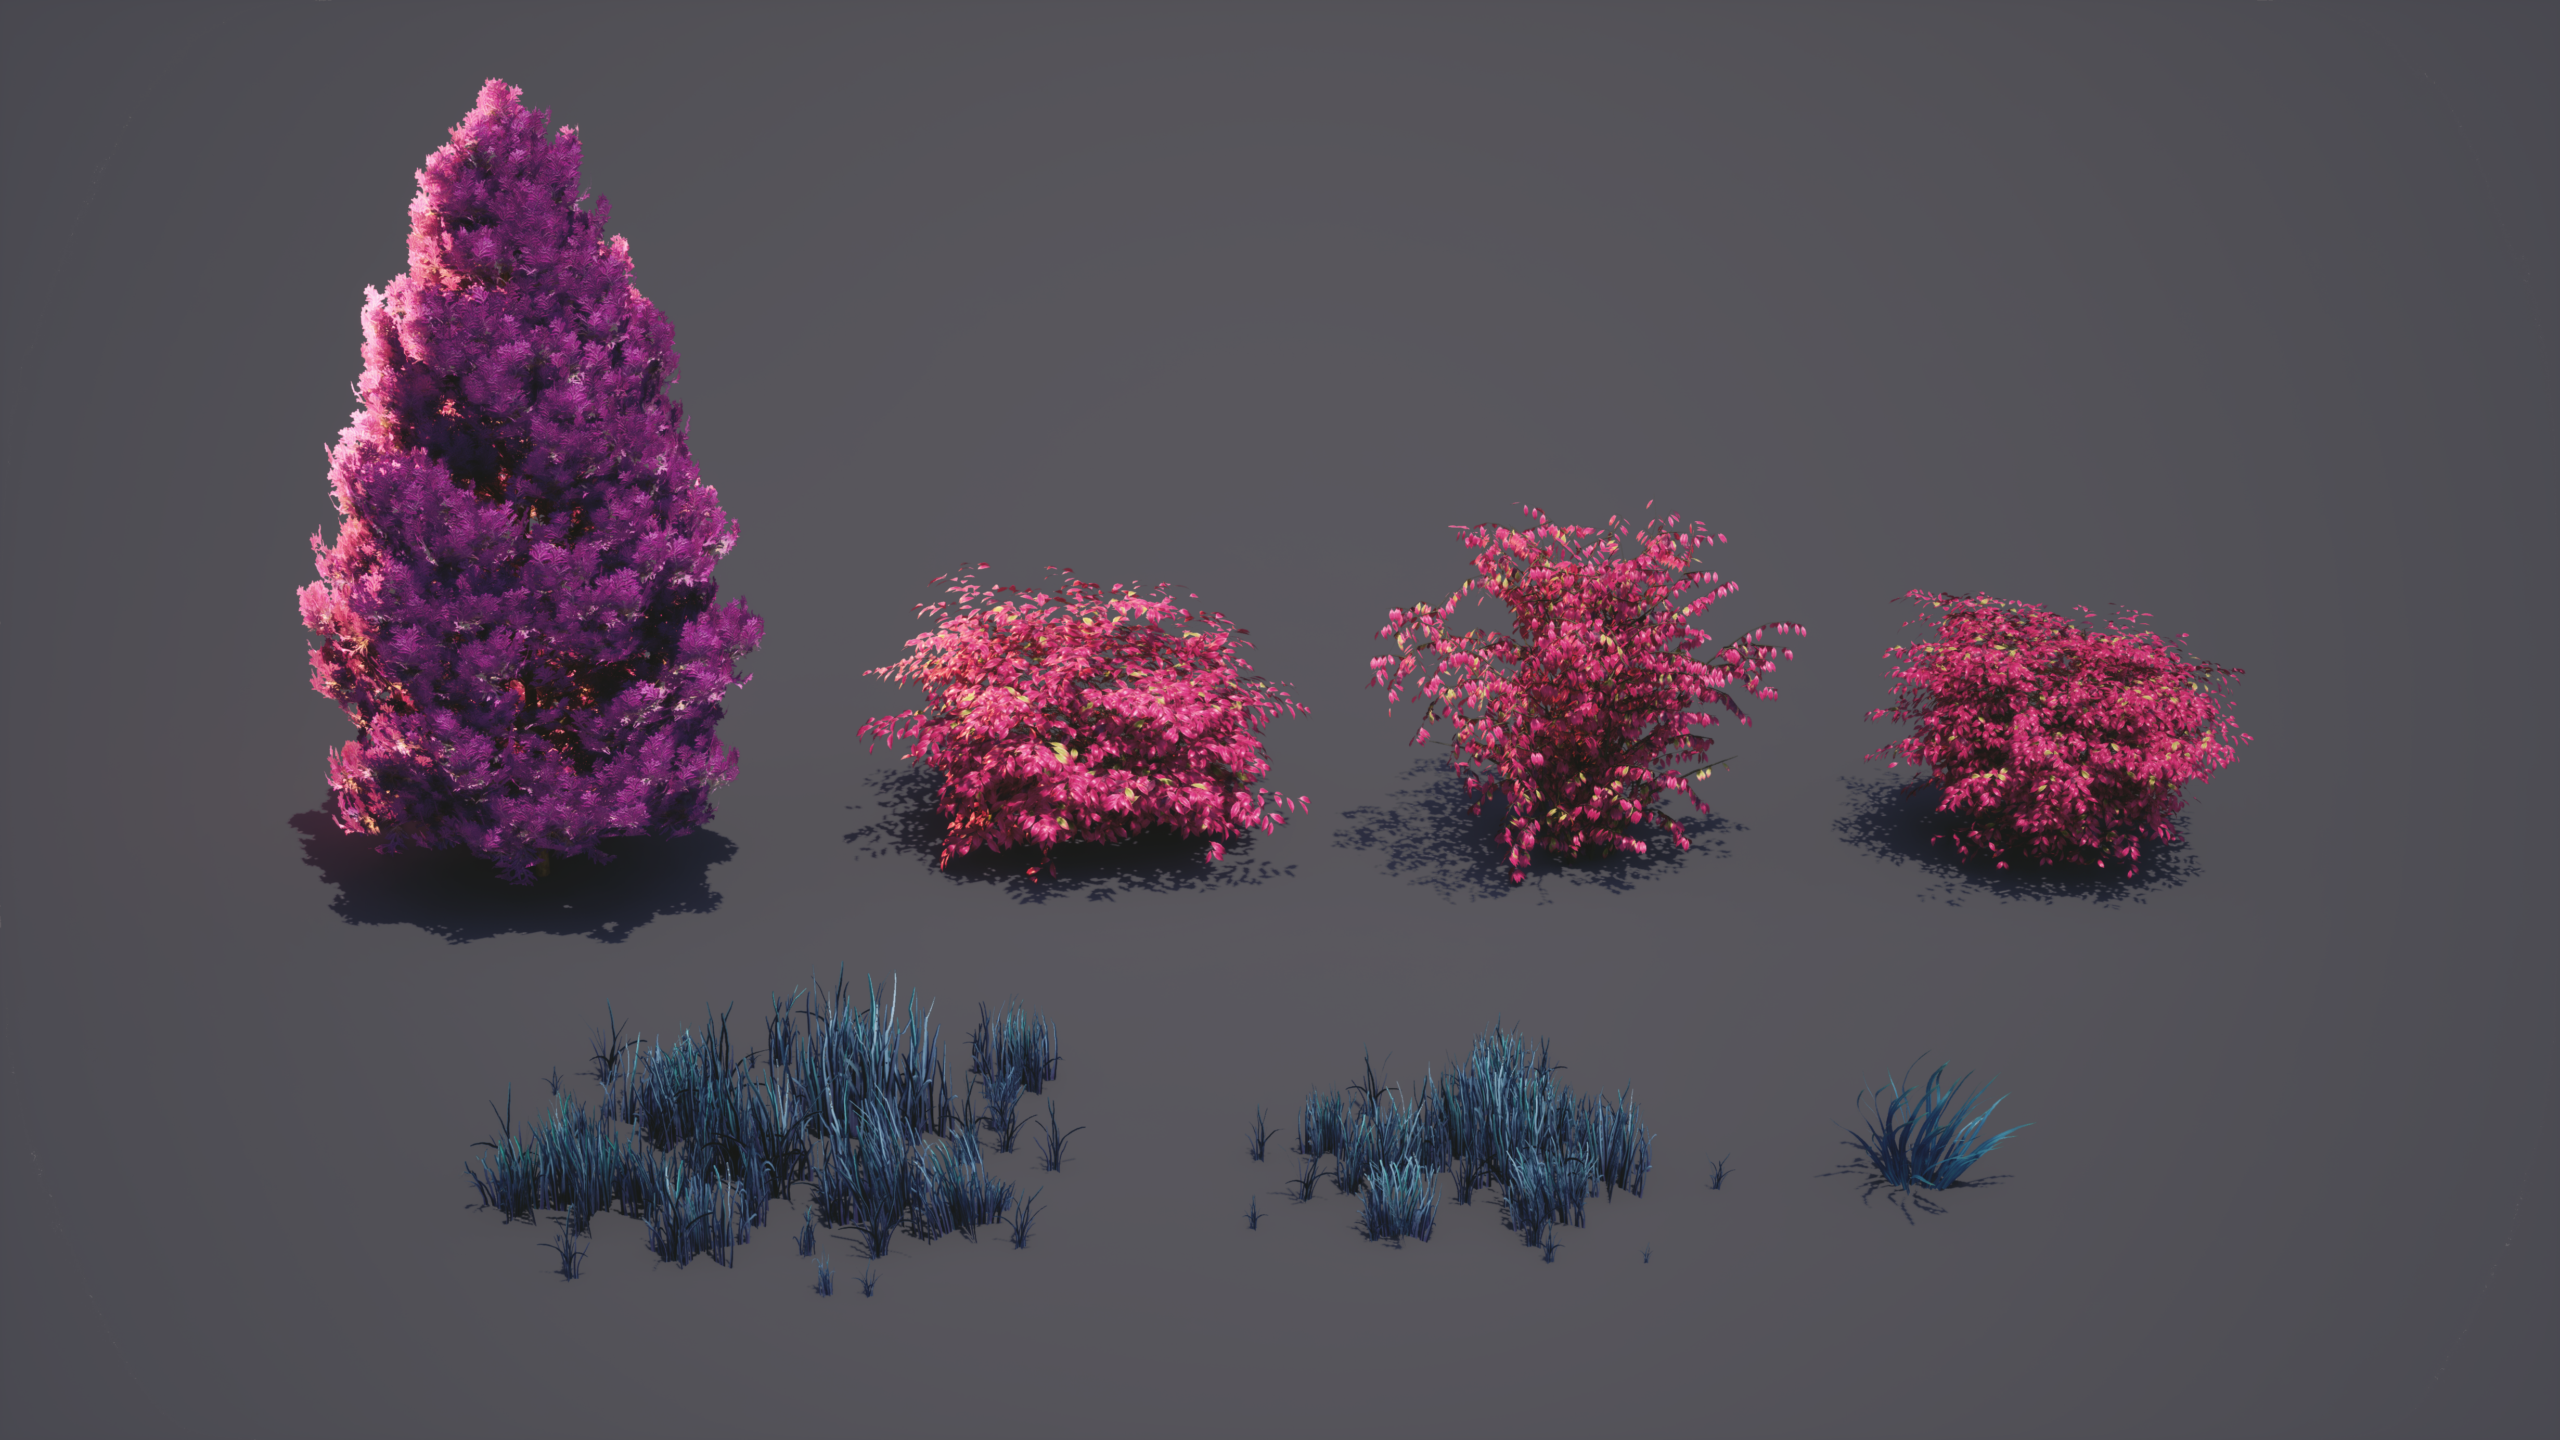
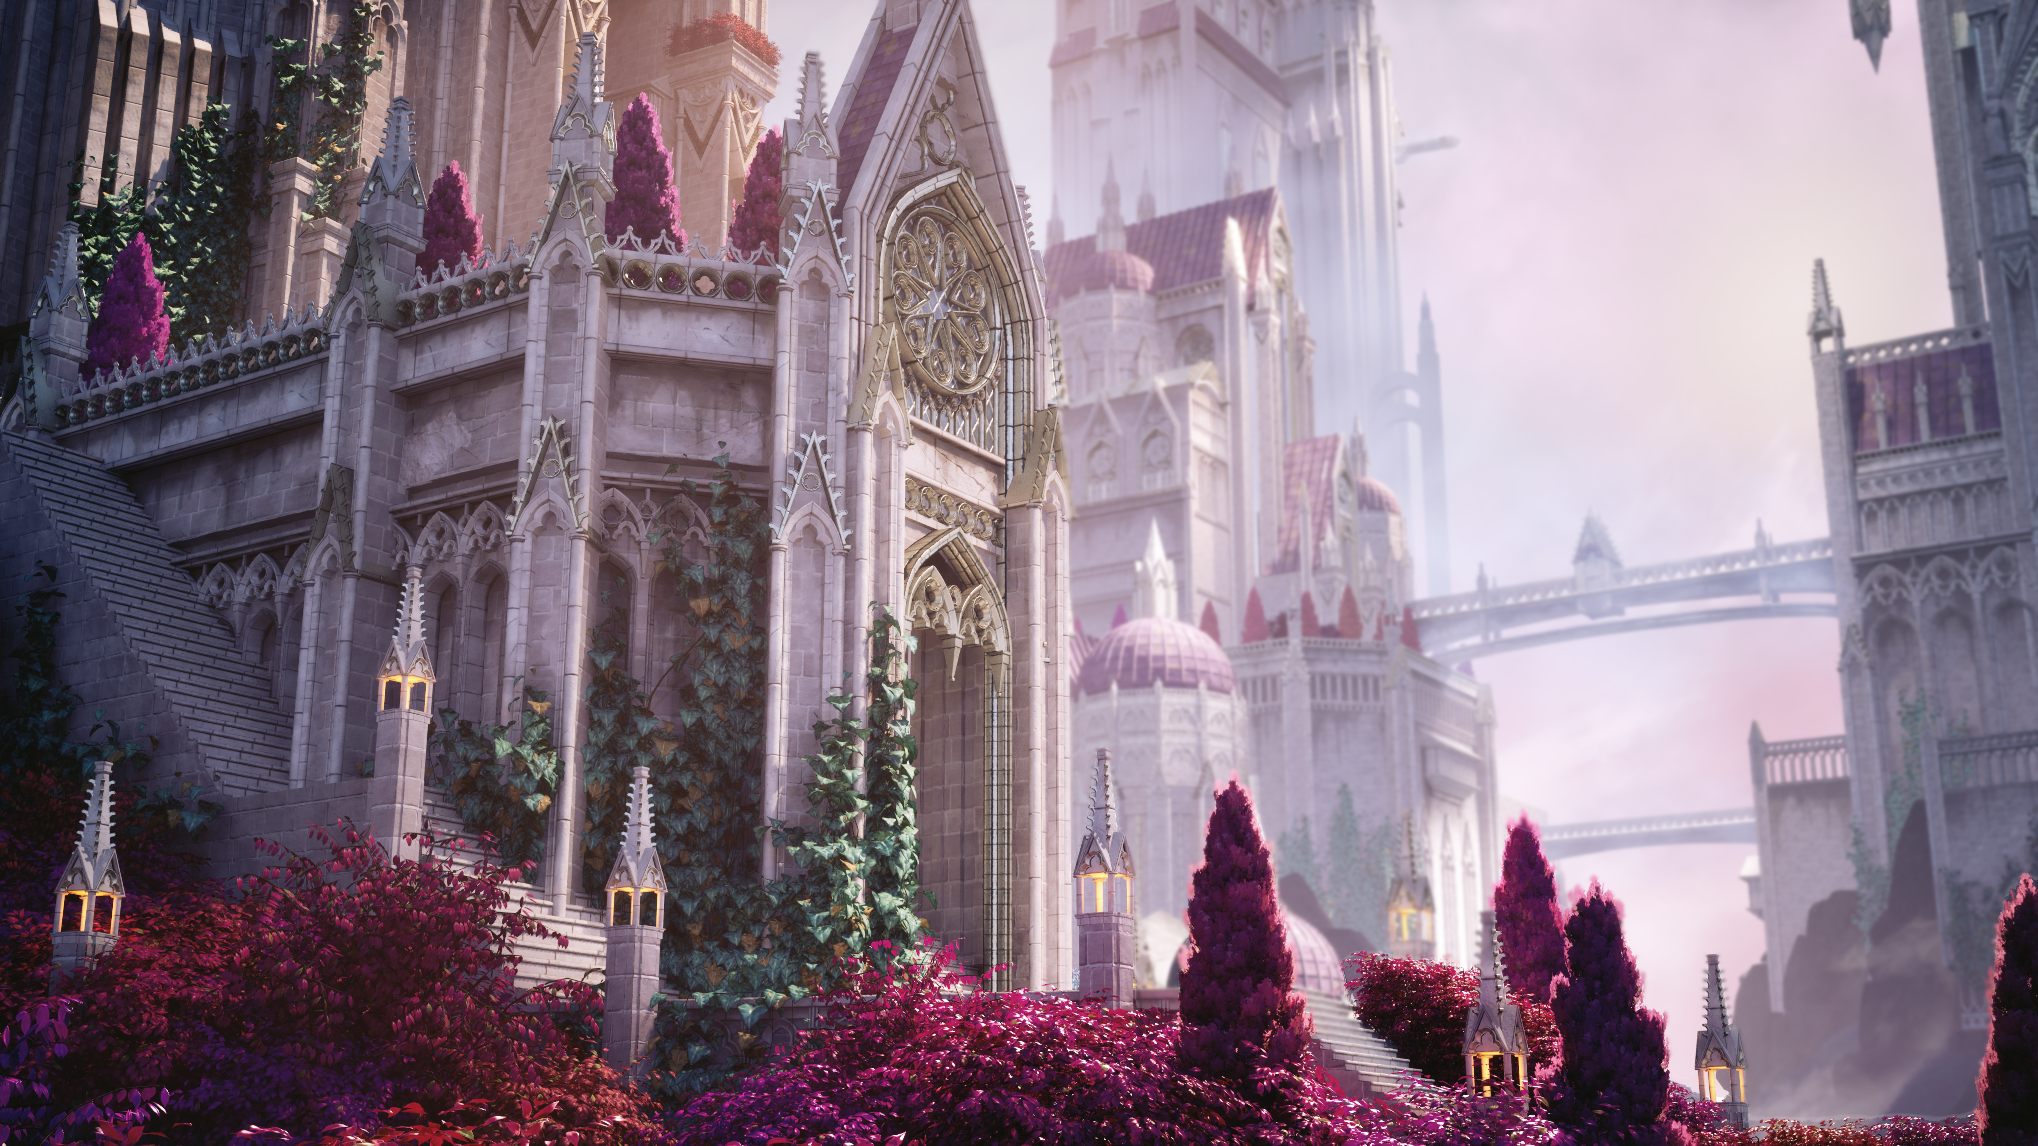
Next, it was time to start polishing my foliage and landscape. I created a grass landscape material in Substance Designer and applied it to my landscape actors. I experimented with two different methods for grass creation to see what I liked best. The first was a blocked-out grass patch in Maya and turned into a high poly in ZBrush. I exported it into Substance Designer for texture maps and created Small, Medium, and Large grass collections in SpeedTree. These worked really well to cover a lot of ground, and I ended up procedurally spreading them across my landscape actors to cover the bulk of the scene. Since it was a solid chunk already made in the texture maps, I lost some freedom when it came to making interesting shapes and silhouettes in SpeedTree. This inspired me to create a set of grass blades in Substance Designer, which I imported on a single texture map into SpeedTree. This allowed me to experiment with forces to get a much more unique clump of grass, which I hand-painted in my scene to break up the monotony of the original meshes. My ivy and bush leaves were sculpted in ZBrush and textured in Substance Painter. I imported this map into SpeedTree and set up my mesh cutouts for each individual leaf type. I assembled my foliage in SpeedTree using my completed modular kit to grow the ivy along the surfaces, so that it looked like it grew naturally when placed in my scene.
Polish
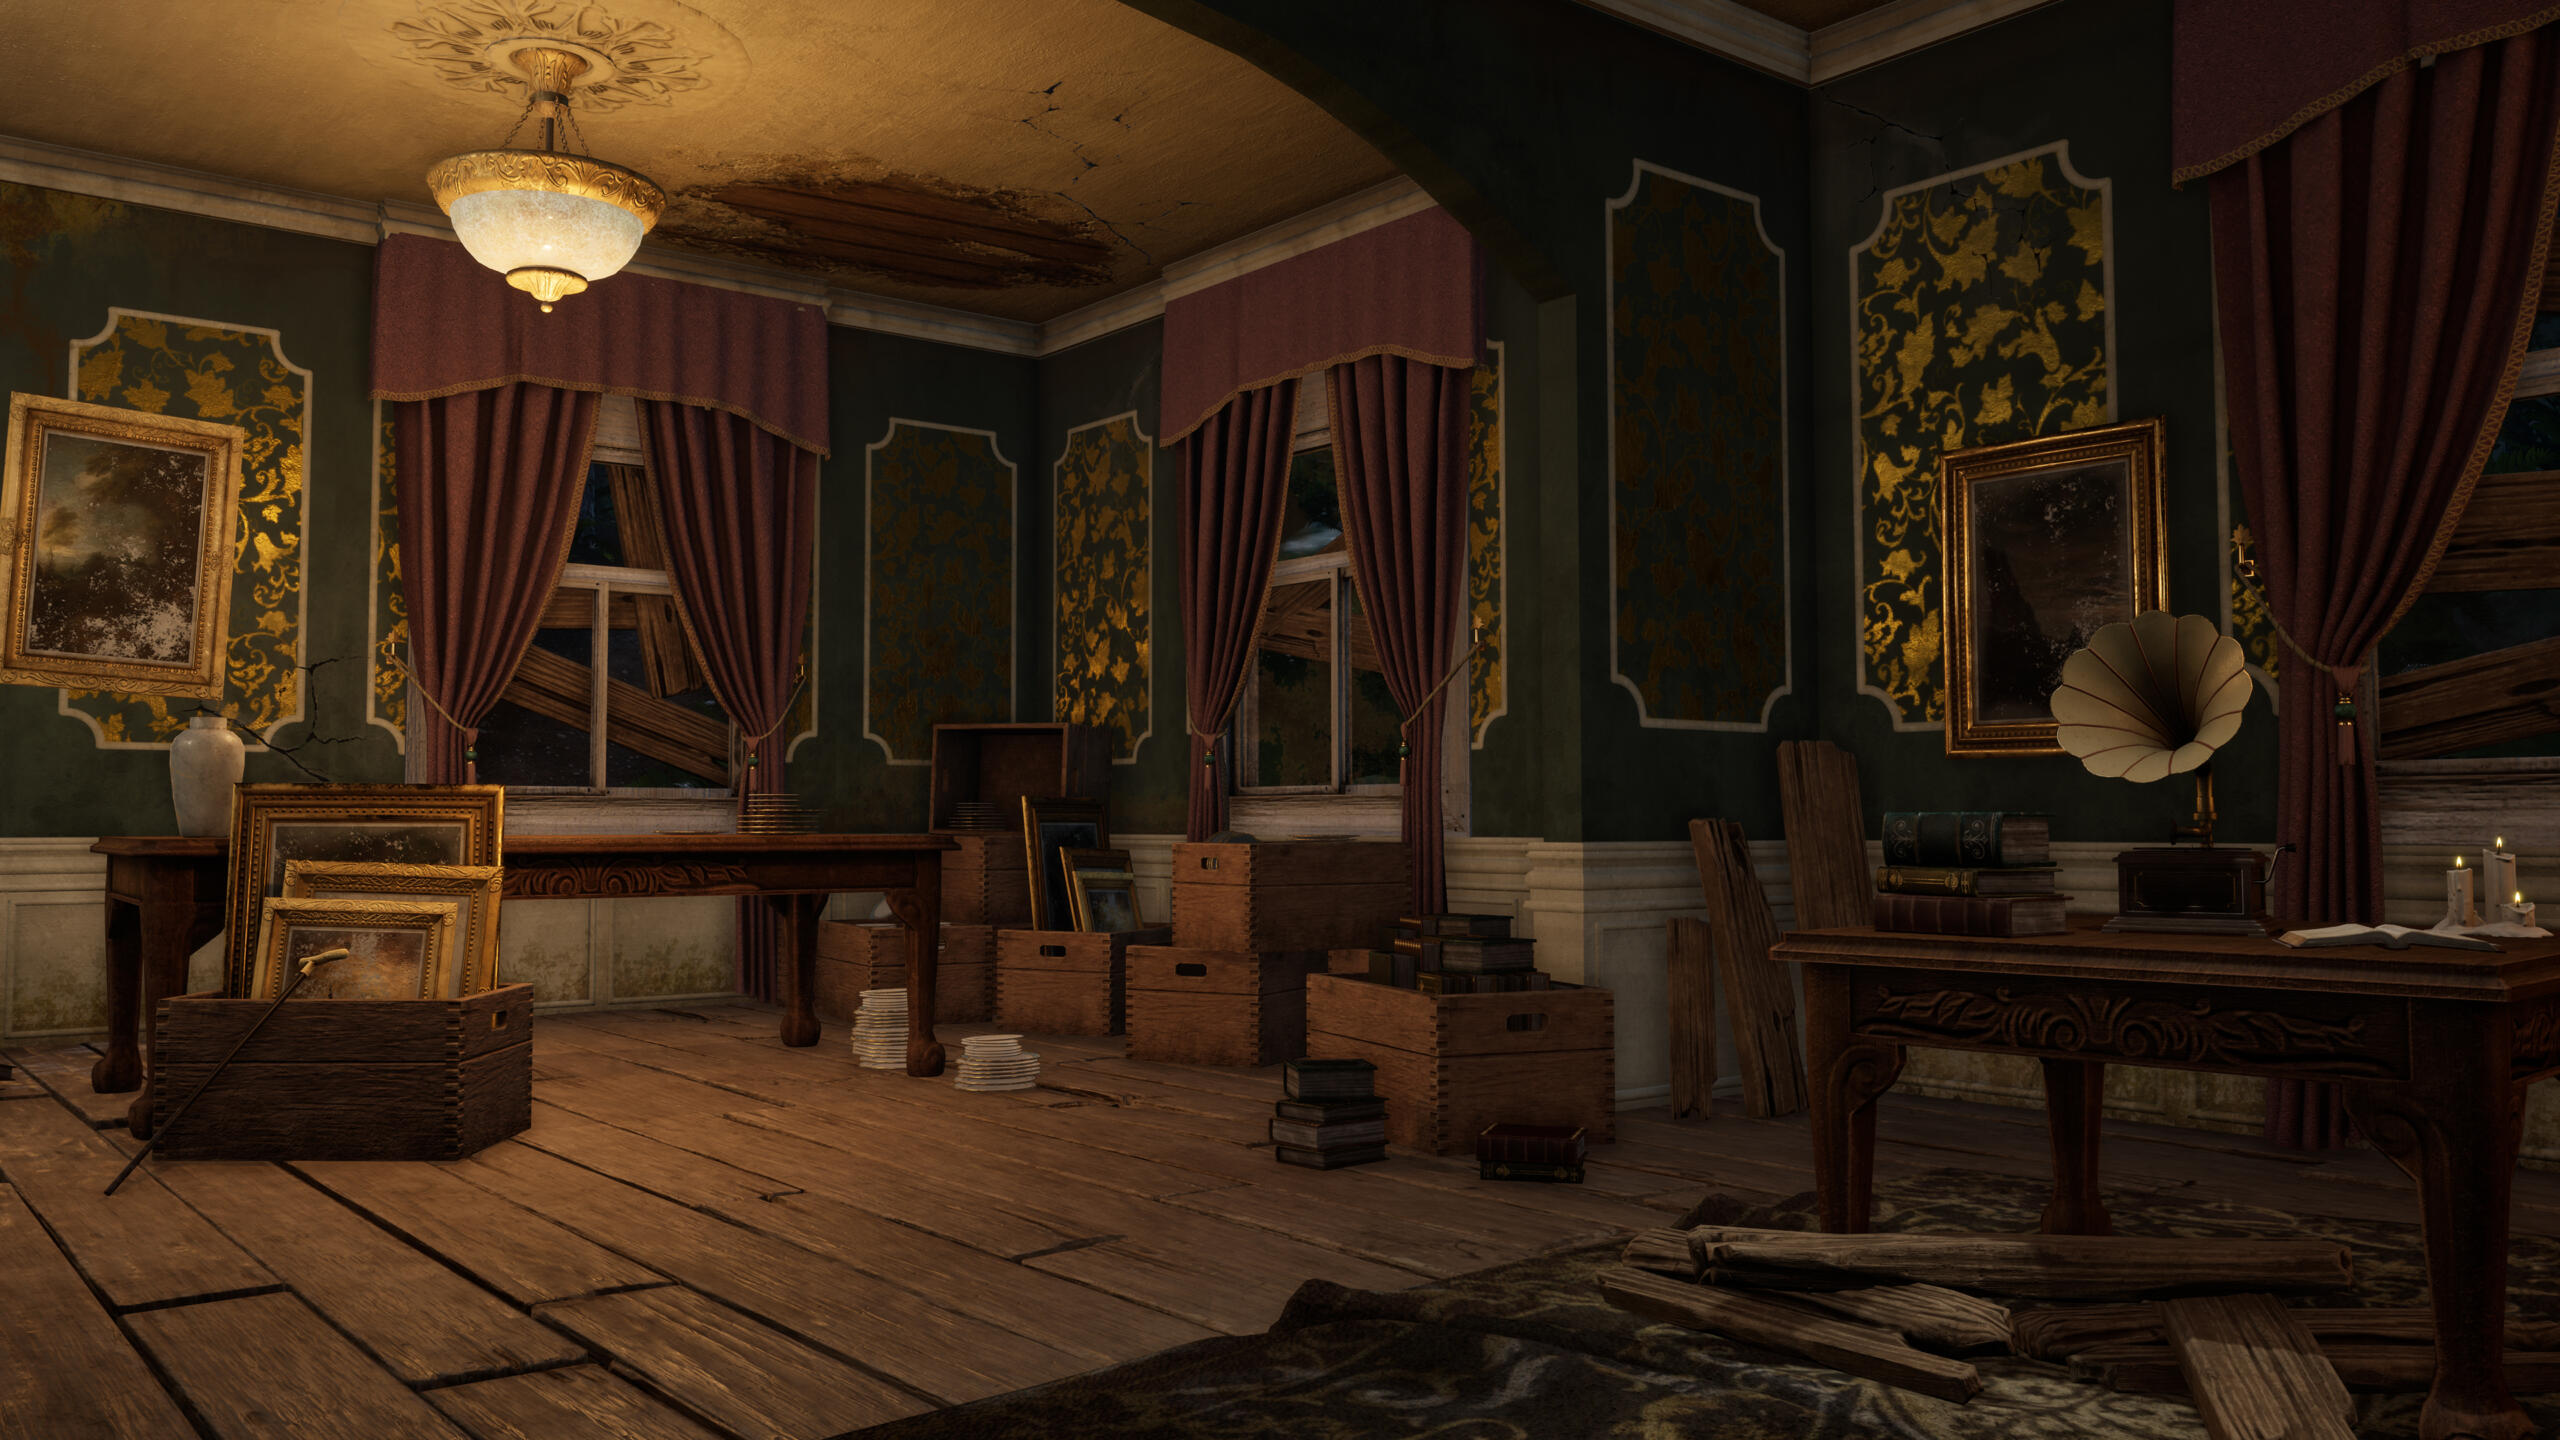
At this point, my scene is looking something like the image below:
My scene before the polish pass.
I started to polish my lighting, material reads, and modeling details during this phase. I identified some key areas, with help from the Vessel Forge mentors, that needed extra details in modeling. From there, I started gathering more real-life references that matched the style of architecture I was going for to help me fill in some gaps. I ended up modeling a lot more medium and small details during this time, which really helped sell the construction of my castle. One issue I ran into was the read on the tiles of my trim sheets. Luckily, I chose to let Substance Designer carry a bulk of my trim sheet work, so it was quick and flexible to adjust my base color and roughness maps until the tiles read clearly from a distance. Everything in my scene is Nanite, which allowed me to practice Unreal Engine 5’s new form of Vertex Paint. I created a quick second UV set for my assets and utilized the Mesh Paint feature (specifically texture paint), which relies on Virtual Texture maps to store painted information on your Nanite meshes. A combination of painting and adjusting my base color maps on my stone tiling texture helped me remove the majority of repetition in the scene. I also used drip and grunge decals in any occluded areas to not only push the shadows but also introduce some breakup to the surfaces.
My scene after the detail modeling phase and Texture Paint first pass.
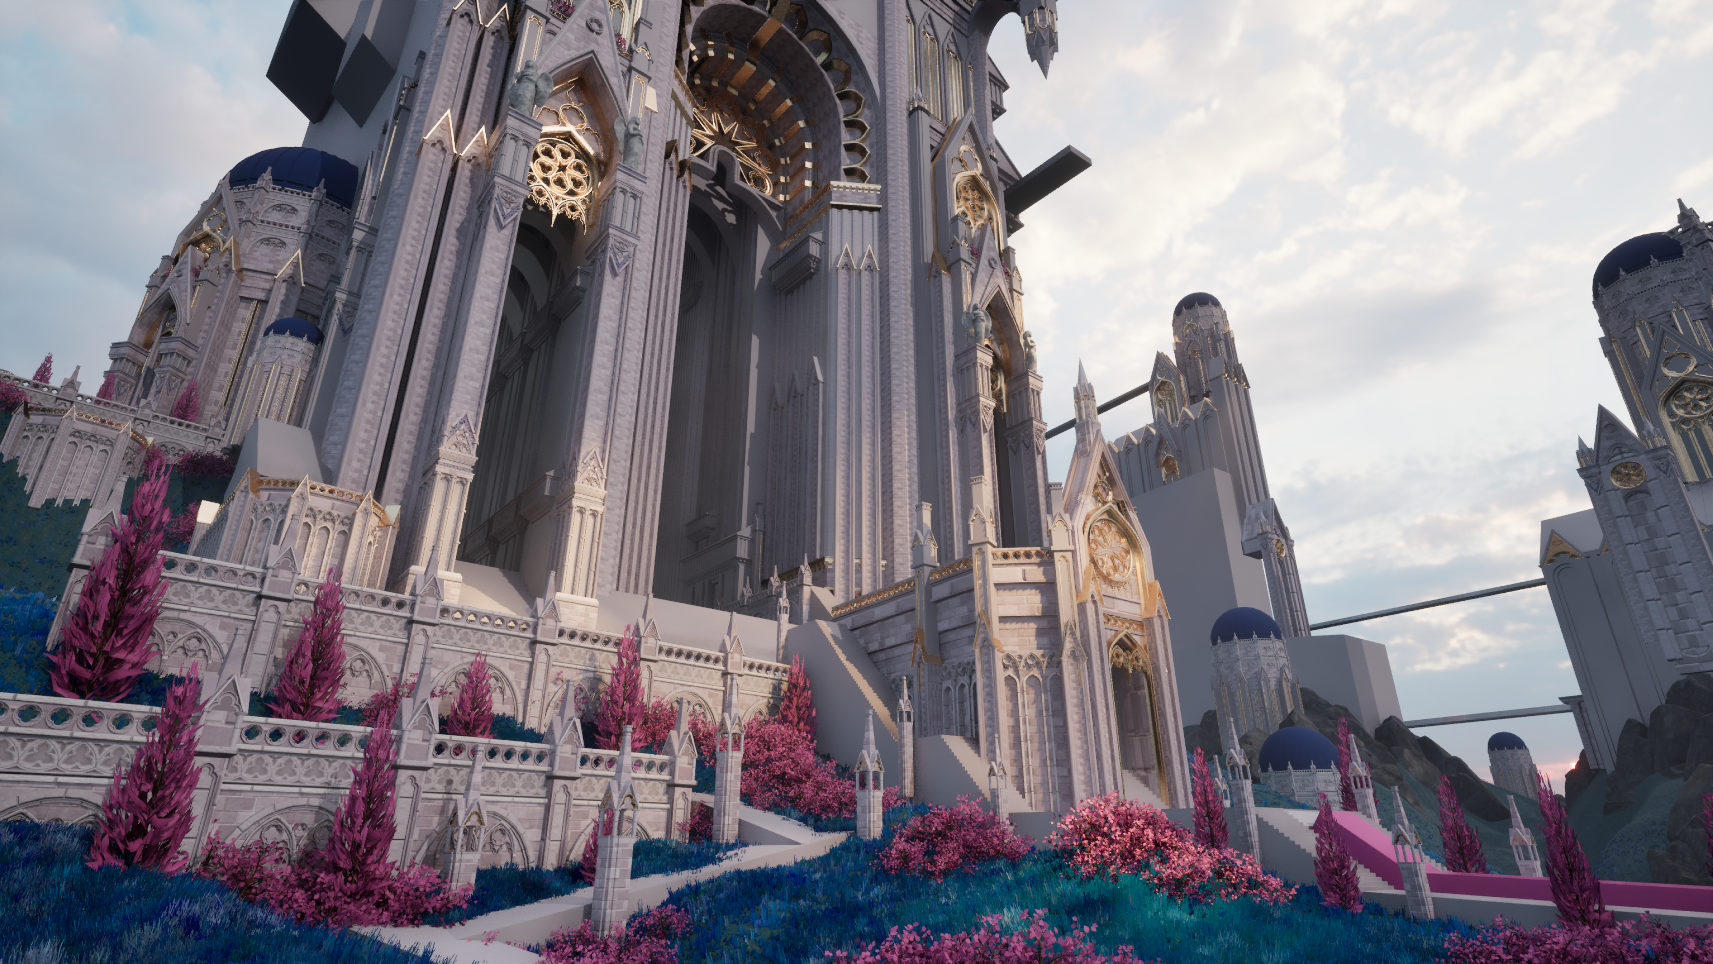
During this project, I used William Faucher’s Easy Mapper and Easy Fog. Although I love developing my own shaders for my personal projects, I decided, for the sake of time, to utilize one that was pre-built. I did make some slight modifications to allow Texture Paint to be read through my meshes’ second UV set, but this tool was super powerful to get precise control of how my materials showed up. Easy Fog was also a great addition to my scene to replace the default Unreal clouds, and helped push the colors and shape language to feel more whimsical and true to the concept. I adjusted the colors, speed, and opacity of the Easy Fog blueprint until I was happy with the result. For both, it was important to me not to use the default settings but to utilize them as a tool during the process and customize them to align with my own artistic vision.
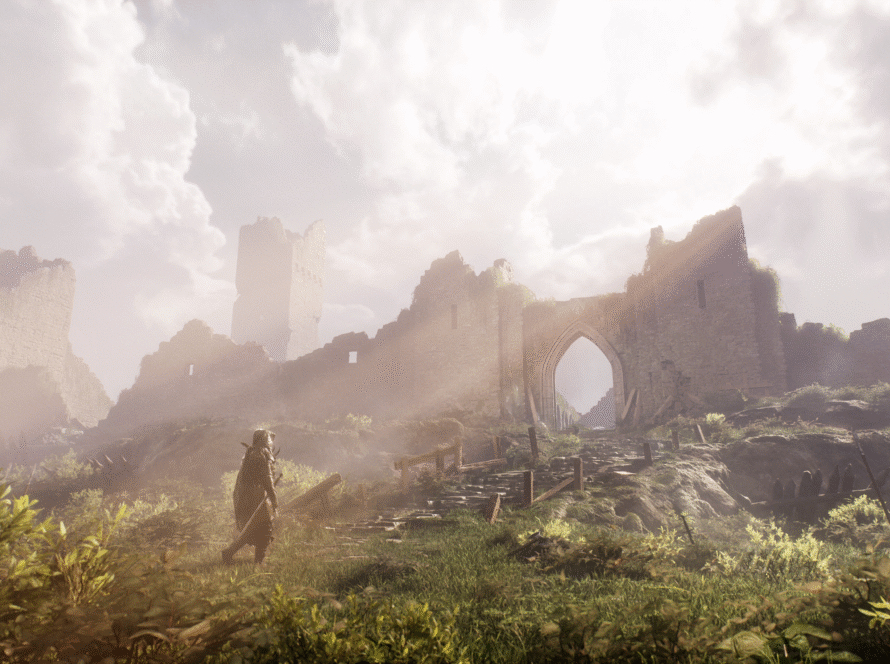
Finally, after I was confident with the rest of my scene, I wanted to have intentional control over the colors and lighting. To achieve this, I created a custom LUT in Photoshop using a screenshot of my environment and some smart filters. This allowed me to choose what colors to highlight and do a final pass on unifying my scene’s color palette. Throughout the entire process, I made sure to check my scene through my camera actors for all my different shots to make sure the compositions remained visually pleasing, making small tweaks here and there to suit each shot. I added the god rays highlighting the entrance to the castle, and I felt they really completed the environment!
Thank you so much for reading my process behind my Fantasy Castle environment. A huge shout out to the Vessel Forge team for the helpful community of artists they have created, and to Jonathan for being a great mentor while I completed this project! I hope you all enjoyed this breakdown. Keep learning and keep creating!
If you’d like to check out the scene, here’s the link:
https://www.artstation.com/artwork/y4O6KK
See more of Laela’s amazing work on ArtStation:
https://www.artstation.com/laelarussell
Thank you for reading from the Vessel Forge Team! Laela took our Environment Art Mentorship with Jonathan Benainous. Take a look at the program below: