In this Mentee Showcase, get to know Mandar Warde, Material Artist at Caterpillar.
Mandar shares his background as an electrical engineer, how he got into video game art, why he chose a Vessel Forge Mentorship, and a full breakdown of his project “Sunstone Villa”.
Q: What is your area of focus? And which Vessel Forge program did you enroll in?
I specialize in procedural material creation, using Substance Designer with a strong focus on building production materials for real-time environments. My interest lies in creating technically efficient, scalable material systems that can be integrated across different engines.
I enrolled in the Material Art membership at Vesel Forge to deepen my understanding of high-level material design, artistic decision-making, and professional production standards.
Q: Tell us about your background. Where did you learn your craft?
That’s an interesting one. I come from an Electrical Engineering background, but the process of creating games always intrigued me. So, I decided to follow my dreams, moved to Boston, and got my master’s (MS in Game Science and Design), which gave me a strong foundation in real-time workflow production, pipelines, and collaborative development.
However, most of my growth as a material artist came from self-directed study, experimentation, and breaking things until they worked.
Now, I’m currently working as a material artist at Caterpillar. My role involves designing, creating, and implementing materials, shaders, and texture pipelines for real-time applications with a strong emphasis on technical problem-solving and consistency across engines. I’ve been working professionally for 4+ years in the Games, Simulation, and XR space.
Q: What led you to pursue a career in video game art?
My journey is far from a traditional one. Back when I was studying engineering, I was never a straight-A student. I was a kid who used to do the bare minimum until I started working, which was very early in my life. I joined a startup/indie studio back in India that gave me the space to explore game development and the XR space. I think that is where I found my “ikigai” (purpose of life). Which was making games and storytelling through experiences.
I worked there for five years, published research papers file patents, and got promoted to a level where I was leading teams and products. That’s when I decided to pursue a deeper knowledge of the AAA industry and game design.
I moved to Boston, US, to pursue my master’s in Game Science and Design and graduated top of my class. Shortly after graduating, I was presented with an opportunity to teach a graduate-level class in the same program I graduated from. There I was, from someone who was struggling to get passing grades, to a straight-A student, to becoming a professor. Well, the journey isn’t done yet, the dream is to work with the best in the world, and keep pushing until I get there.
I’ve always been drawn to building worlds. Over time, I realized that materials are the foundation of visual believability. They control surface response, storytelling, mood, and realism at a very fundamental level. Choosing materials wasn’t random; it was intentional. It’s a niche that blends artistic sensitivity with my technical thinking, that balance fits how I approach problems and life.
Q: What do you enjoy about creating art for video games?
I enjoy the intersection of art and systems. I think video games are a really impactful medium for storytelling. There are things that games can communicate and make people experience that movies or TV cannot. I believe that at the end of the day, all material artists are storytellers.
Growing up, I learned a lot about the world from video games. They shaped how I see the world. I think the fact that your art can create an impact on someone’s life is one of the best parts of working in the industry.
For me, a material isn’t just an image. It’s a reactive surface that behaves under light, interacts with shaders, and needs to perform efficiently in real time. There’s something deeply satisfying about creating a fully precision material that is flexible, optimized and production-ready.
Q: What were some of your biggest takeaways from your Vessel Forge program?
- Strong materials start with a strong reference analysis.
- Plan your trims; the dimensions matter more than you think.
- Tiling isn’t something that you can fix at the last minute. Start thinking about it from your base shapes.
- Material readability iterate over mindlessly adding details to your materials. Your materials might look good in Marmoset, but may look very different in the engine.
- Intentionality separates professional work from hobby work.
If I were to consolidate, I would say design is more engineering than engineering is design. I relate to this so much more after the mentorship.
The mentorship forced me to raise my standards. It challenged how I analyse references, structure graphs, and think about material hierarchy and readability from a practical standpoint.
One of the things which matter to me the most was honest feedback. If something looked bad, I wanted Jonathan to call it out without any filters. This exposed gaps I didn’t realize I had. That’s valuable. Real growth comes from friction, not validation.

Q: Why did you decide to apply for a Vessel Forge mentorship, and what is your plan going forward in your career?
My self-learning was reaching a point where I couldn’t improve on my own; feedback was becoming repetitive, and progress felt stagnant. I wanted someone to show me the things I wasn’t able to see.
Last year, when I met Jonathan at GDC, one of the things we spoke about was being able to level up my work and understanding the mistakes I was making. That’s when he mentioned starting Vessel Forge, and right then, I knew that I was enrolling.
I’m applying what I learned from Vessel Forge to refine my procedural workflows and build a more scalable material pipeline across different engines.
I think what Jonathan has taught me is solid, and it only makes sense to continue scaling it from this point forward and practising until I reach a point where I can bring my own ideas in and improve the workflow. Being a material artist with a technical background allows me to be someone who combines artistic quality with technical reliability, someone the team can trust to build systems, not just assets.
Q: Where can people find your art?
ArtStation: https://www.artstation.com/war_dae
LinkedIn: https://www.linkedin.com/in/mandarwarde

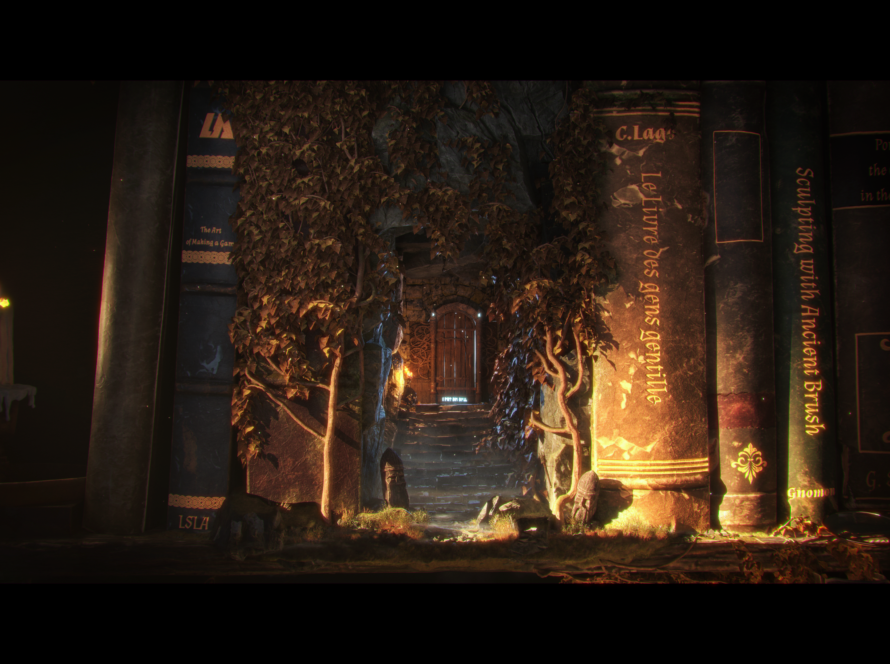
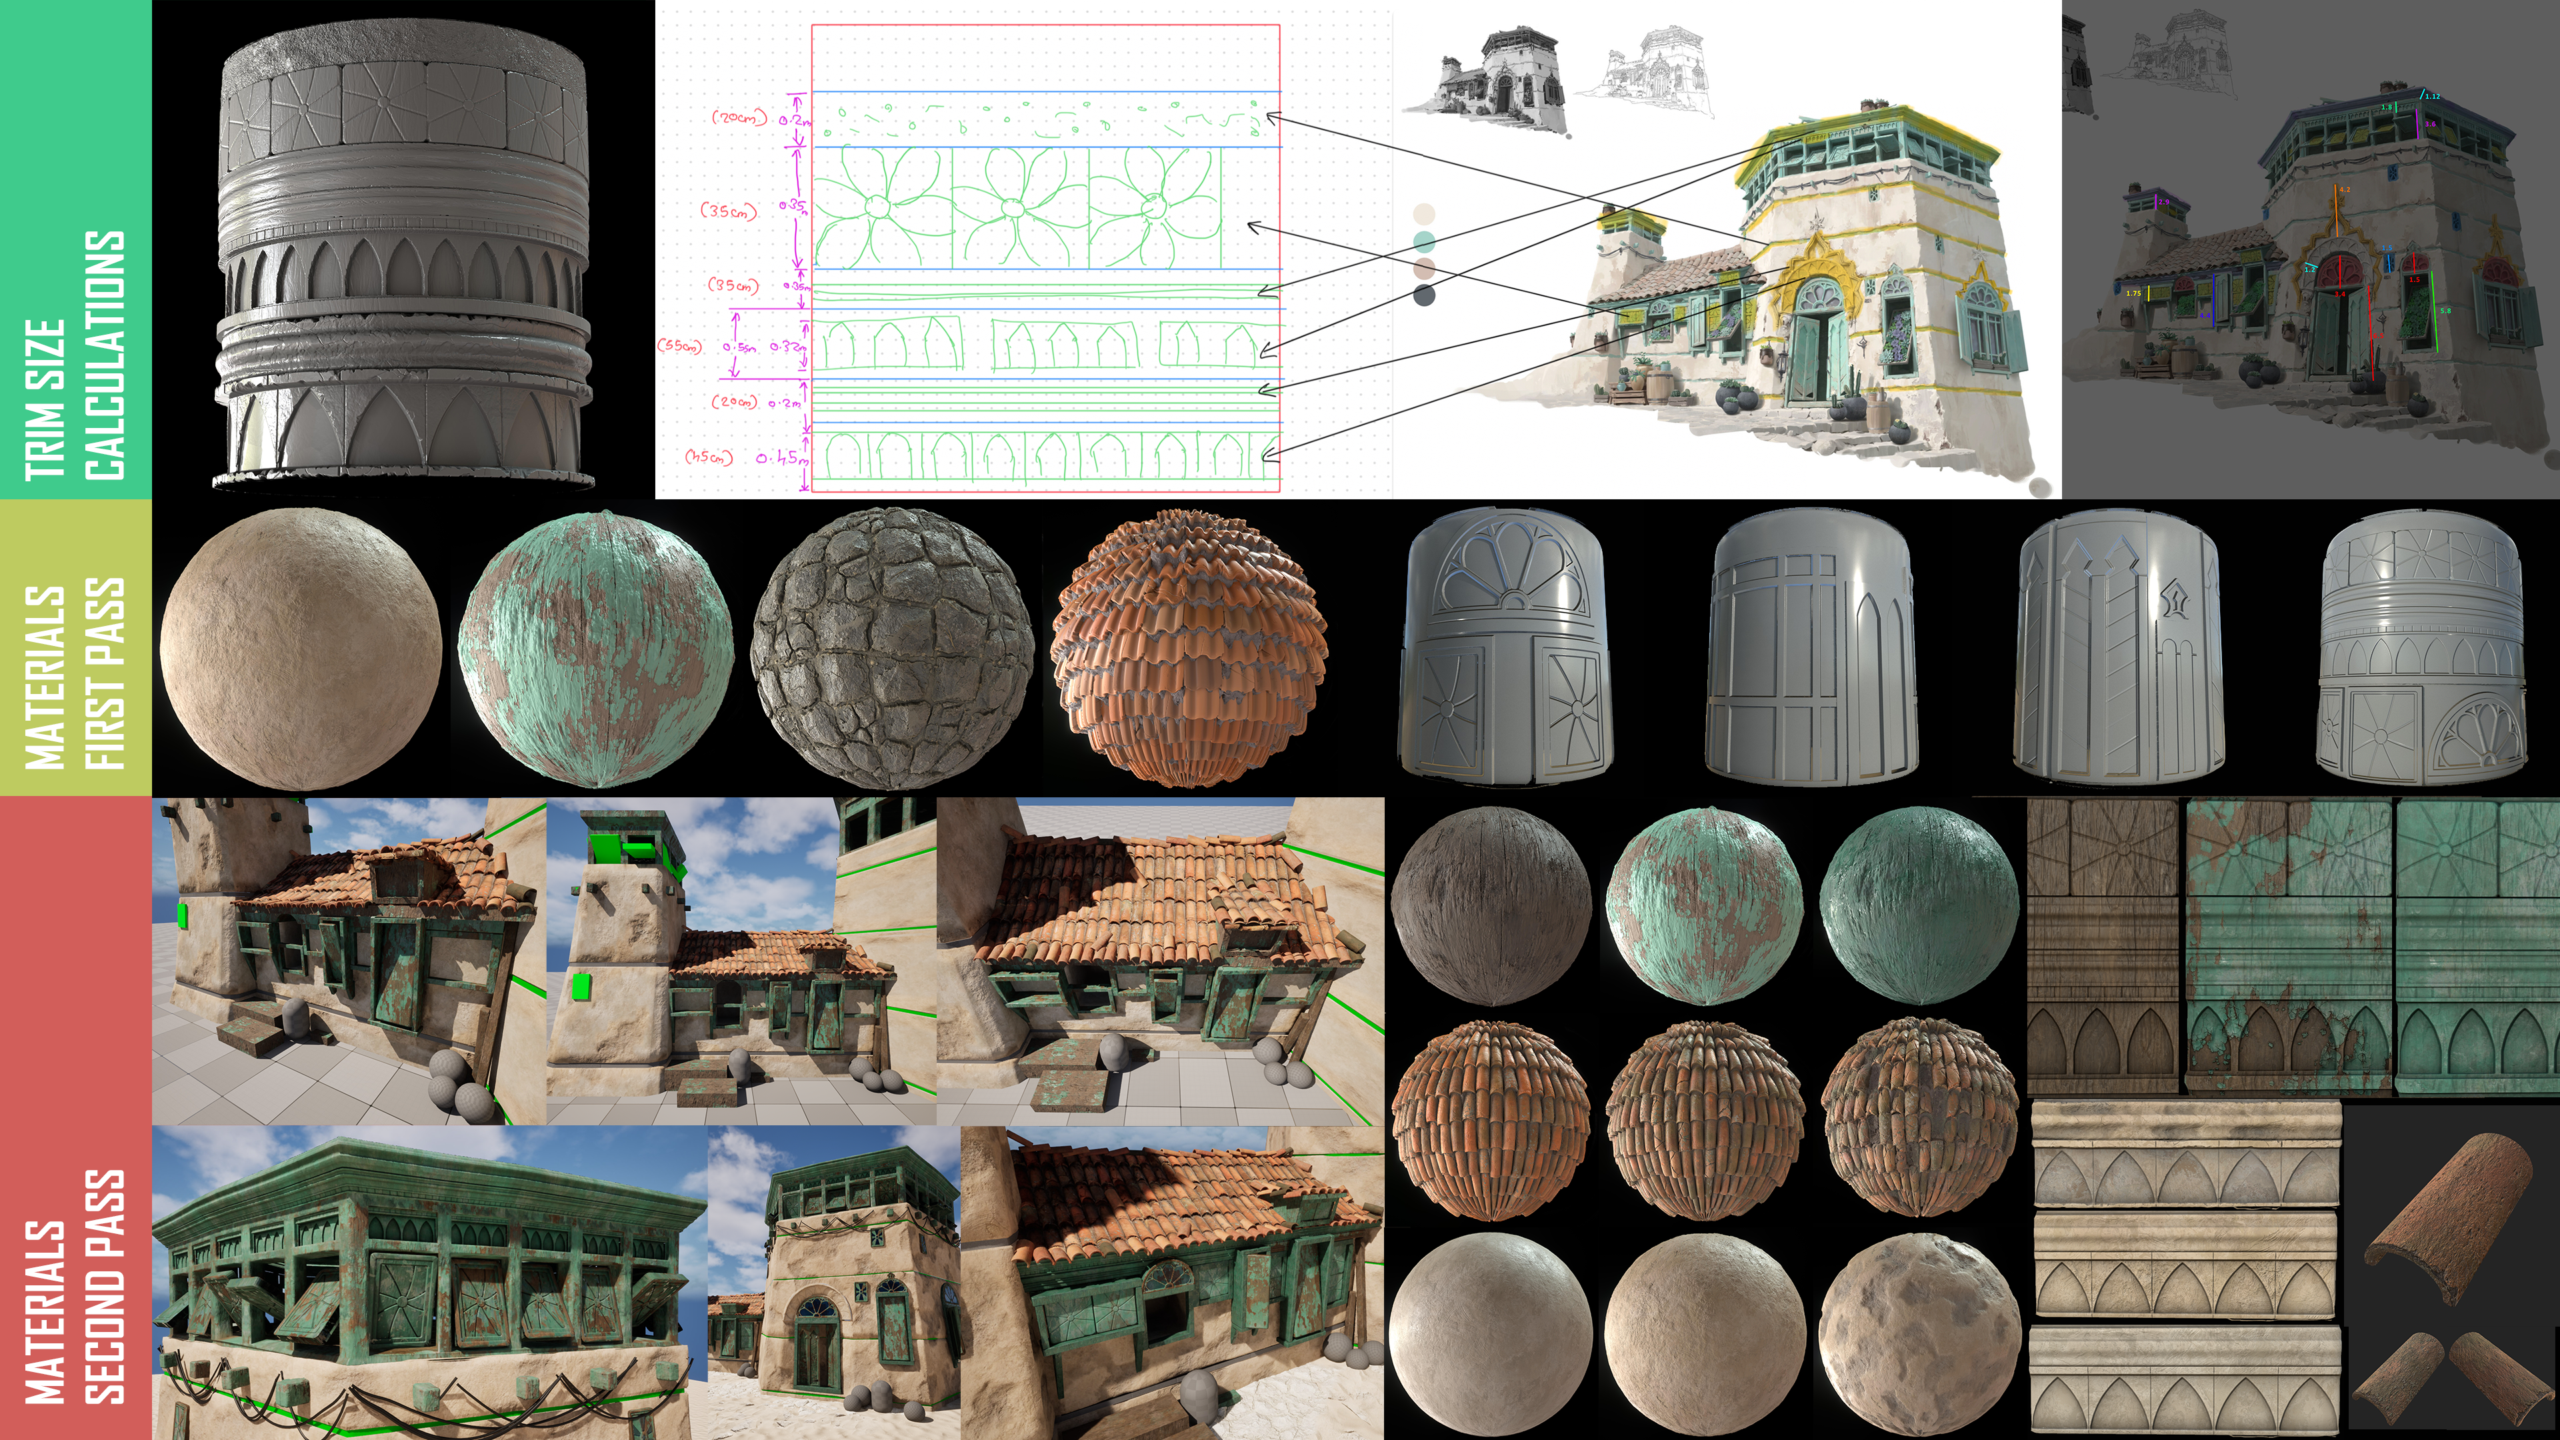
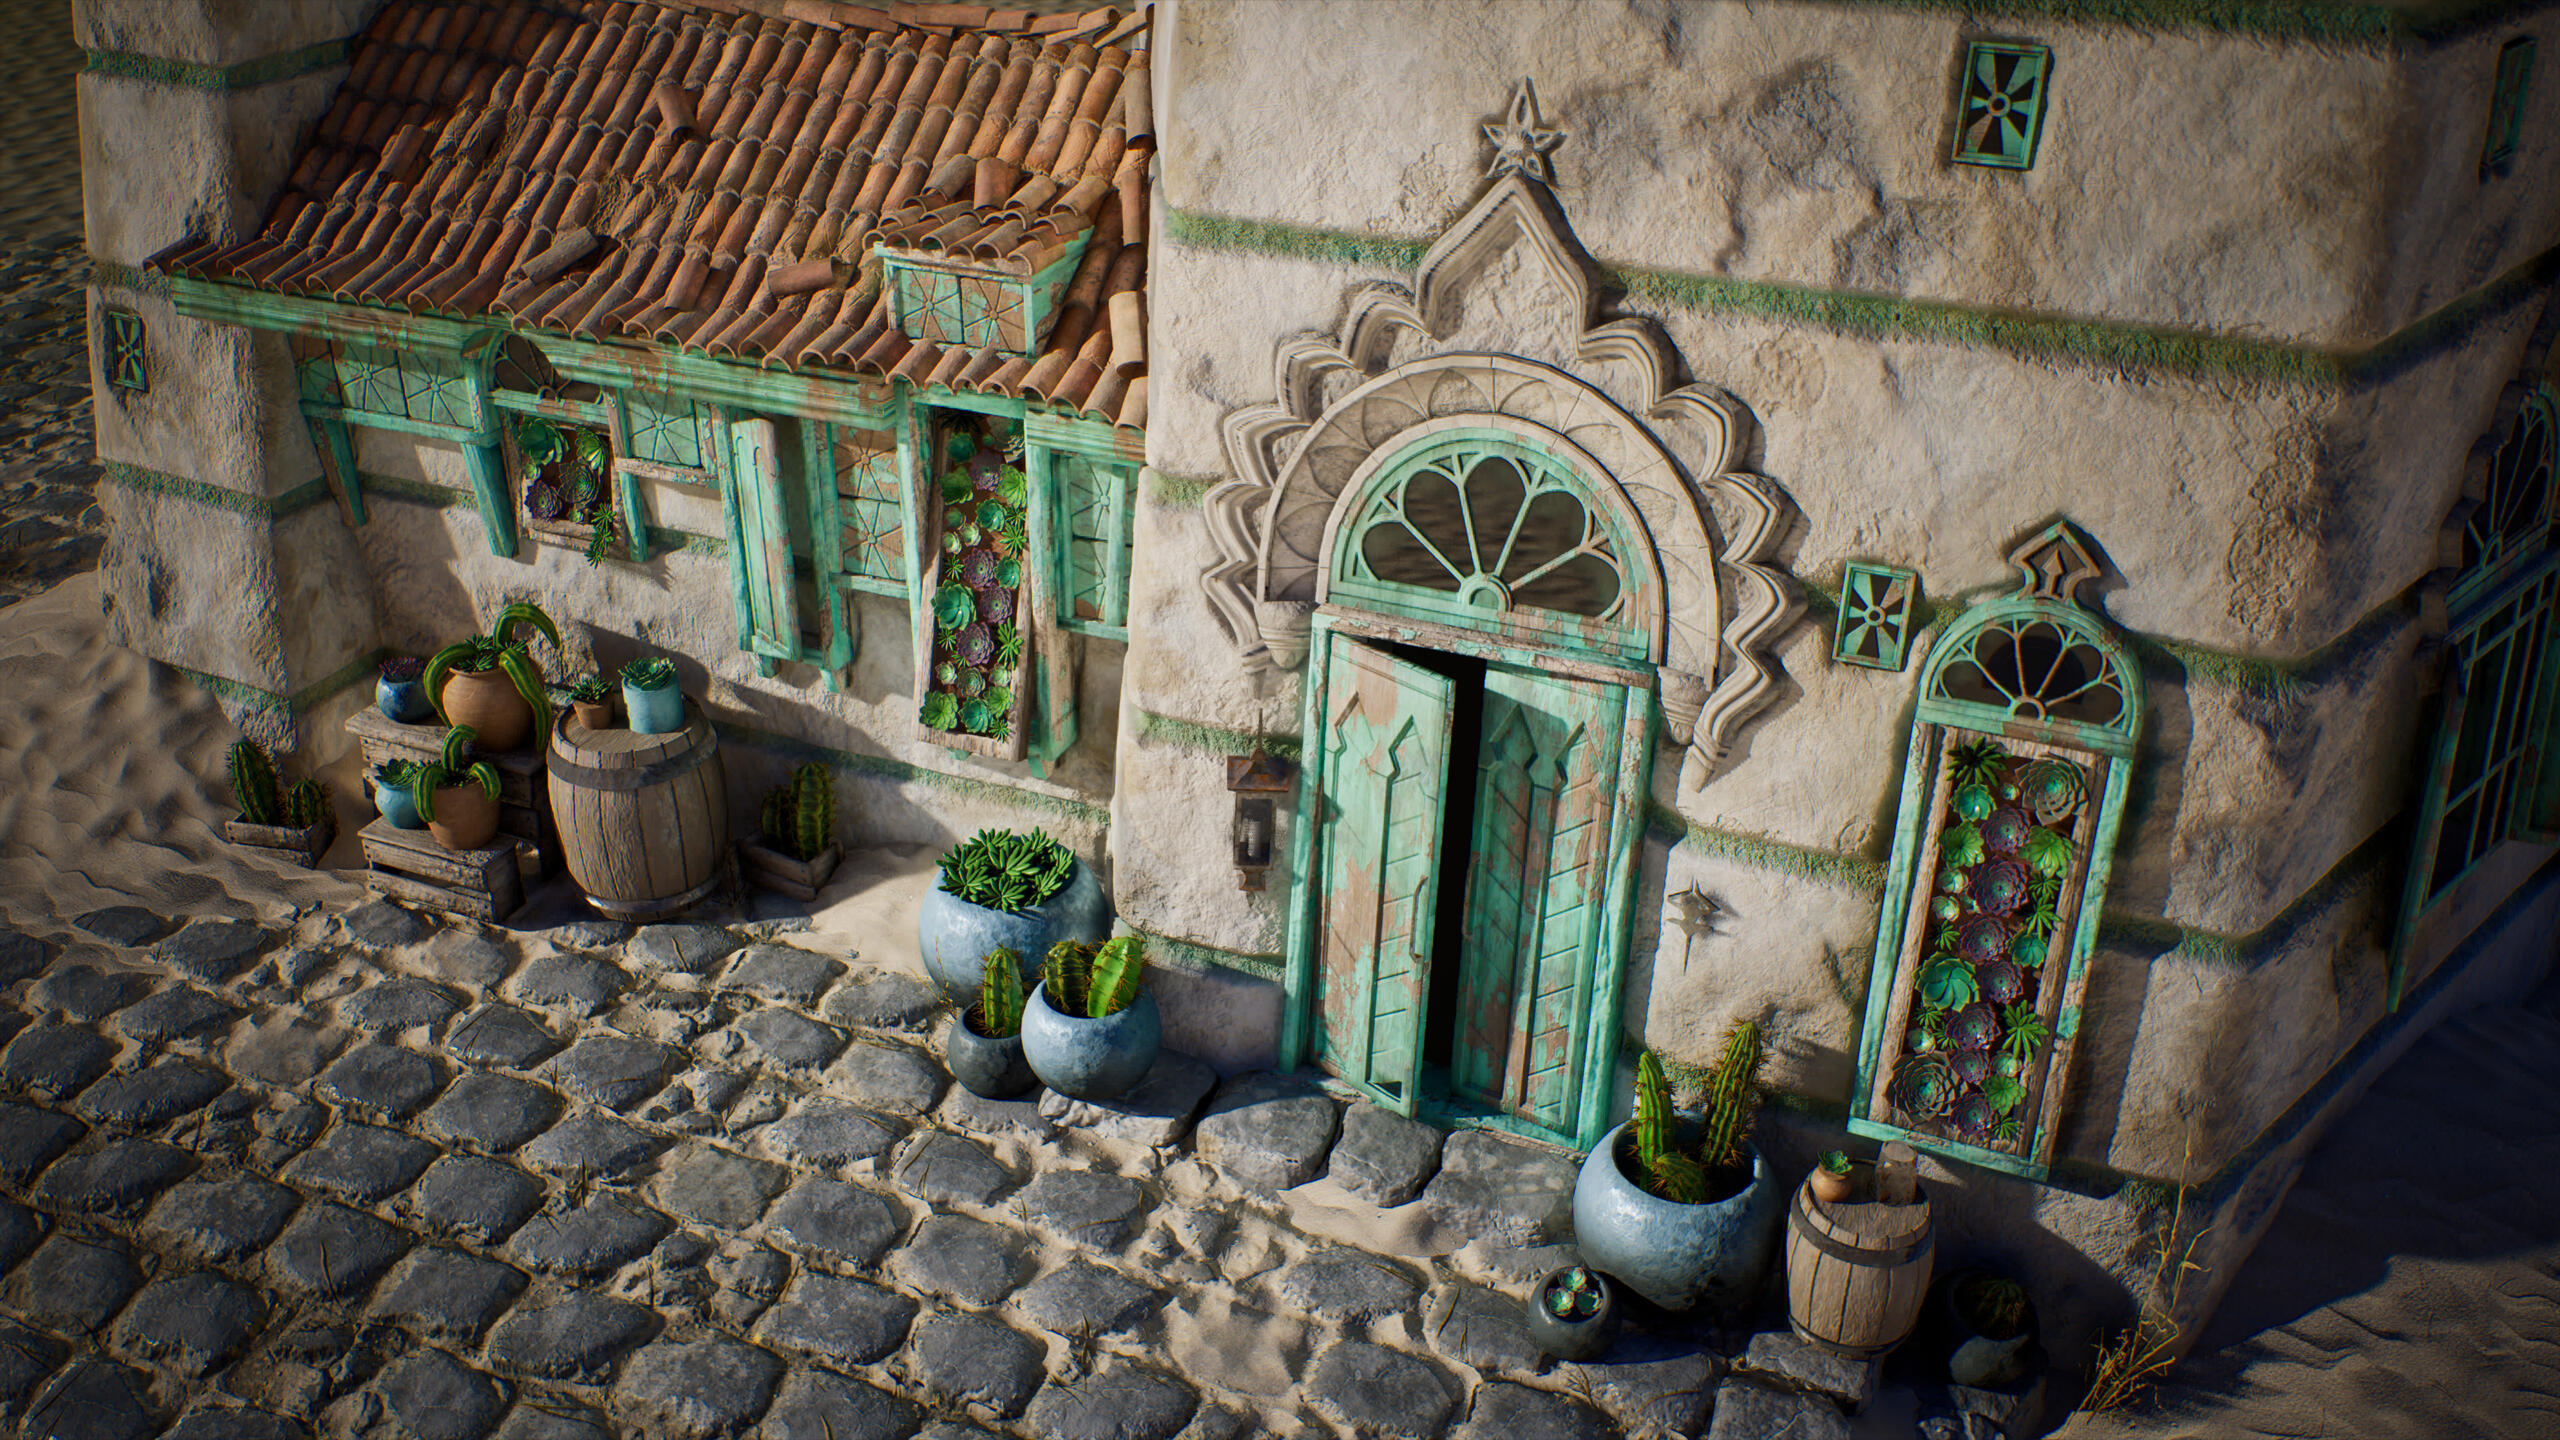
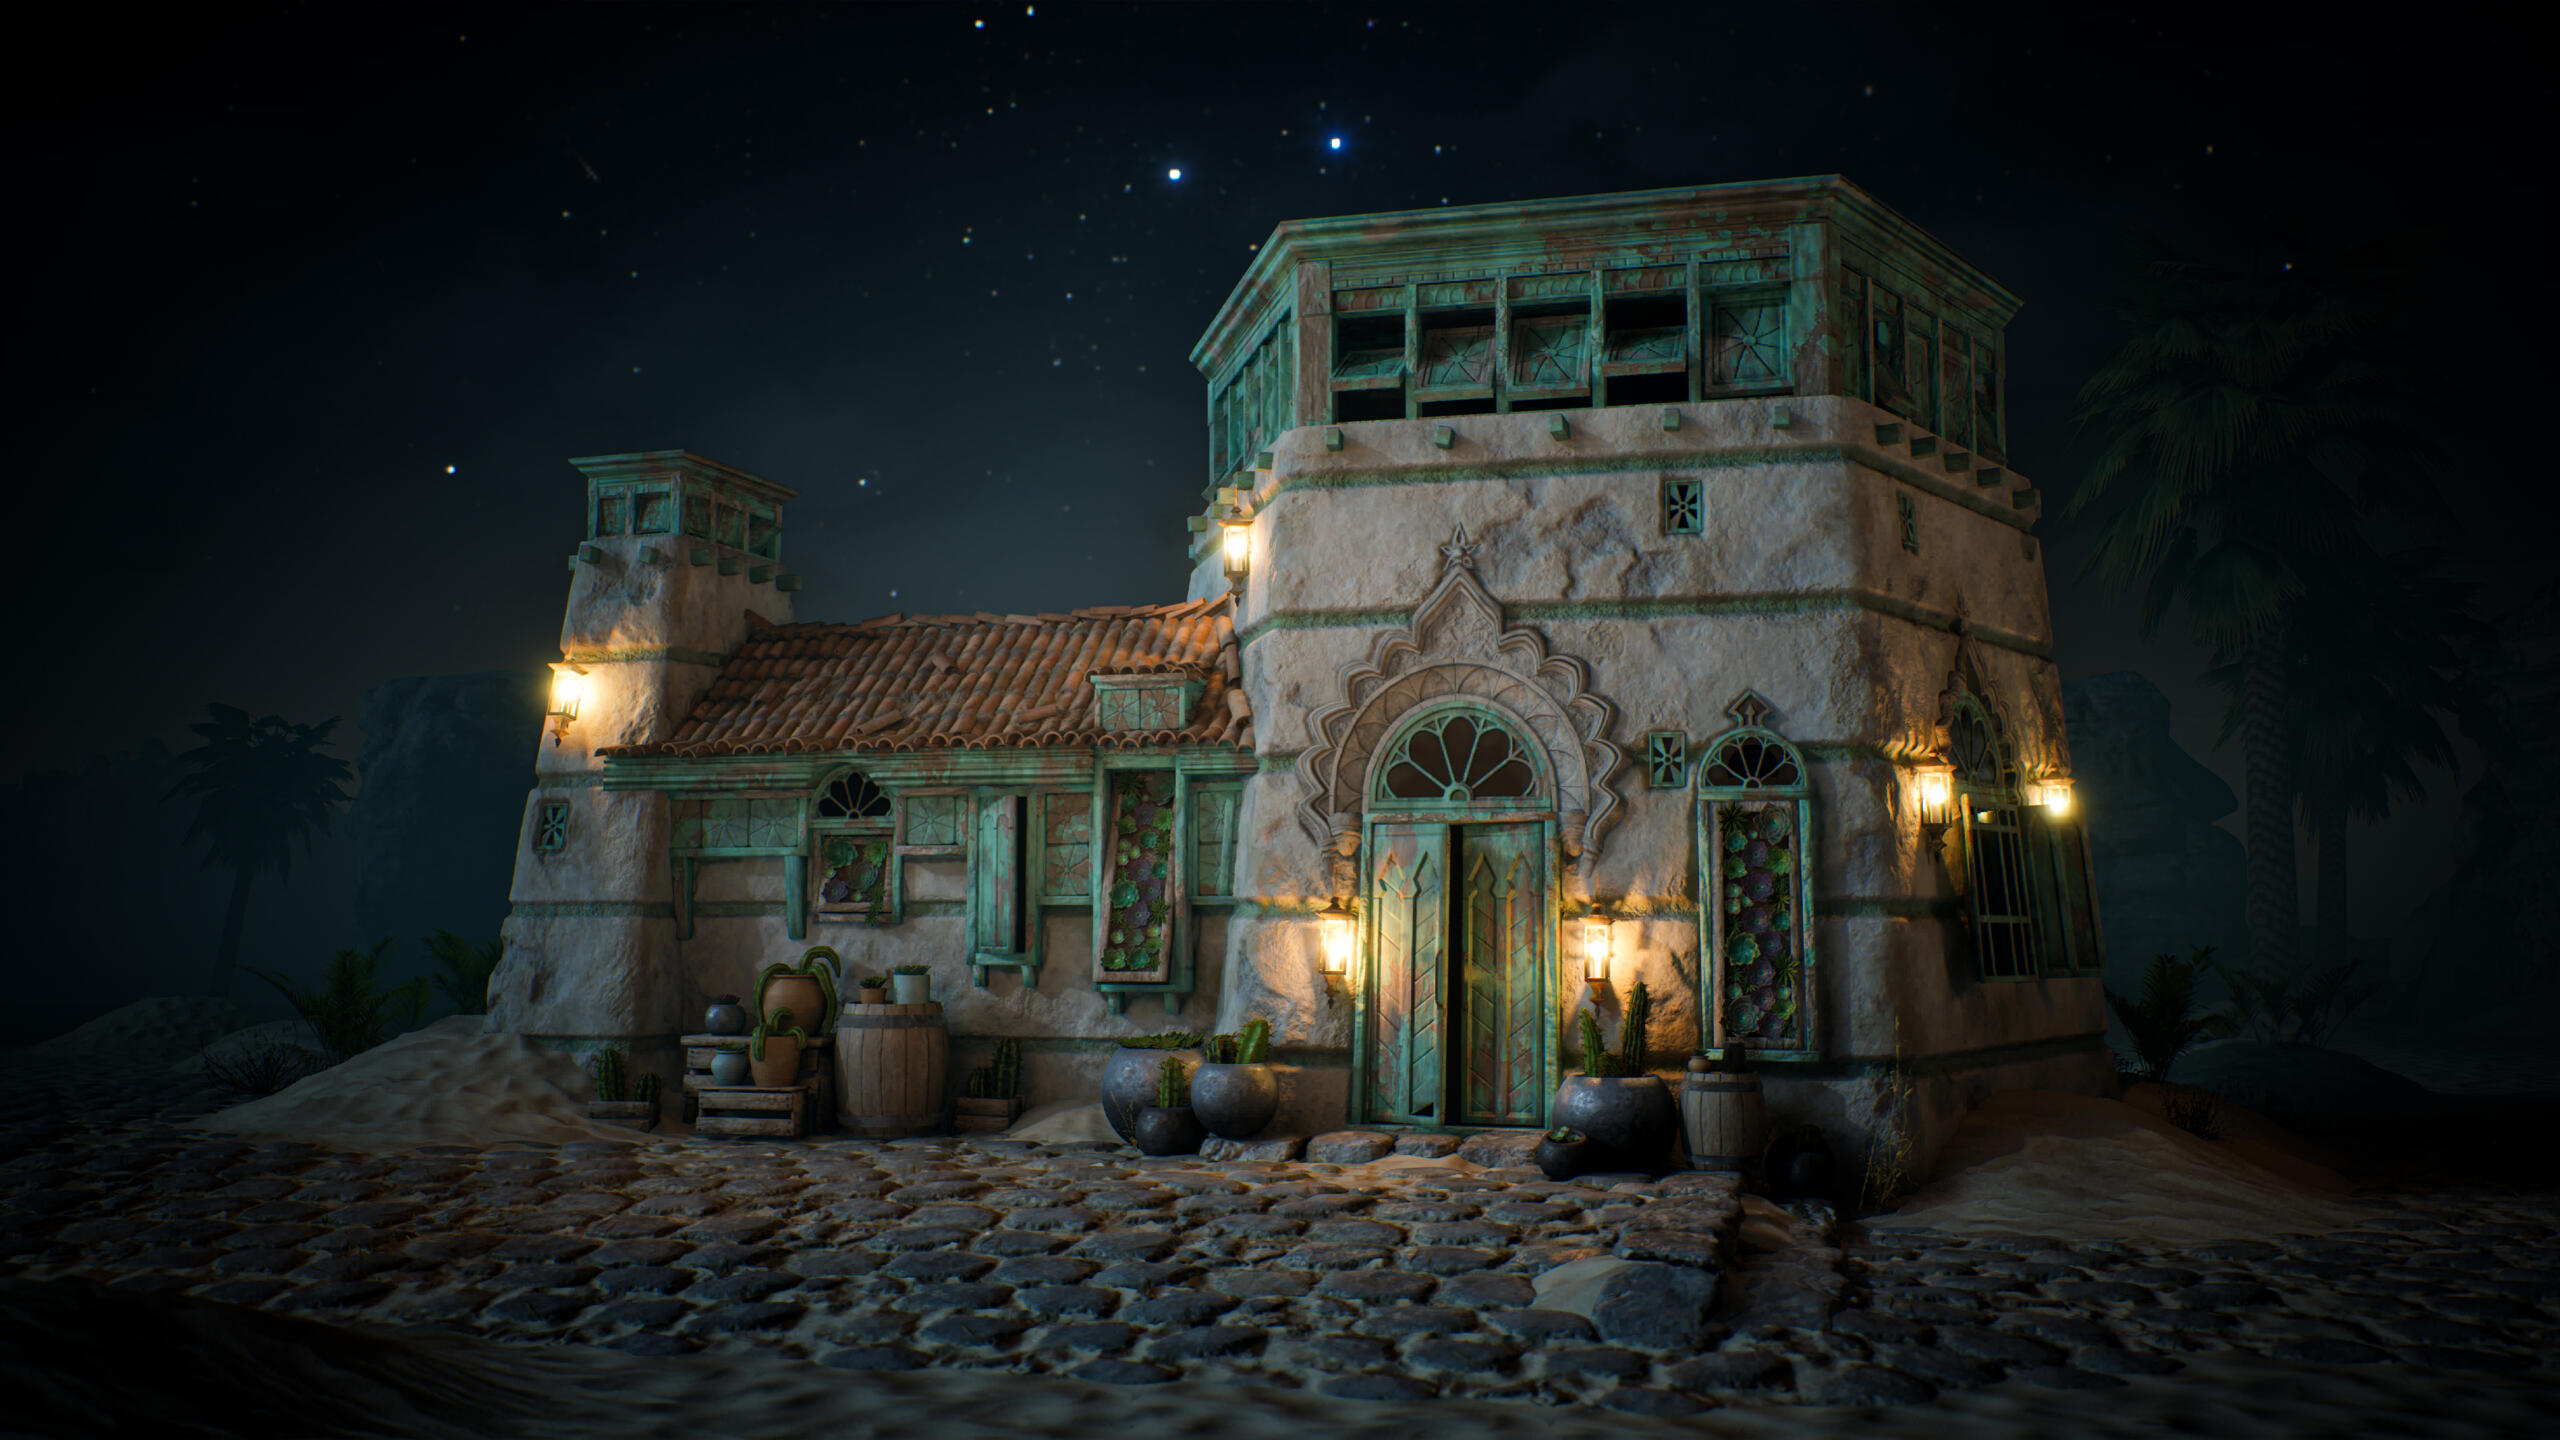
Sunstone Villa
Designing a Cohesive Material Series for Production
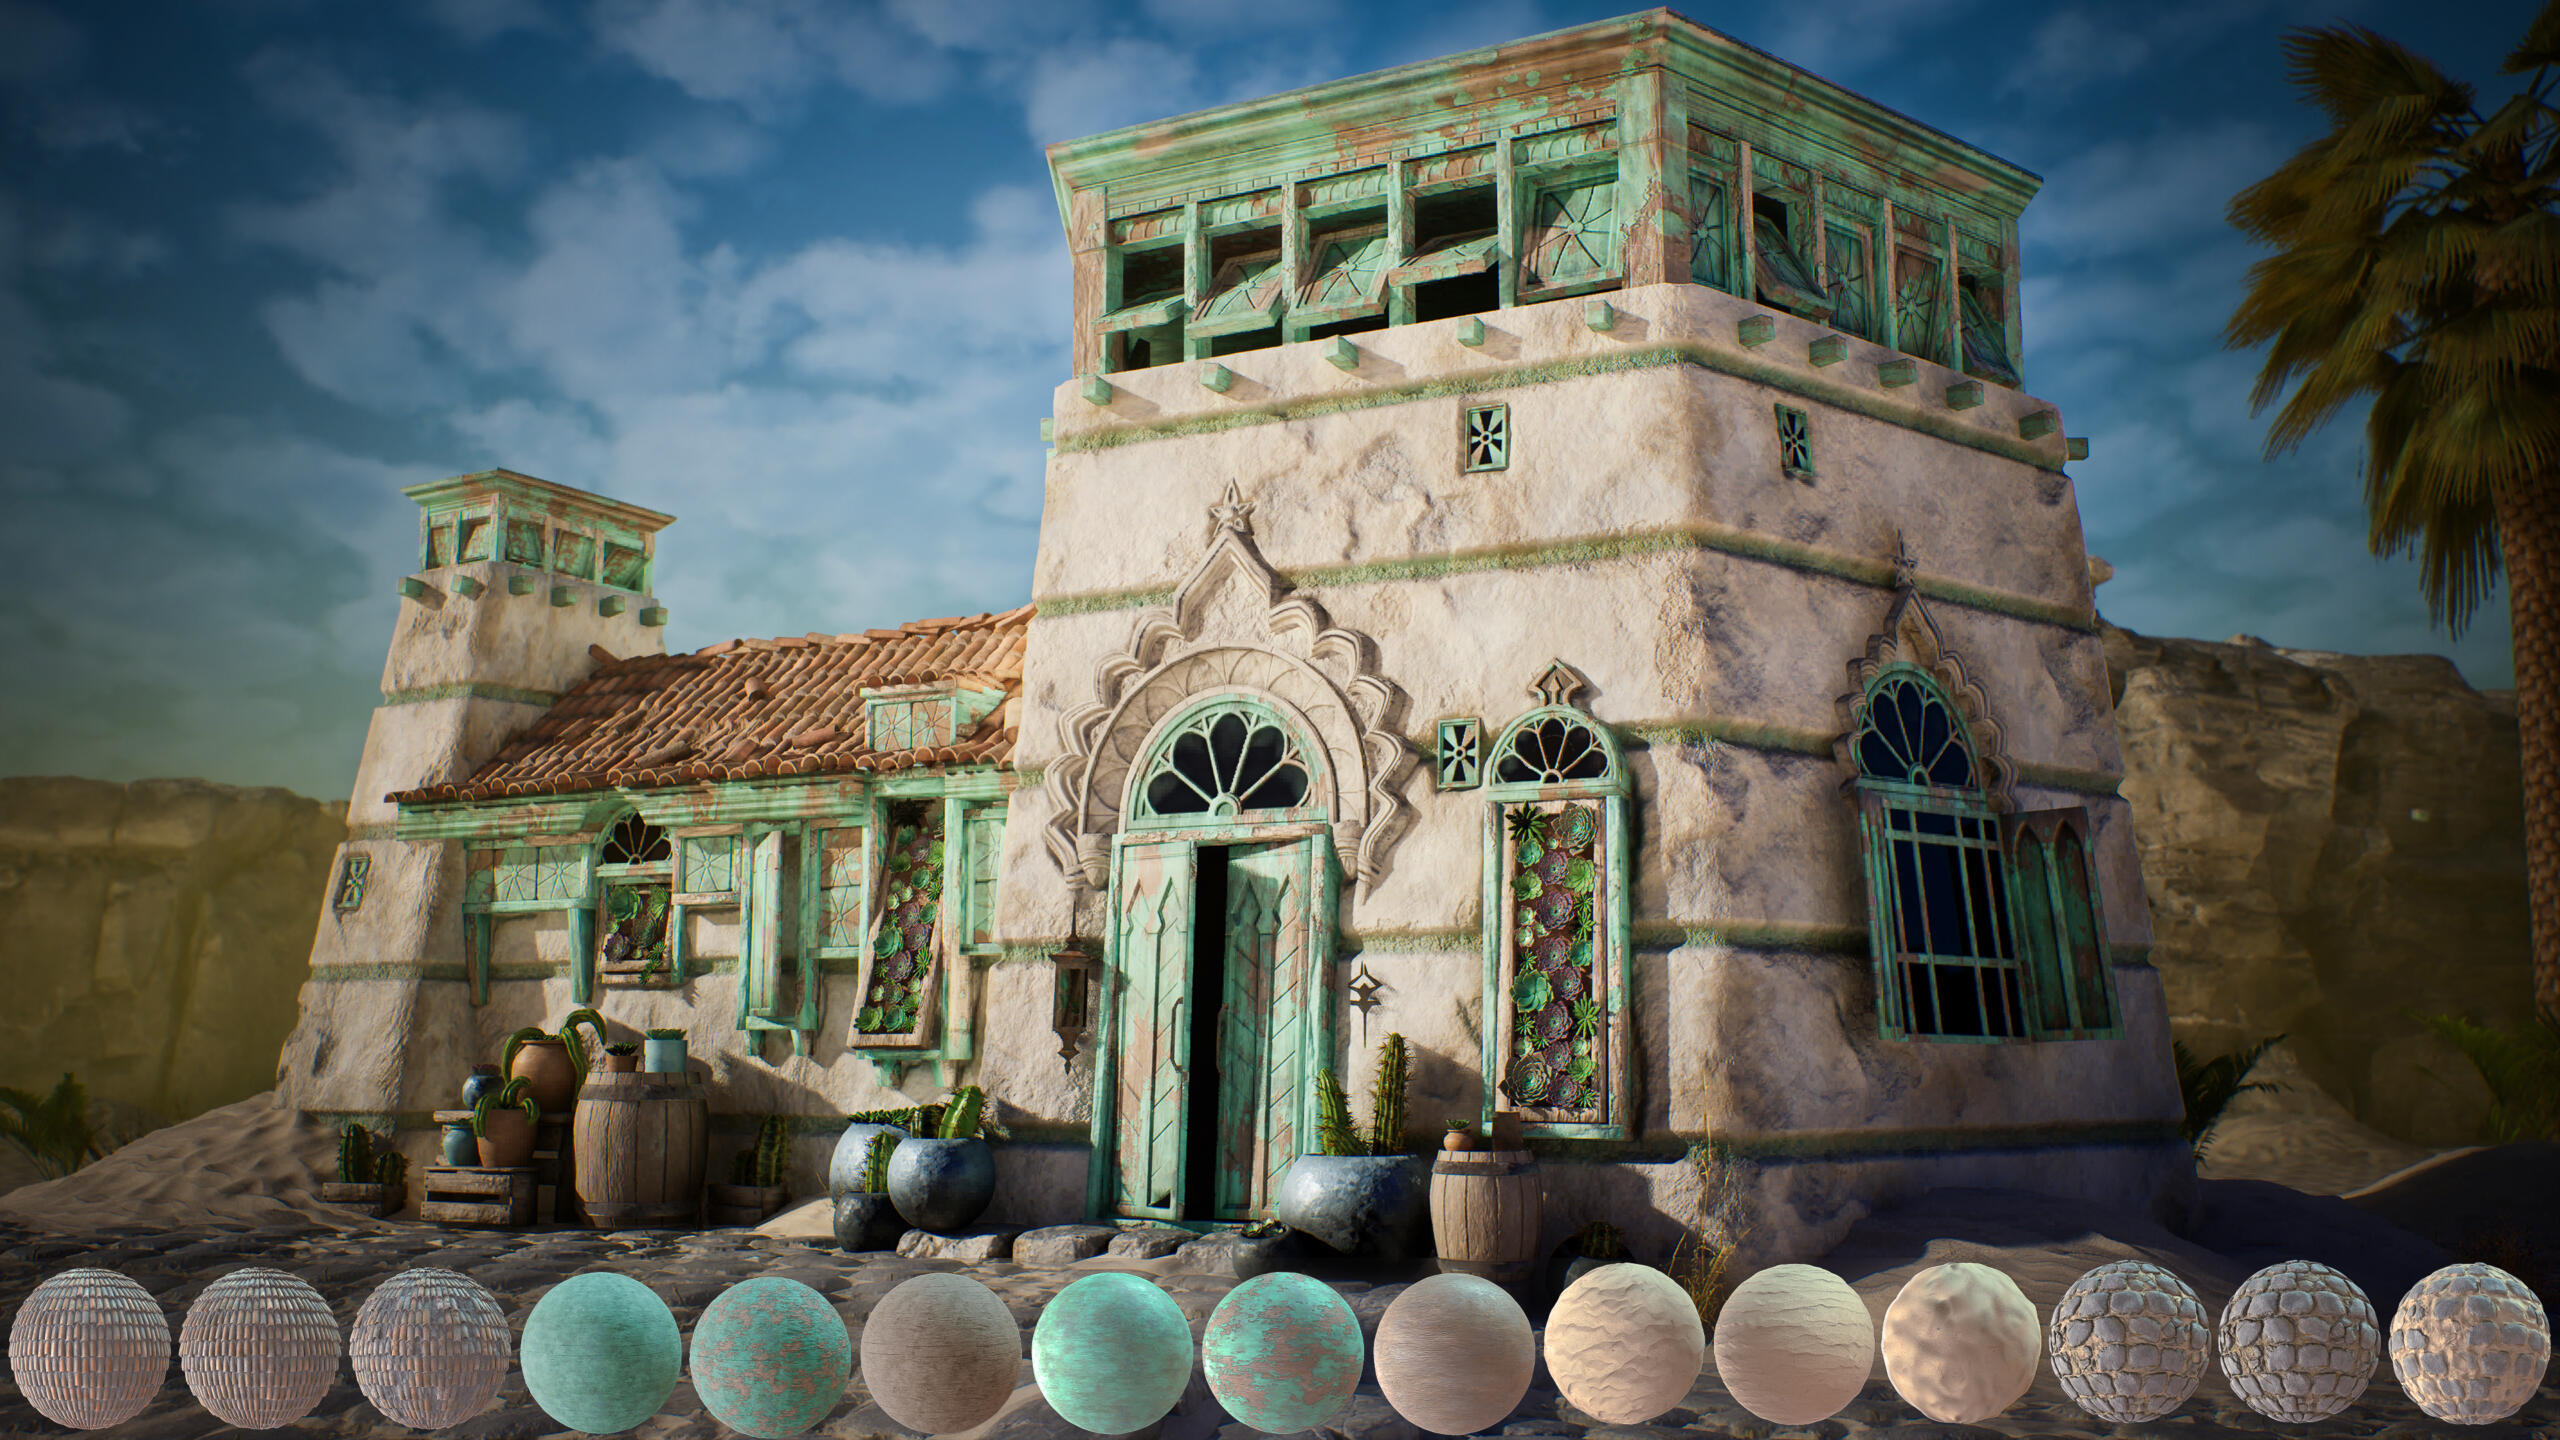
When I began the Sunstone Villa project, the goal wasn’t to create another “good-looking” material.
Most of my previous portfolio pieces leaned heavily on high-frequency detail, aggressive height information, and strong standalone presentation renders. They looked impressive in isolation, but they weren’t built to coexist. Tiling wasn’t always invisible. Blending wasn’t always considered. And more importantly, they weren’t designed as part of a larger, functional system.
With this mentorship, I wanted to shift my thinking from hero material creation to production material design. Sunstone Villa became that turning point.
Establishing Scale: Texel Density & Trim Planning
I placed a character into the scene and worked in real-world centimeters. Scale was non-negotiable.
The trims were planned using a 200cm reference mapped to a 2K texture, roughly ~1024px per meter. This became the baseline for the entire project. Every trim, every tileable surface adhered to that density. Consistency here was critical. If one surface deviates, the illusion breaks.
Rather than packing every trim into a single massive 8K atlas, I separated variations into controlled atlases (clean, chipped, broken). A single oversized atlas would have increased cost unnecessarily and reduced flexibility. The goal wasn’t to maximize resolution; it was to maintain scalable efficiency.
I treated trims as architectural components, not decorative strips.
Building a Shared Material Core
The 18 materials were not isolated graphs. At the core of the project was a centralized base material in Substance Designer. This base is defined:
- Shared noise logic
- Height structure
- Roughness behavior
- Color parameter controls
- Mask logic for material separation
Individual trims and tileables referenced this shared backbone. If I modified the wood tone at the source, every related asset updated accordingly. That level of cohesion wasn’t just aesthetic; it made iteration controlled and predictable.
Height logic and masking were inherited as well. This became particularly important when separating metallic and non-metallic zones within complex trims. Even when materials were visually blended, physically incorrect interactions were prevented through mask discipline.
This wasn’t 18 materials. It was one system with multiple expressions.
Height Discipline & Controlled Blending
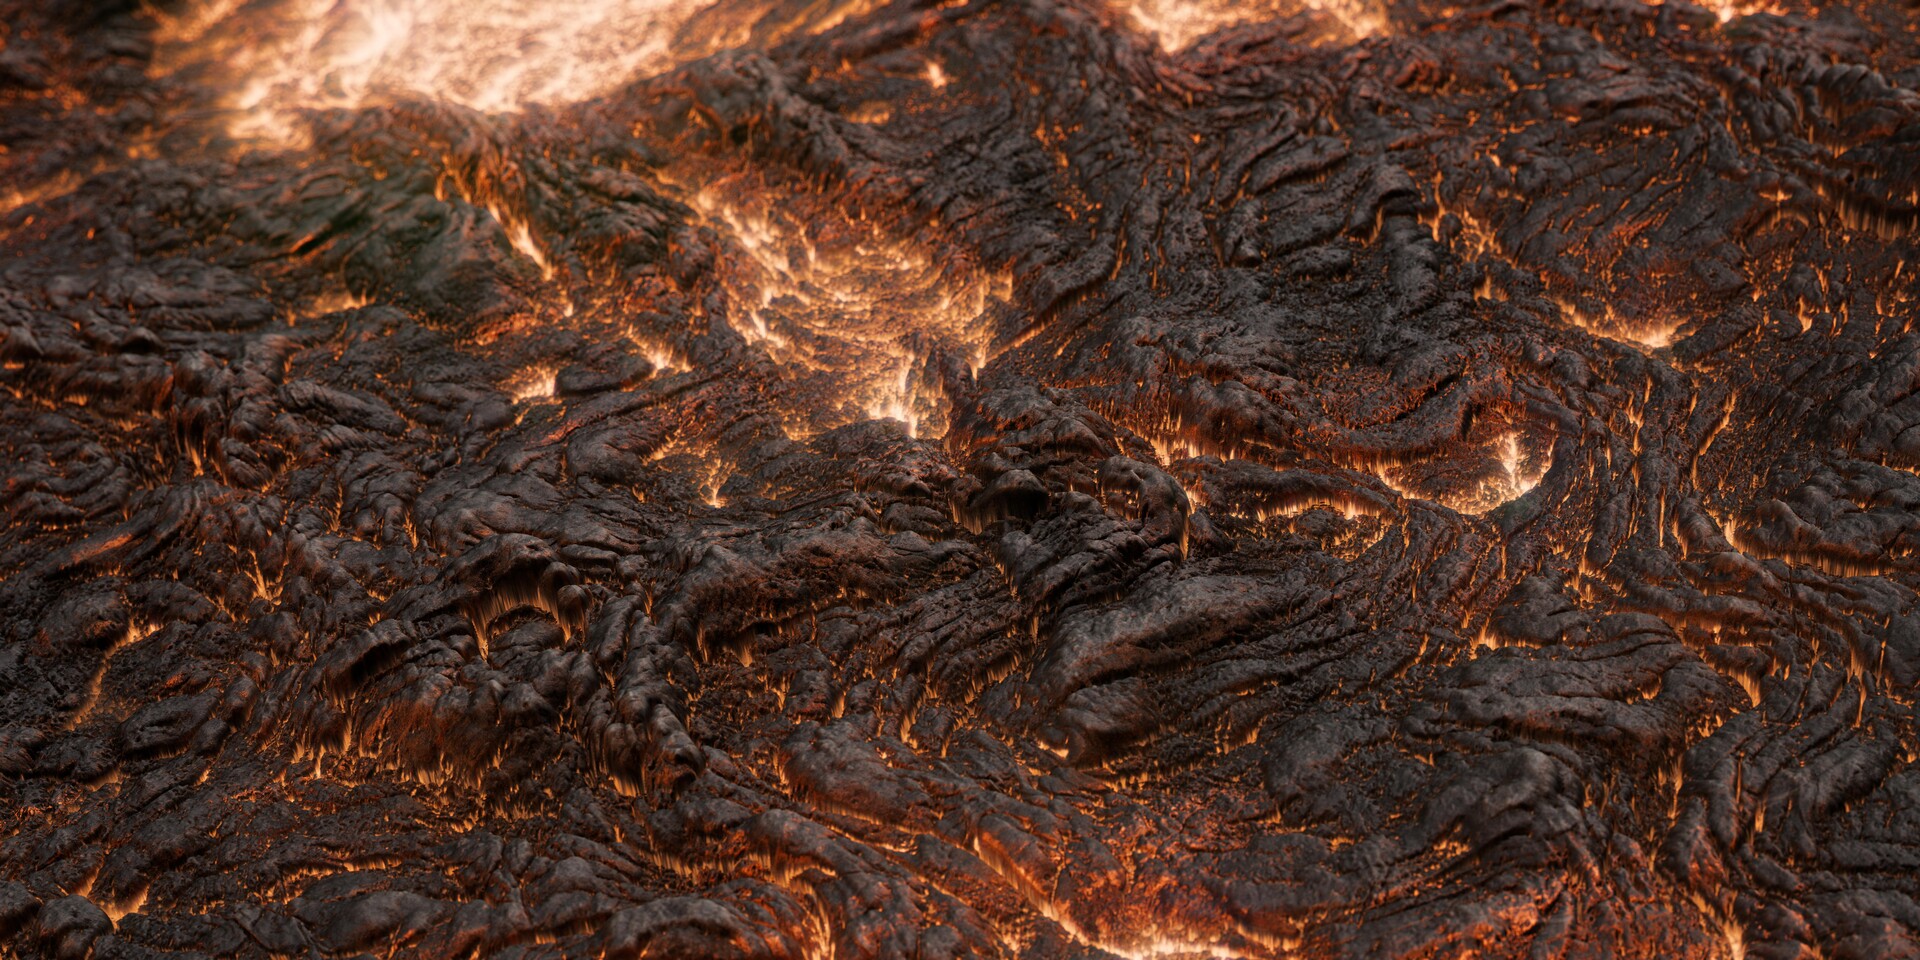
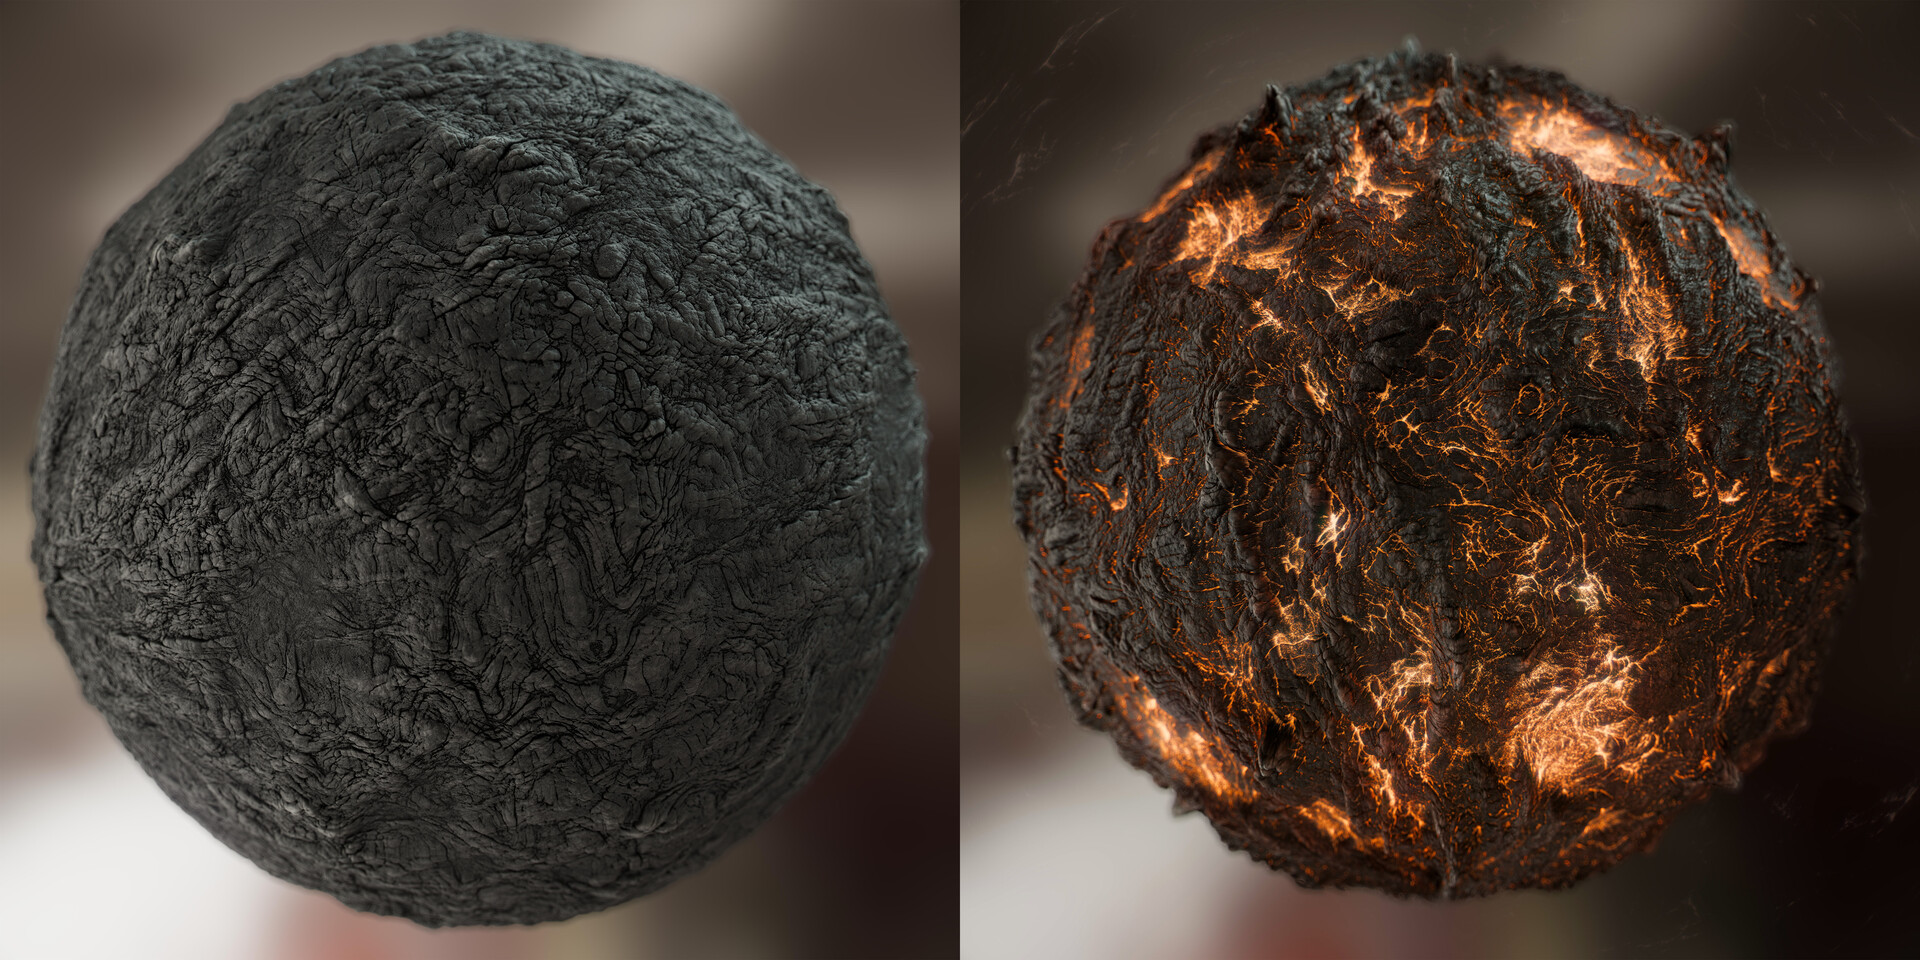
One of the biggest mindset shifts for me was treating height as structural data rather than decorative detail.
In previous projects, exaggerated height often drove visual appeal. Here, height had to serve blending.
All materials were normalized within controlled depth ranges to ensure that vertex blending in Unreal behaved predictably. I used height-based blending rather than simple Lerp to preserve surface credibility across transitions.
The degradation system was structured across three states:
- Clean
- Chipped
- Broken
Each state was controlled through RGB vertex channels. Instead of creating separate materials, I created material states. The shader remained instance-friendly, and transitions remained controlled.
Small centimeter-level corrections in height prevented surface popping and ensured believable layering, especially across roof tiles and stone intersections.
The objective wasn’t dramatic depth. It was a controlled interaction.
Procedural Asset Generation as a Scalability Strategy
Procedural Rock Generator
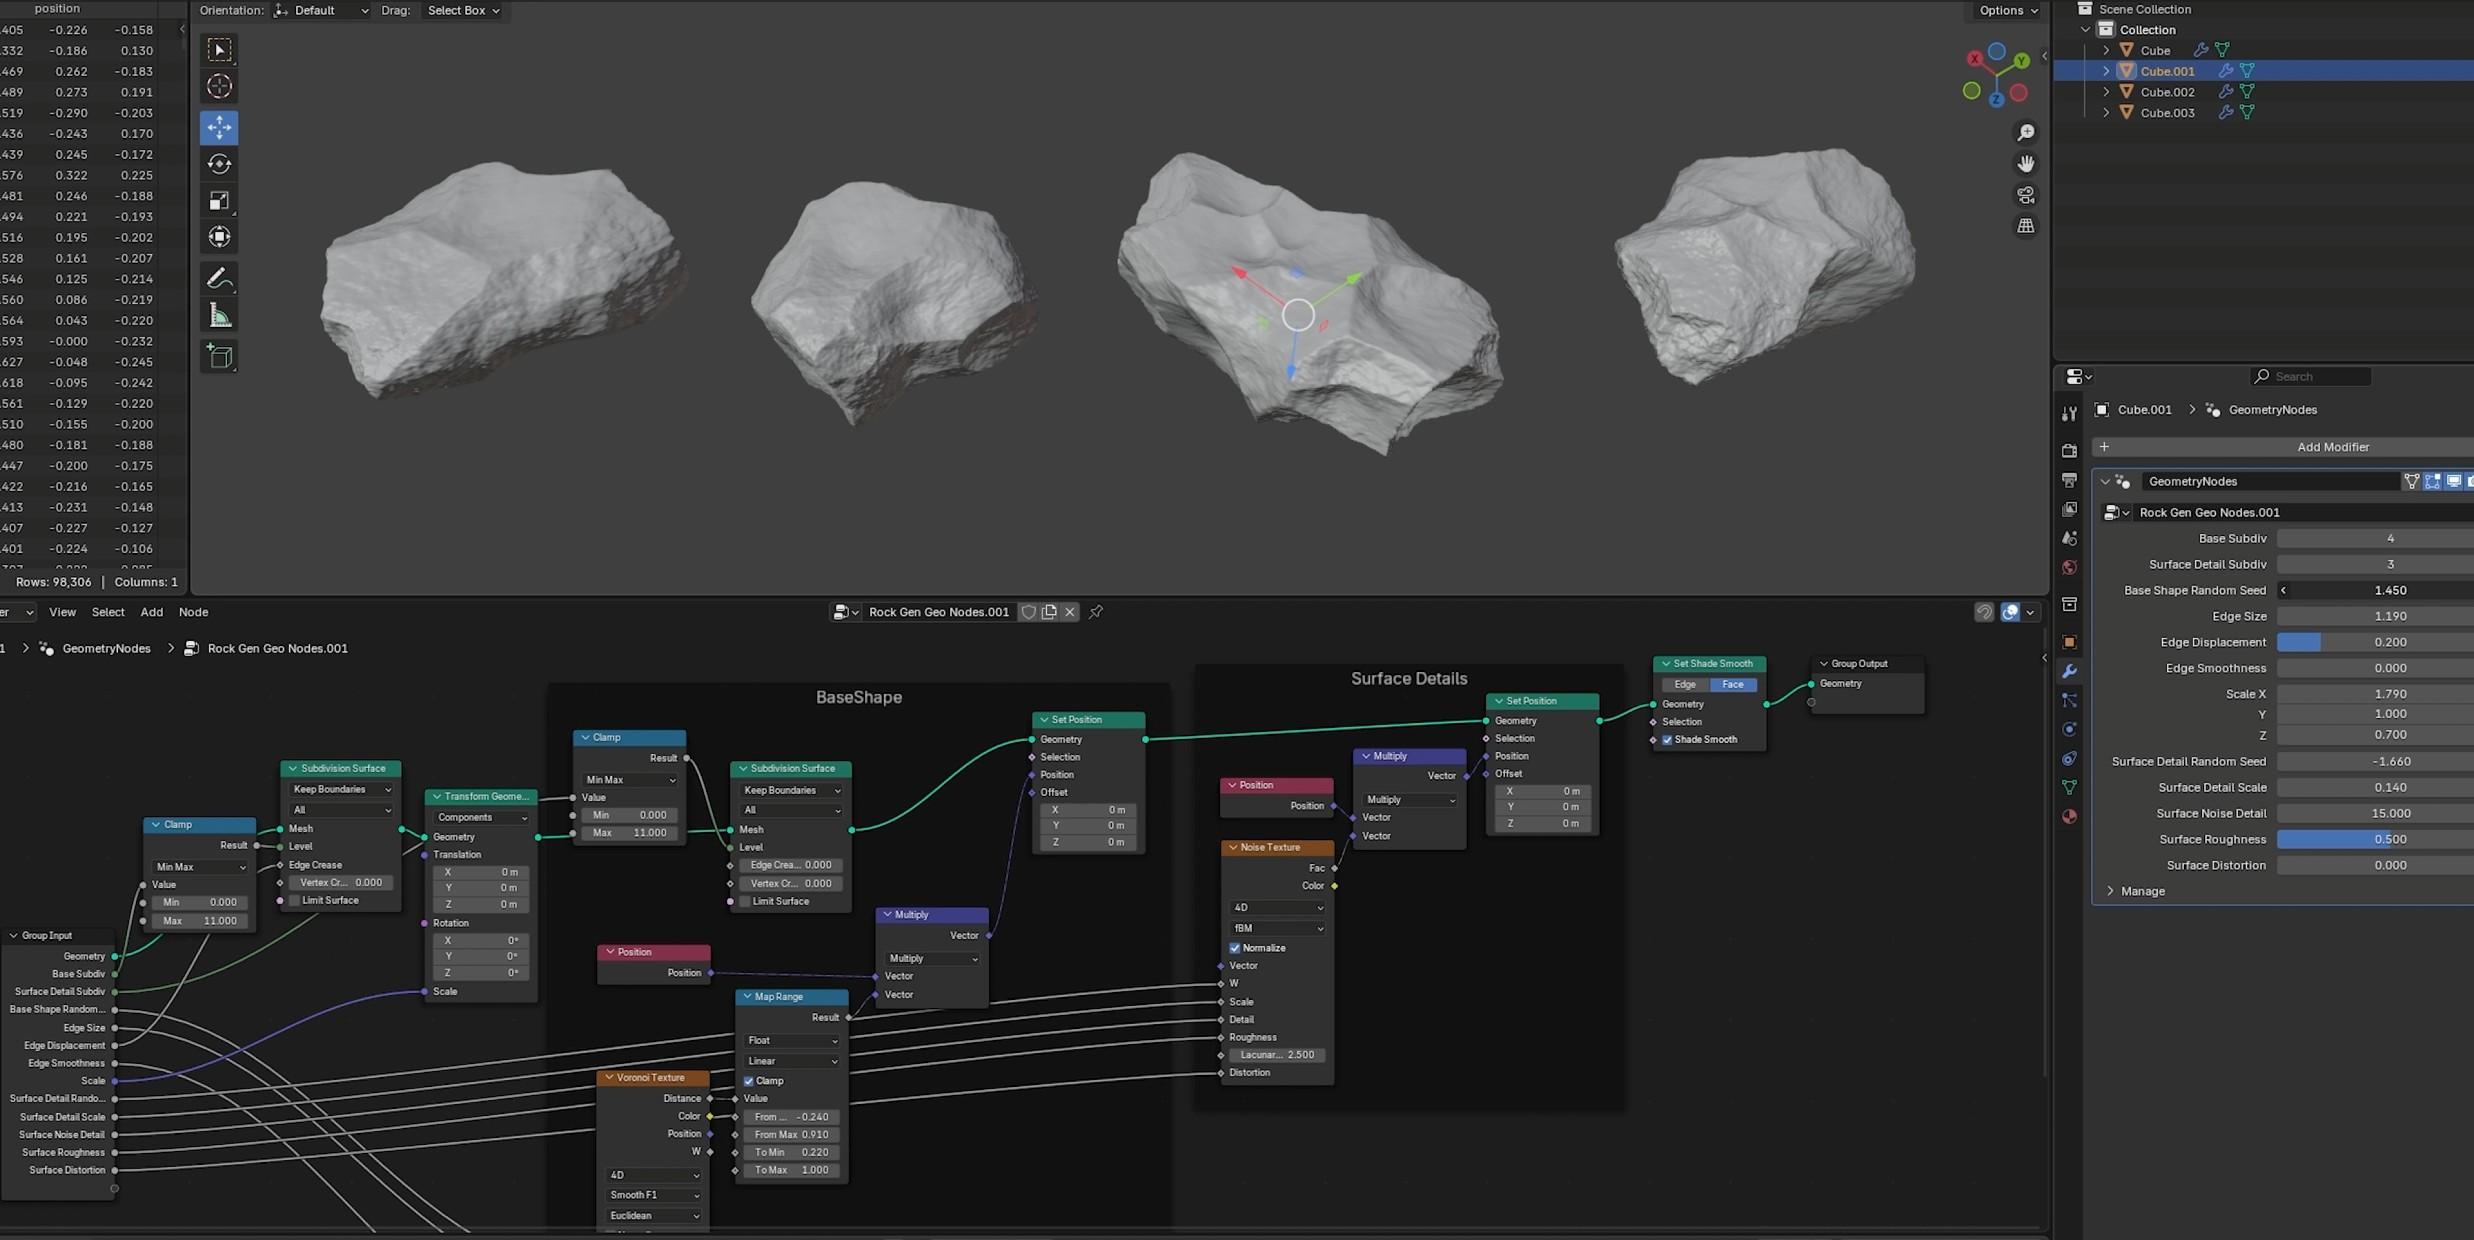
Coming from an engineering mindset, I naturally gravitate toward procedural solutions. Therefore, I built a procedural rock asset generator in Blender.
The goal was simple:
Avoid manual sculpting while maintaining variation.
The system starts from a cube. Through controlled subdivisions and layered noise displacement, similar in logic to procedural height workflows, the cube transforms into a high-poly rock.
Key controls included:
- Noise frequency
- Falloff control
- Displacement strength
- Shape bias
Once satisfied with the high-poly output, I generated a reduced low-poly version from the same system. Both were baked in Painter, and the resulting normal information was merged with the rock material logic authored in Designer.
This workflow allowed me to:
- Produce multiple rock variations quickly
- Maintain visual cohesion through shared material logic
- Rely on instancing in-engine
- Increase environmental density without multiplying texture sets
Instead of sculpting five rocks manually, I built a tool that generated as many as I needed.
The one-day investment in building the generator paid off in scalability.
Cactus Generator

The cactus system followed a similar philosophy.
I created a curve-driven generator in Geometry Nodes that converted splines into meshes. A radial pattern was extruded along the path, and spikes were procedurally distributed along the circumference.
After that, generating variations became trivial.
Instead of sculpting five separate cacti, I generated them parametrically and relied on instancing inside Unreal to keep memory controlled. Roughly ten unique base meshes were sufficient to populate the environment convincingly.
Interestingly, I used Painter’s metal edge wear generator on the cactus surface to subtly accentuate ridges. It’s an unconventional approach for an organic asset, but it produced convincing micro-variation with minimal effort.
“Sometimes tools surprise you if you let them.”
Shader Architecture & Performance Considerations
All textures were authored at 2K resolution for consistency.
ORM packing was used to consolidate channels, and a master material handled multiple shading models through instancing. Height-based blending, controlled displacement, and vertex painting drove most surface transitions.
Shader complexity remained within acceptable ranges (green) throughout the scene.
In certain areas, I leveraged world-aligned or triplanar setups to avoid unnecessary UV scaling issues, particularly for logs and sand. This reduced manual UV management while keeping surfaces consistent.
I didn’t over-engineer the system, but I did ensure it was controlled.
Materials Deep Dive
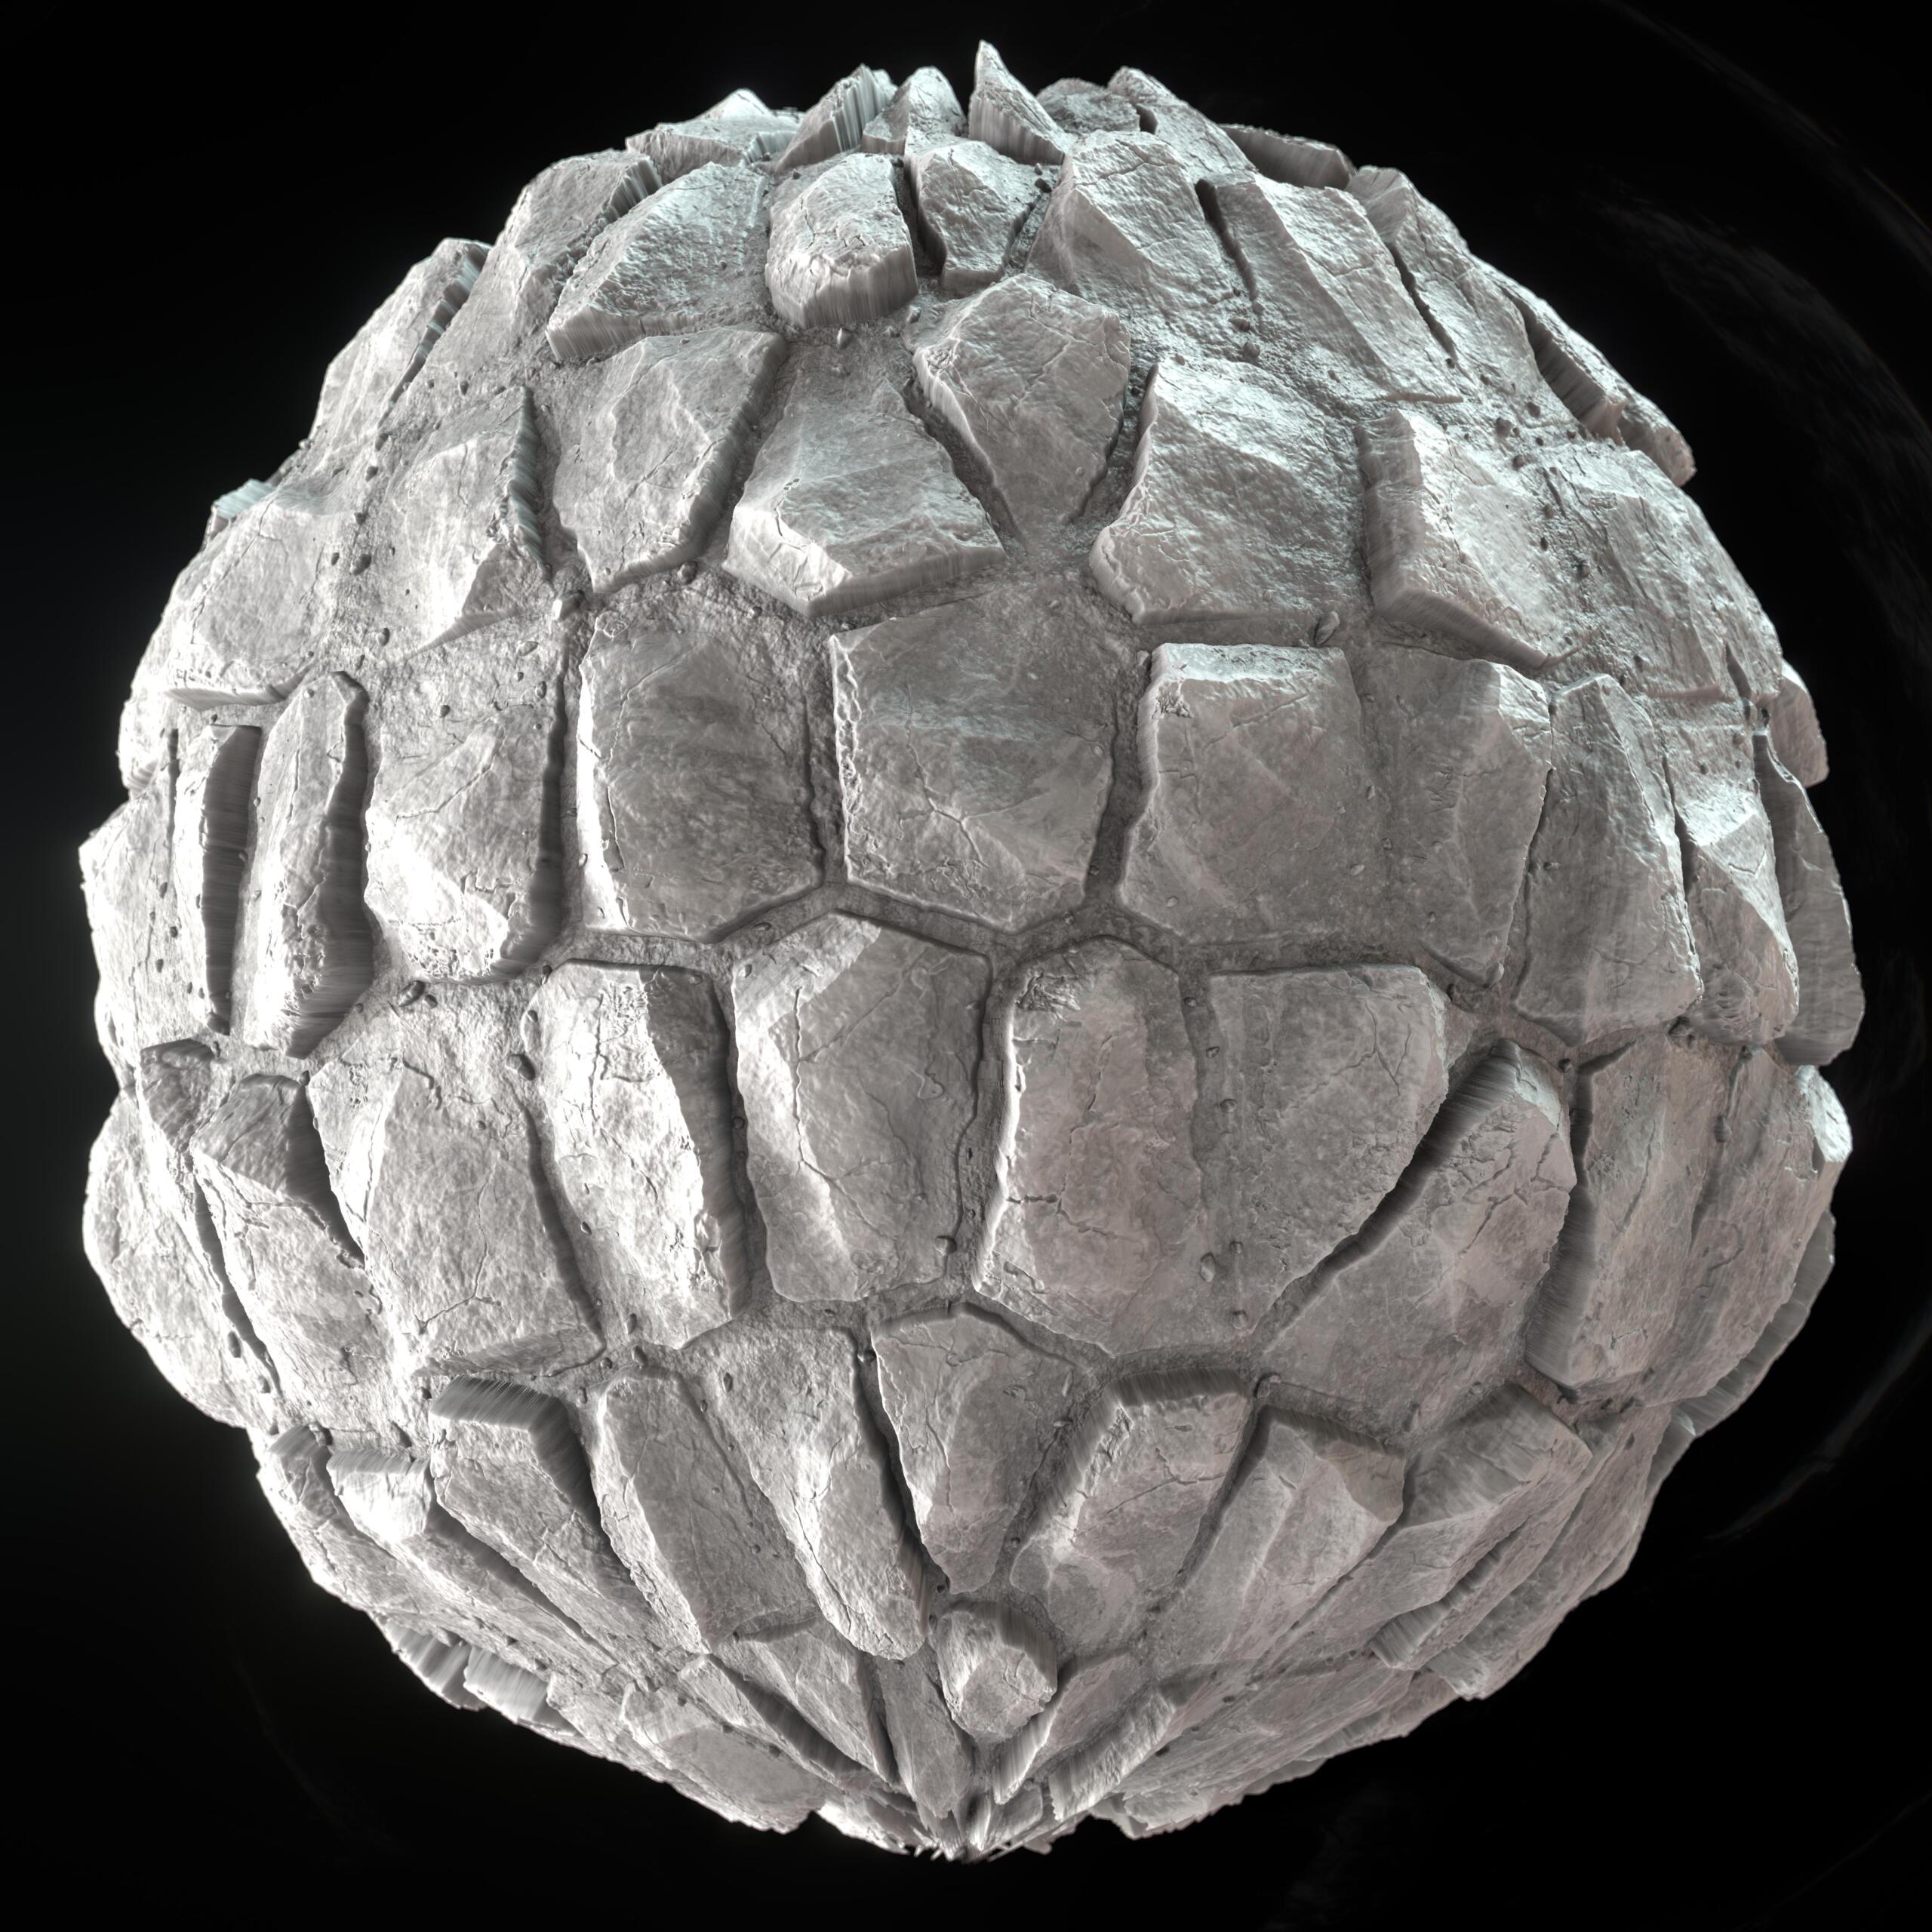
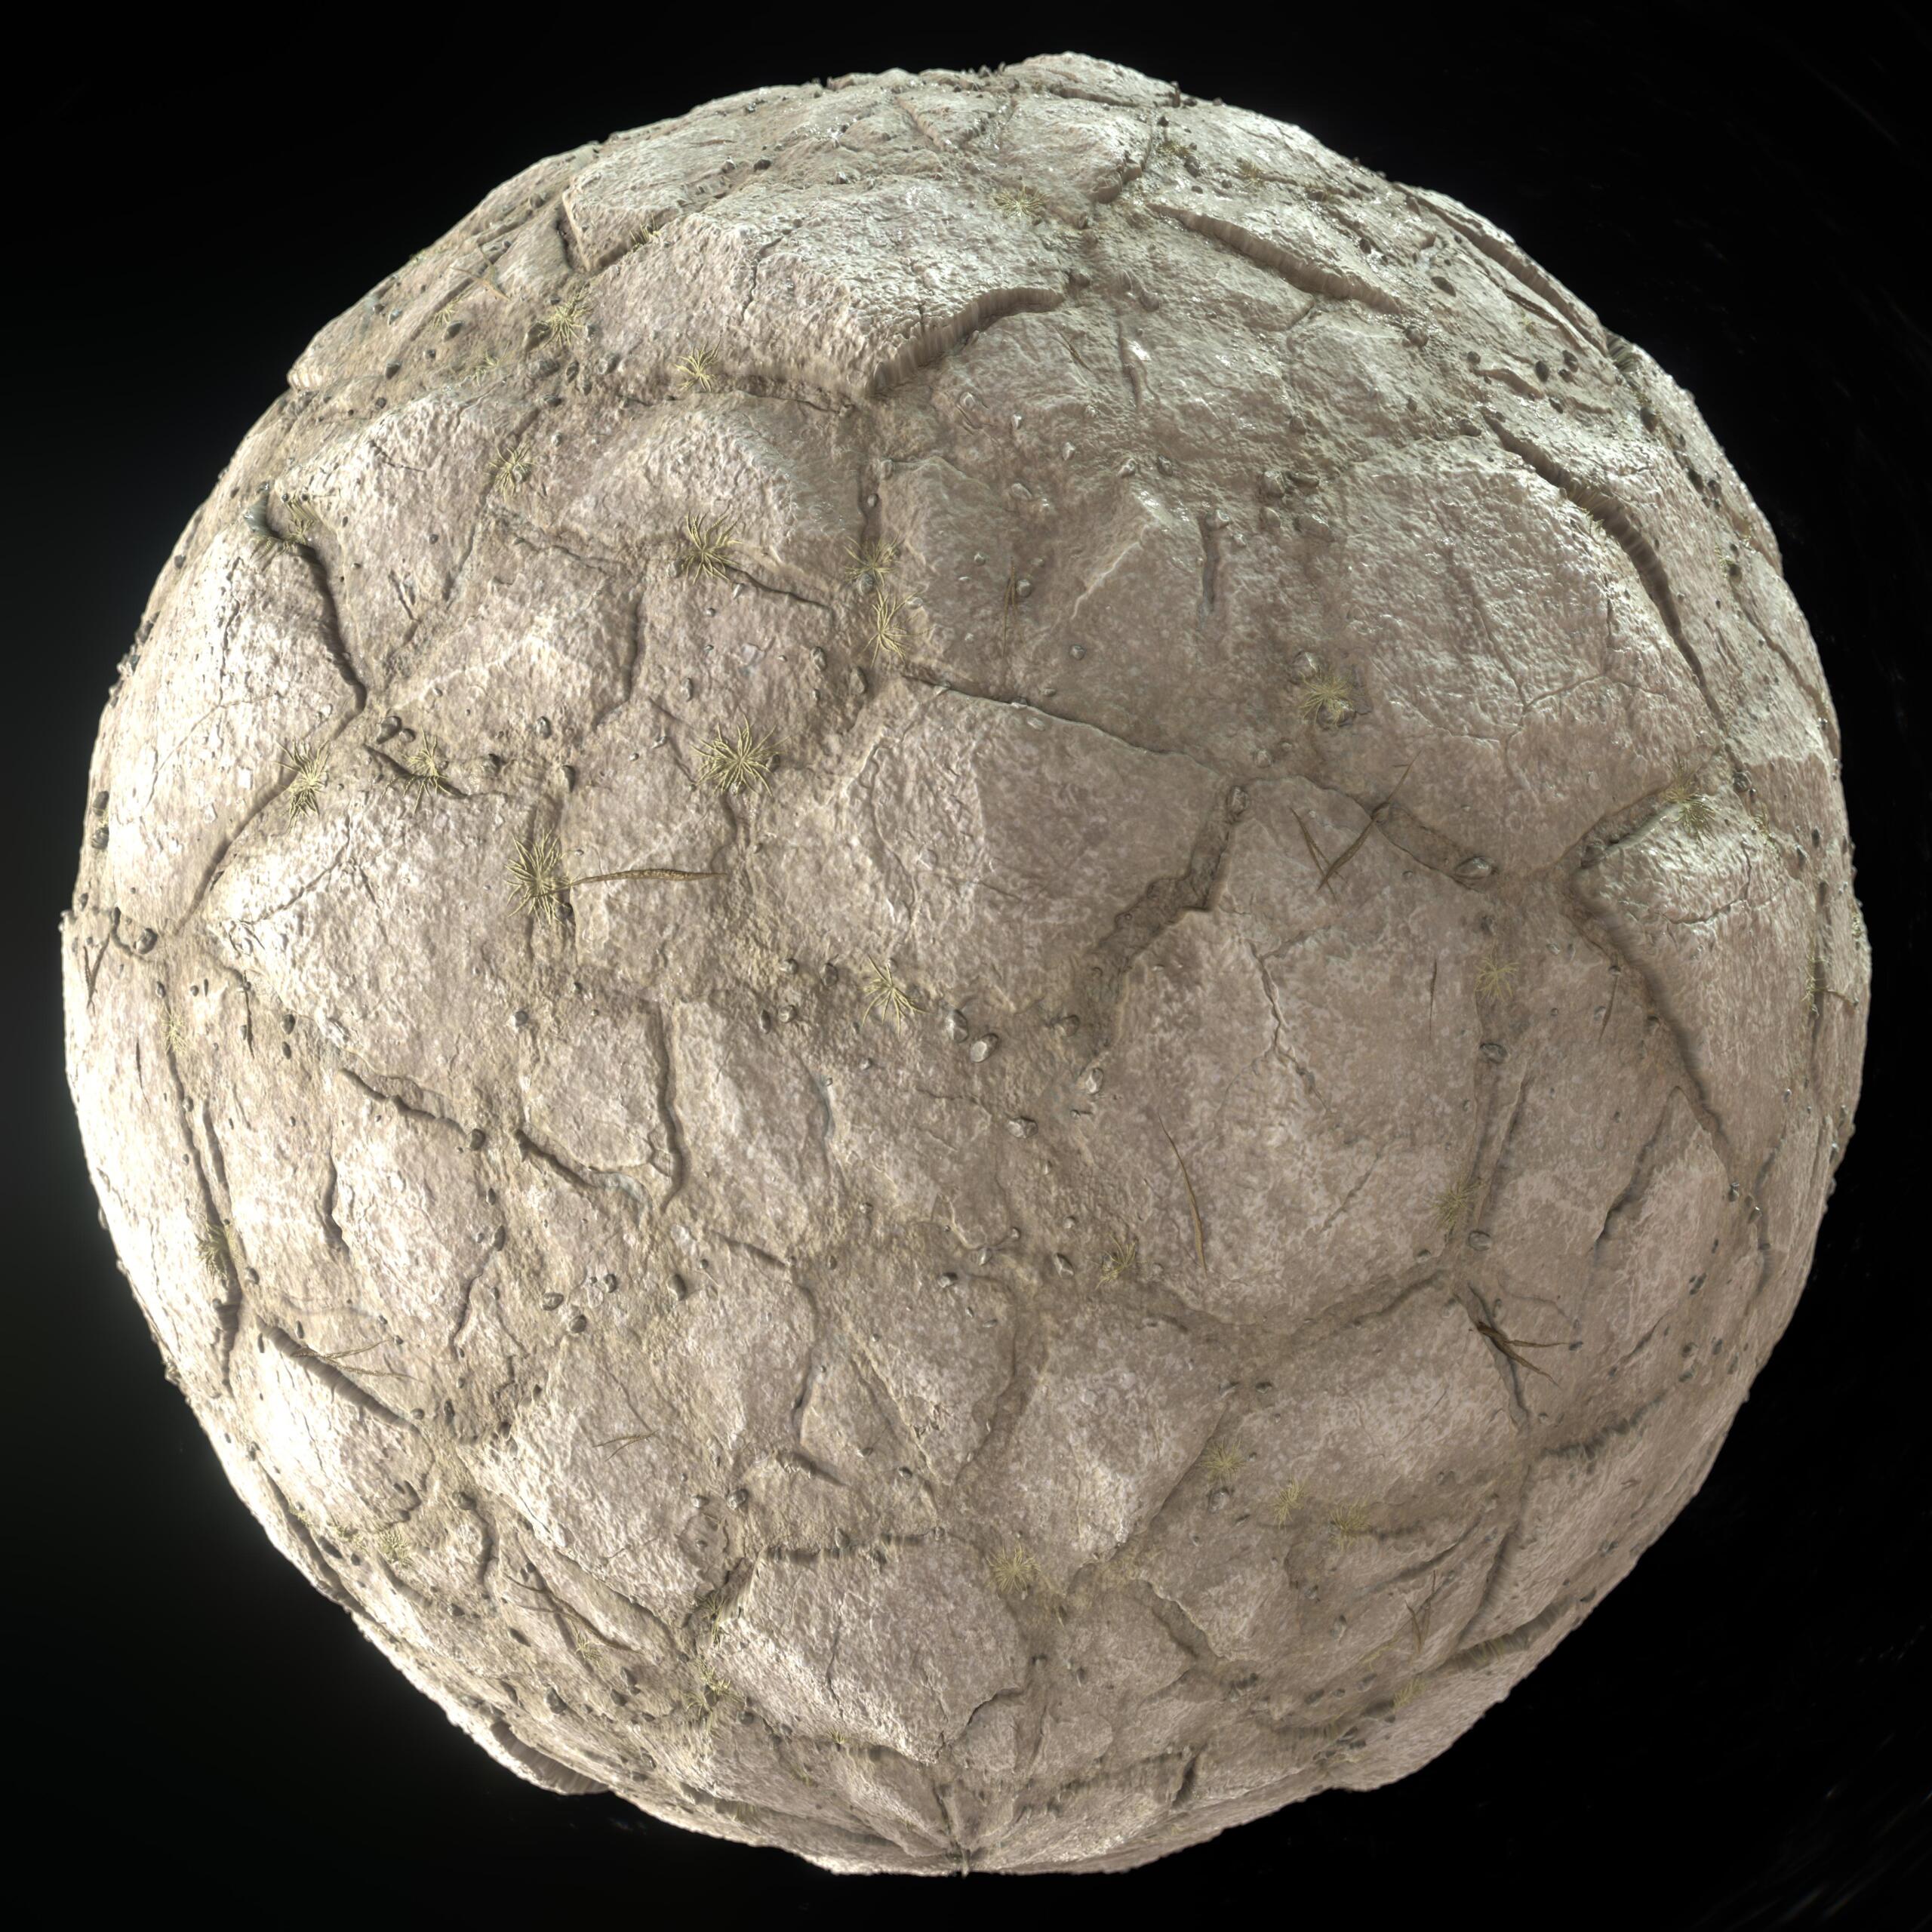
Roof Tiles: A Non-Destructive Variation System
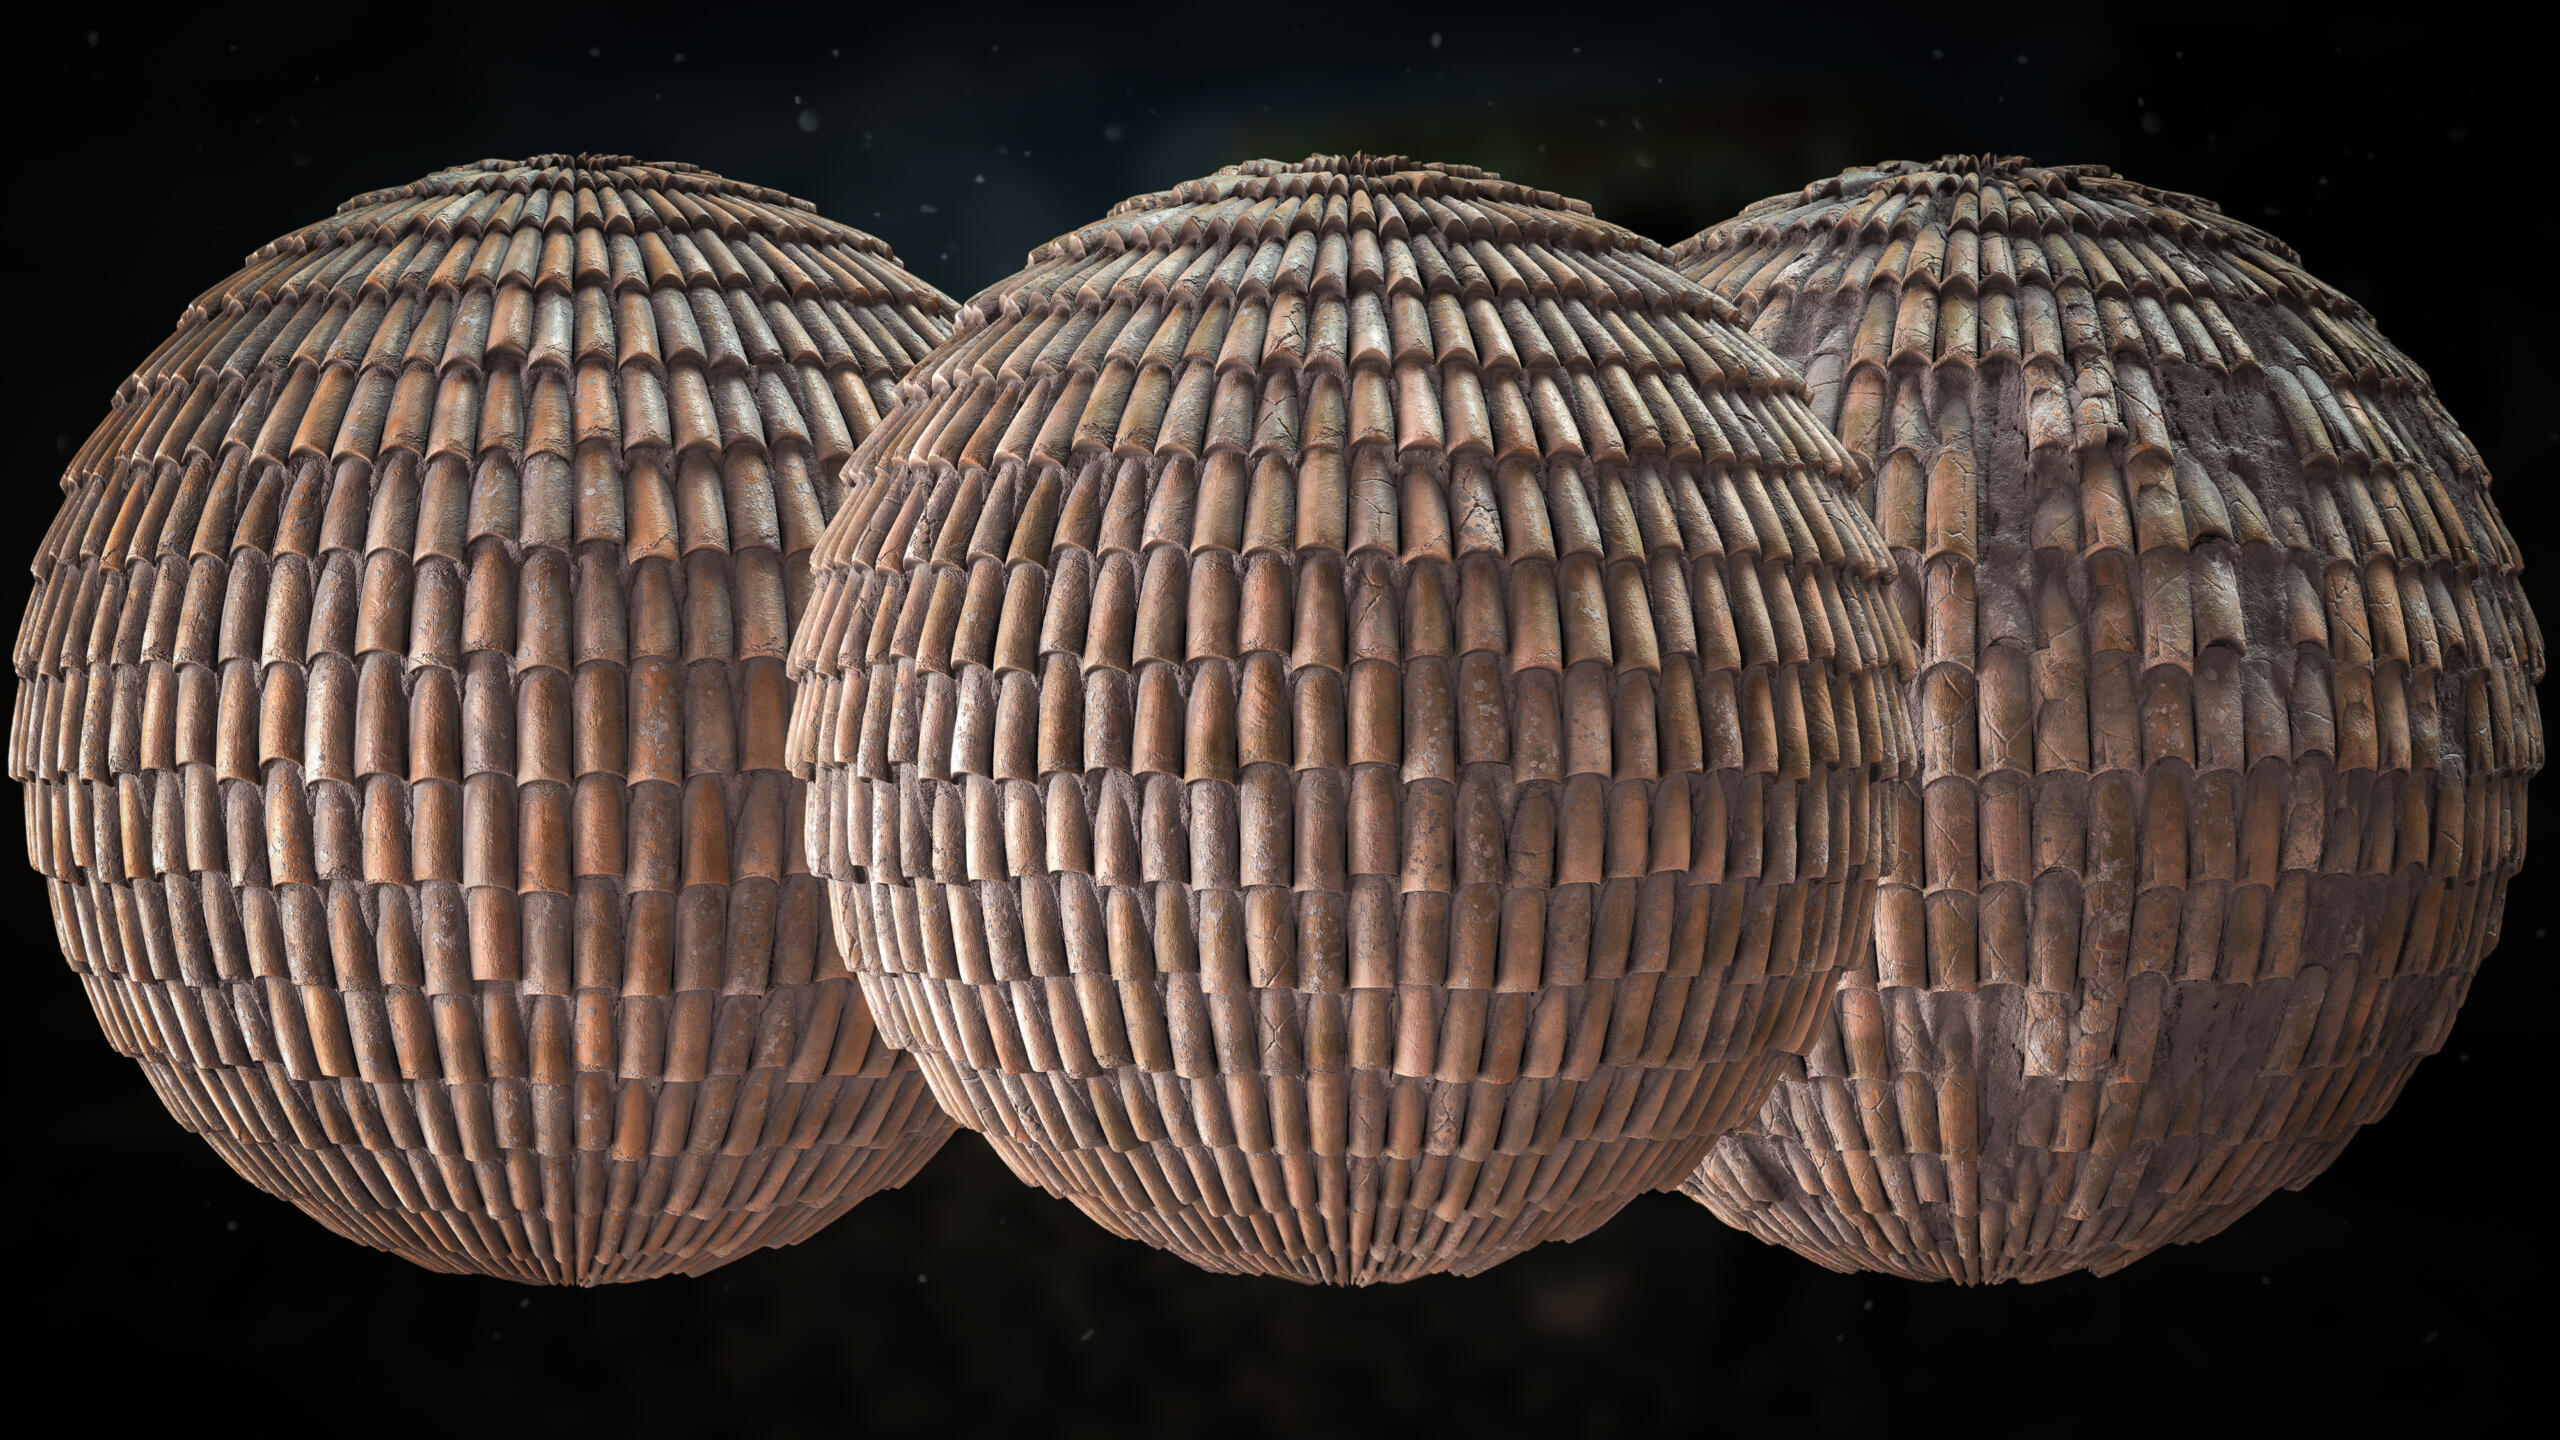
The roof tiles were built around a non-destructive philosophy.
Instead of sculpting multiple versions manually, I created a roof profile, a base shape defining a single tile’s cross-section. This approach was inspired by techniques often demonstrated in procedural workflows.
From that profile, I built two key components:
- A roof profile node defining base geometry
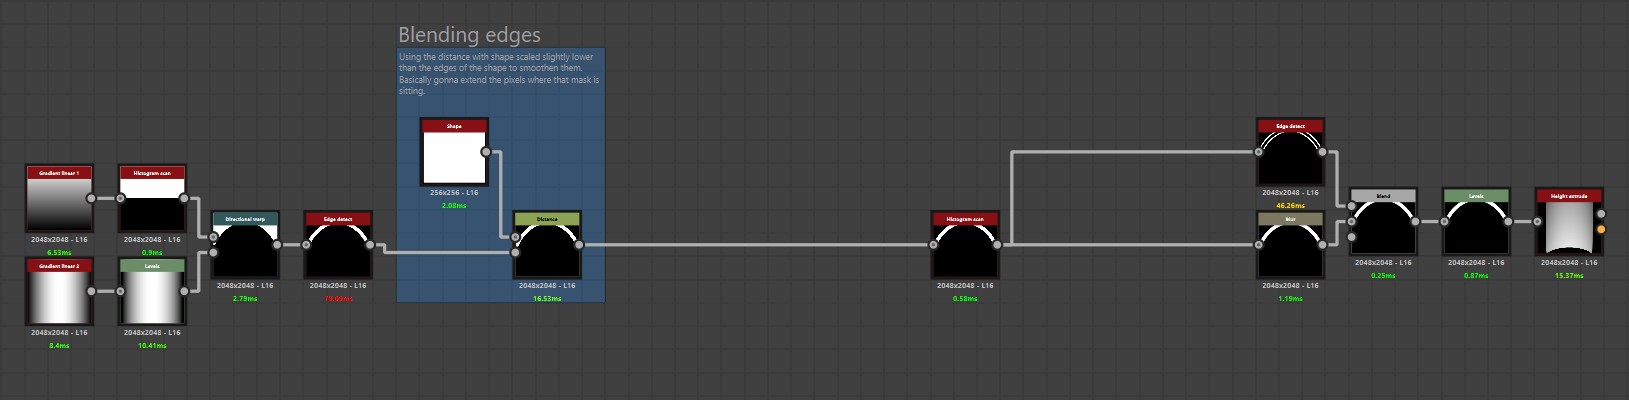
- A custom tile breaker node controlling crack patterns and fragmentation
These were chained together so that cracks were always derived from the original form.
This meant:
- If I adjusted the tile curvature later, all crack logic updated automatically.
- If I wanted a different roof style, I could modify the base profile without rebuilding damage.
The result was a non-destructive system capable of producing:
- Clean tiles
- Chipped variations
- Fully broken versions
All while maintaining structural consistency.
Rather than baking damage permanently into geometry, I treated damage as a parametric layer.
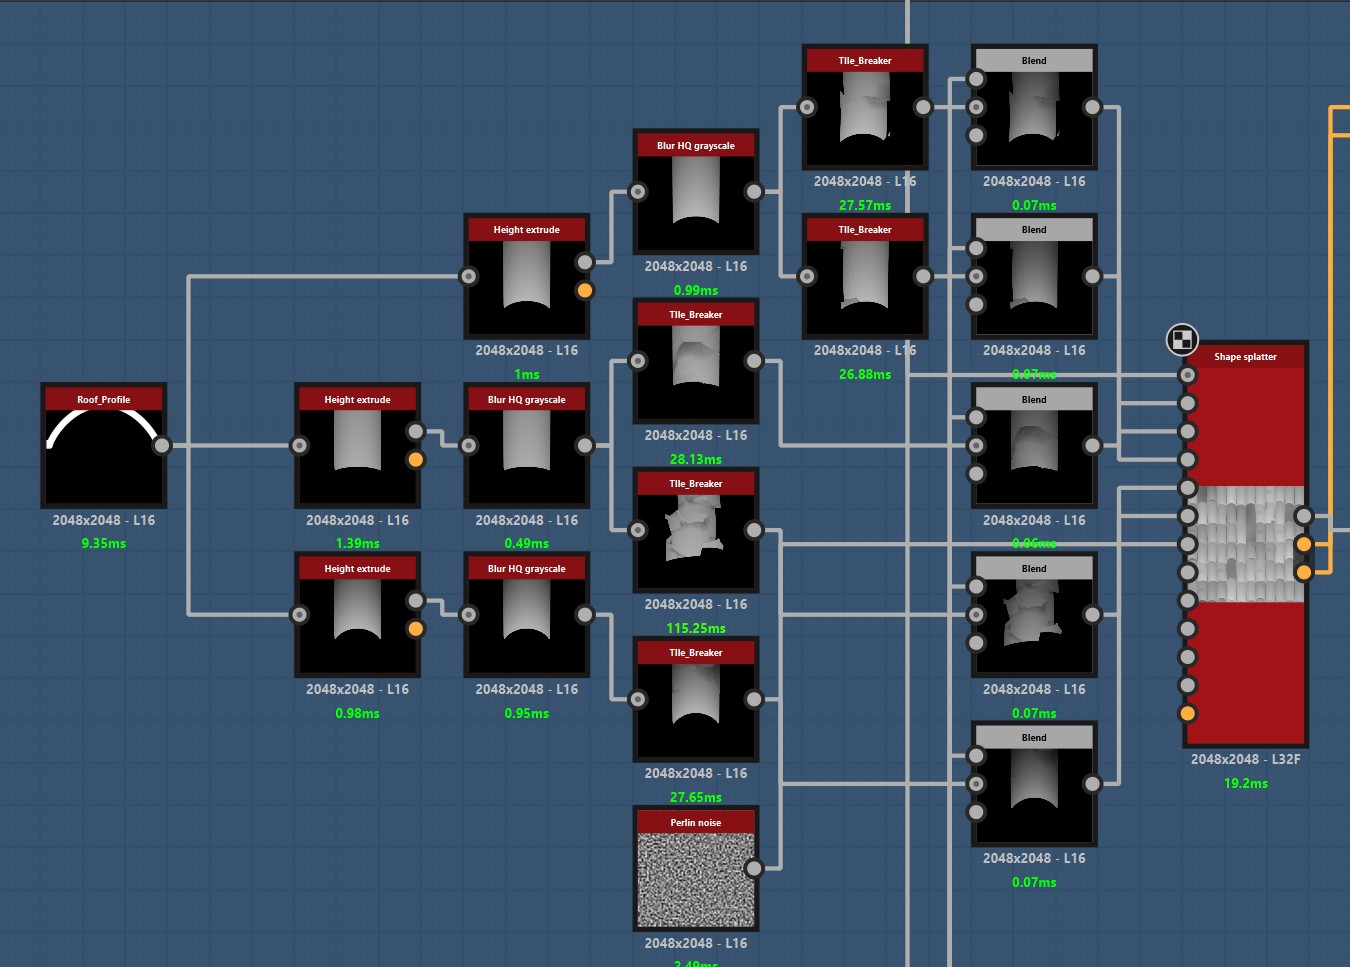
That flexibility mirrors real production needs, art direction changes happen, and systems need to adapt without collapsing.
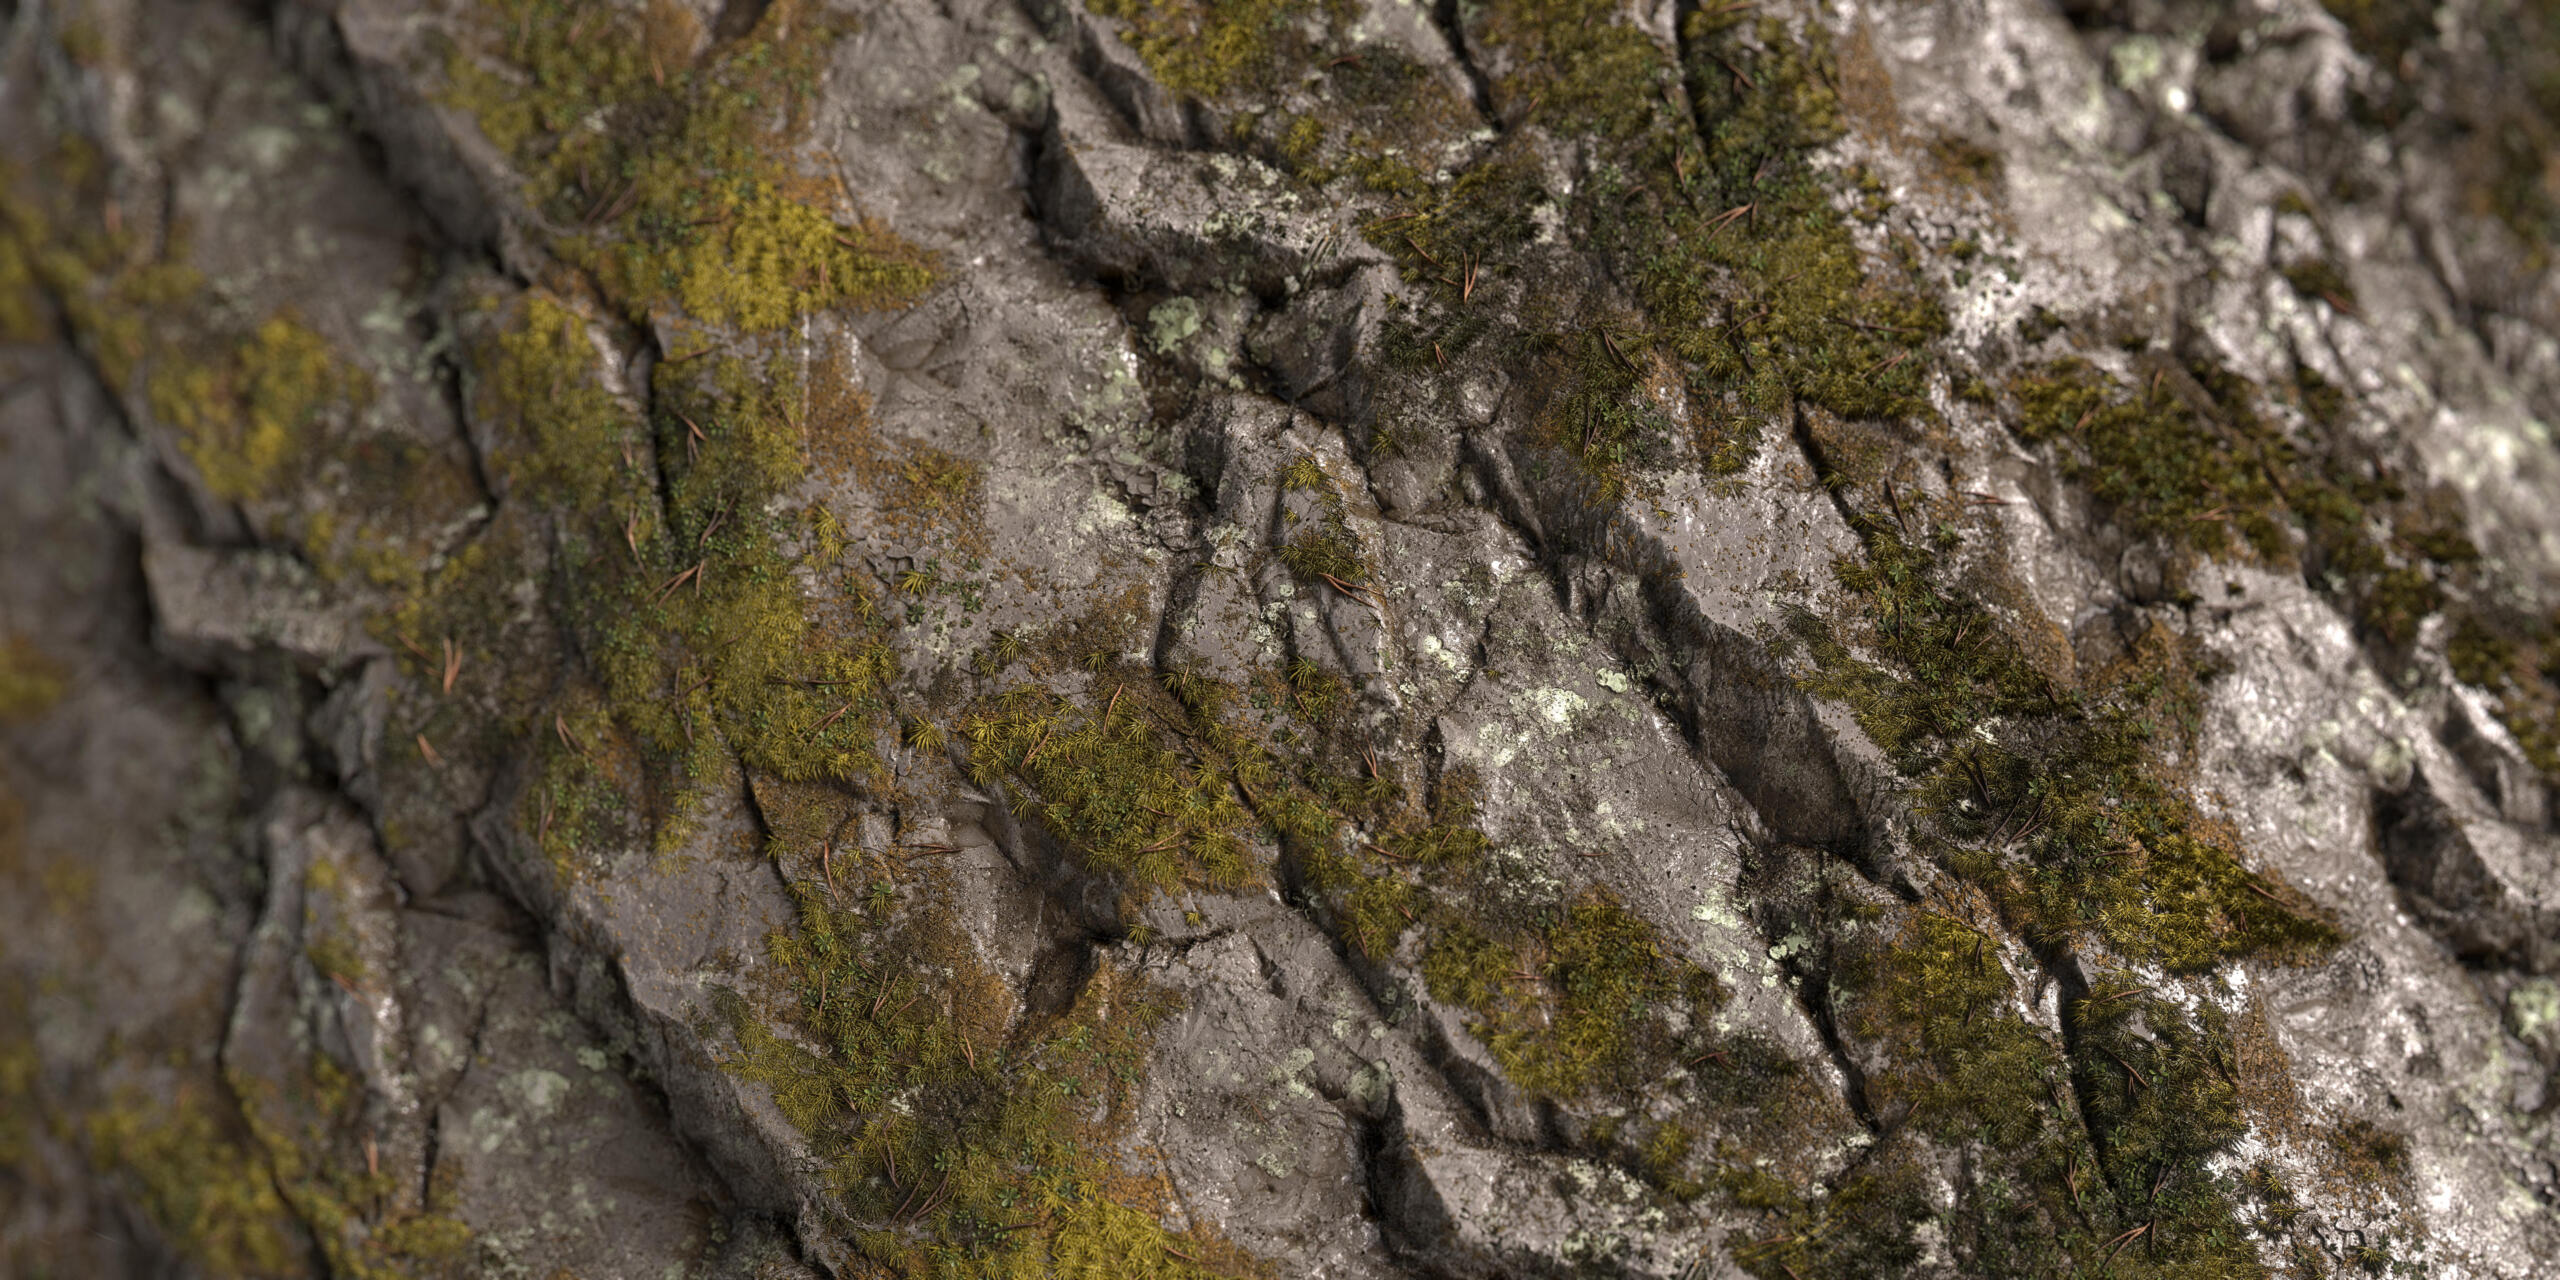
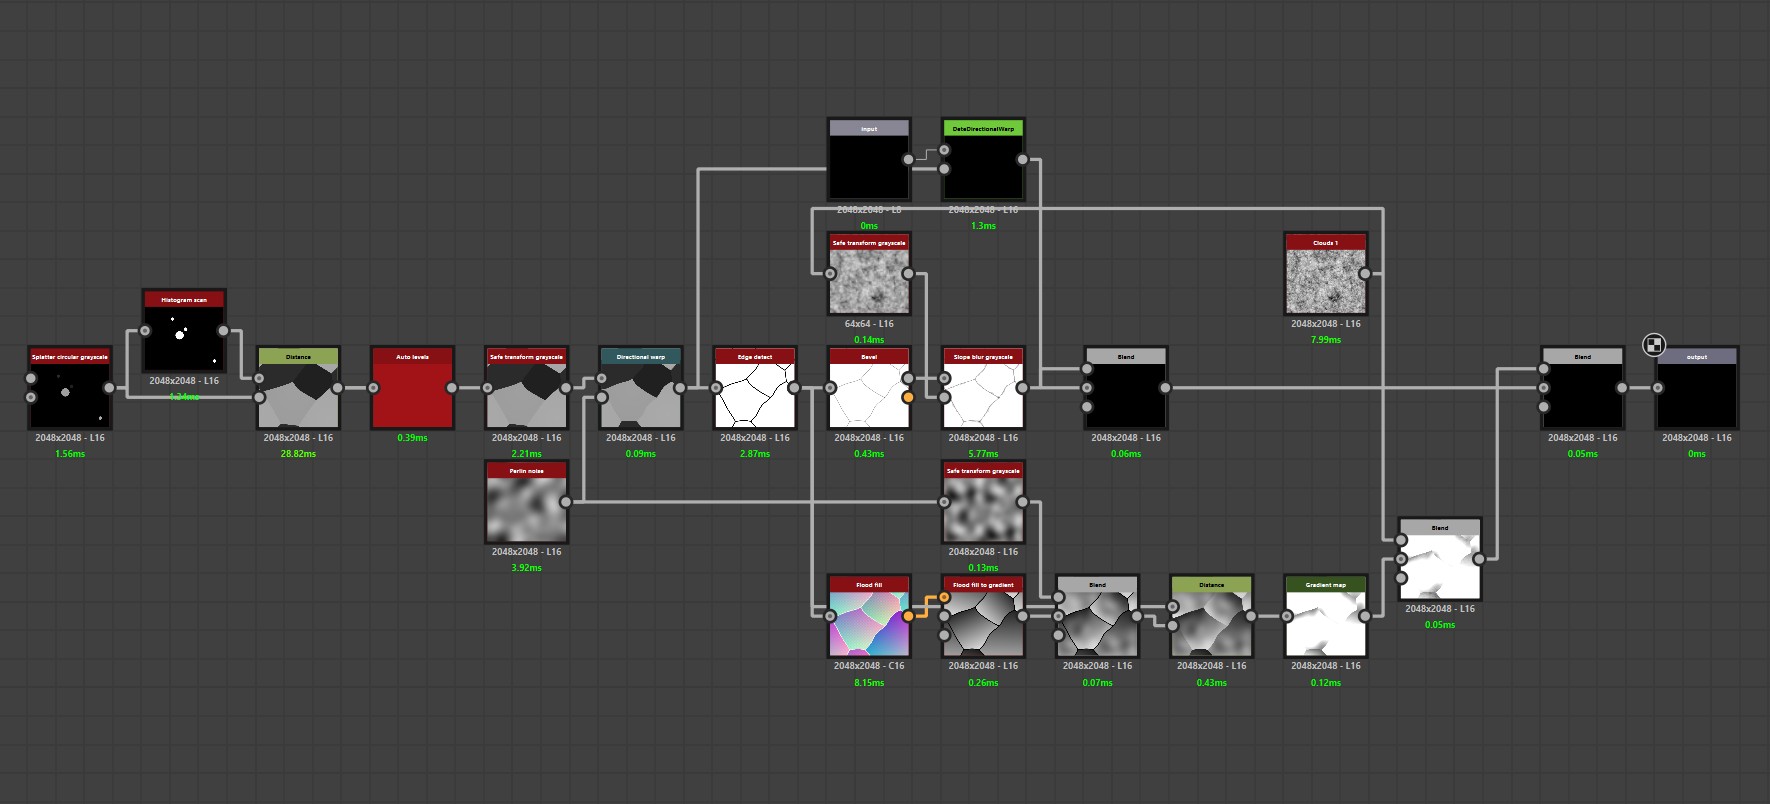
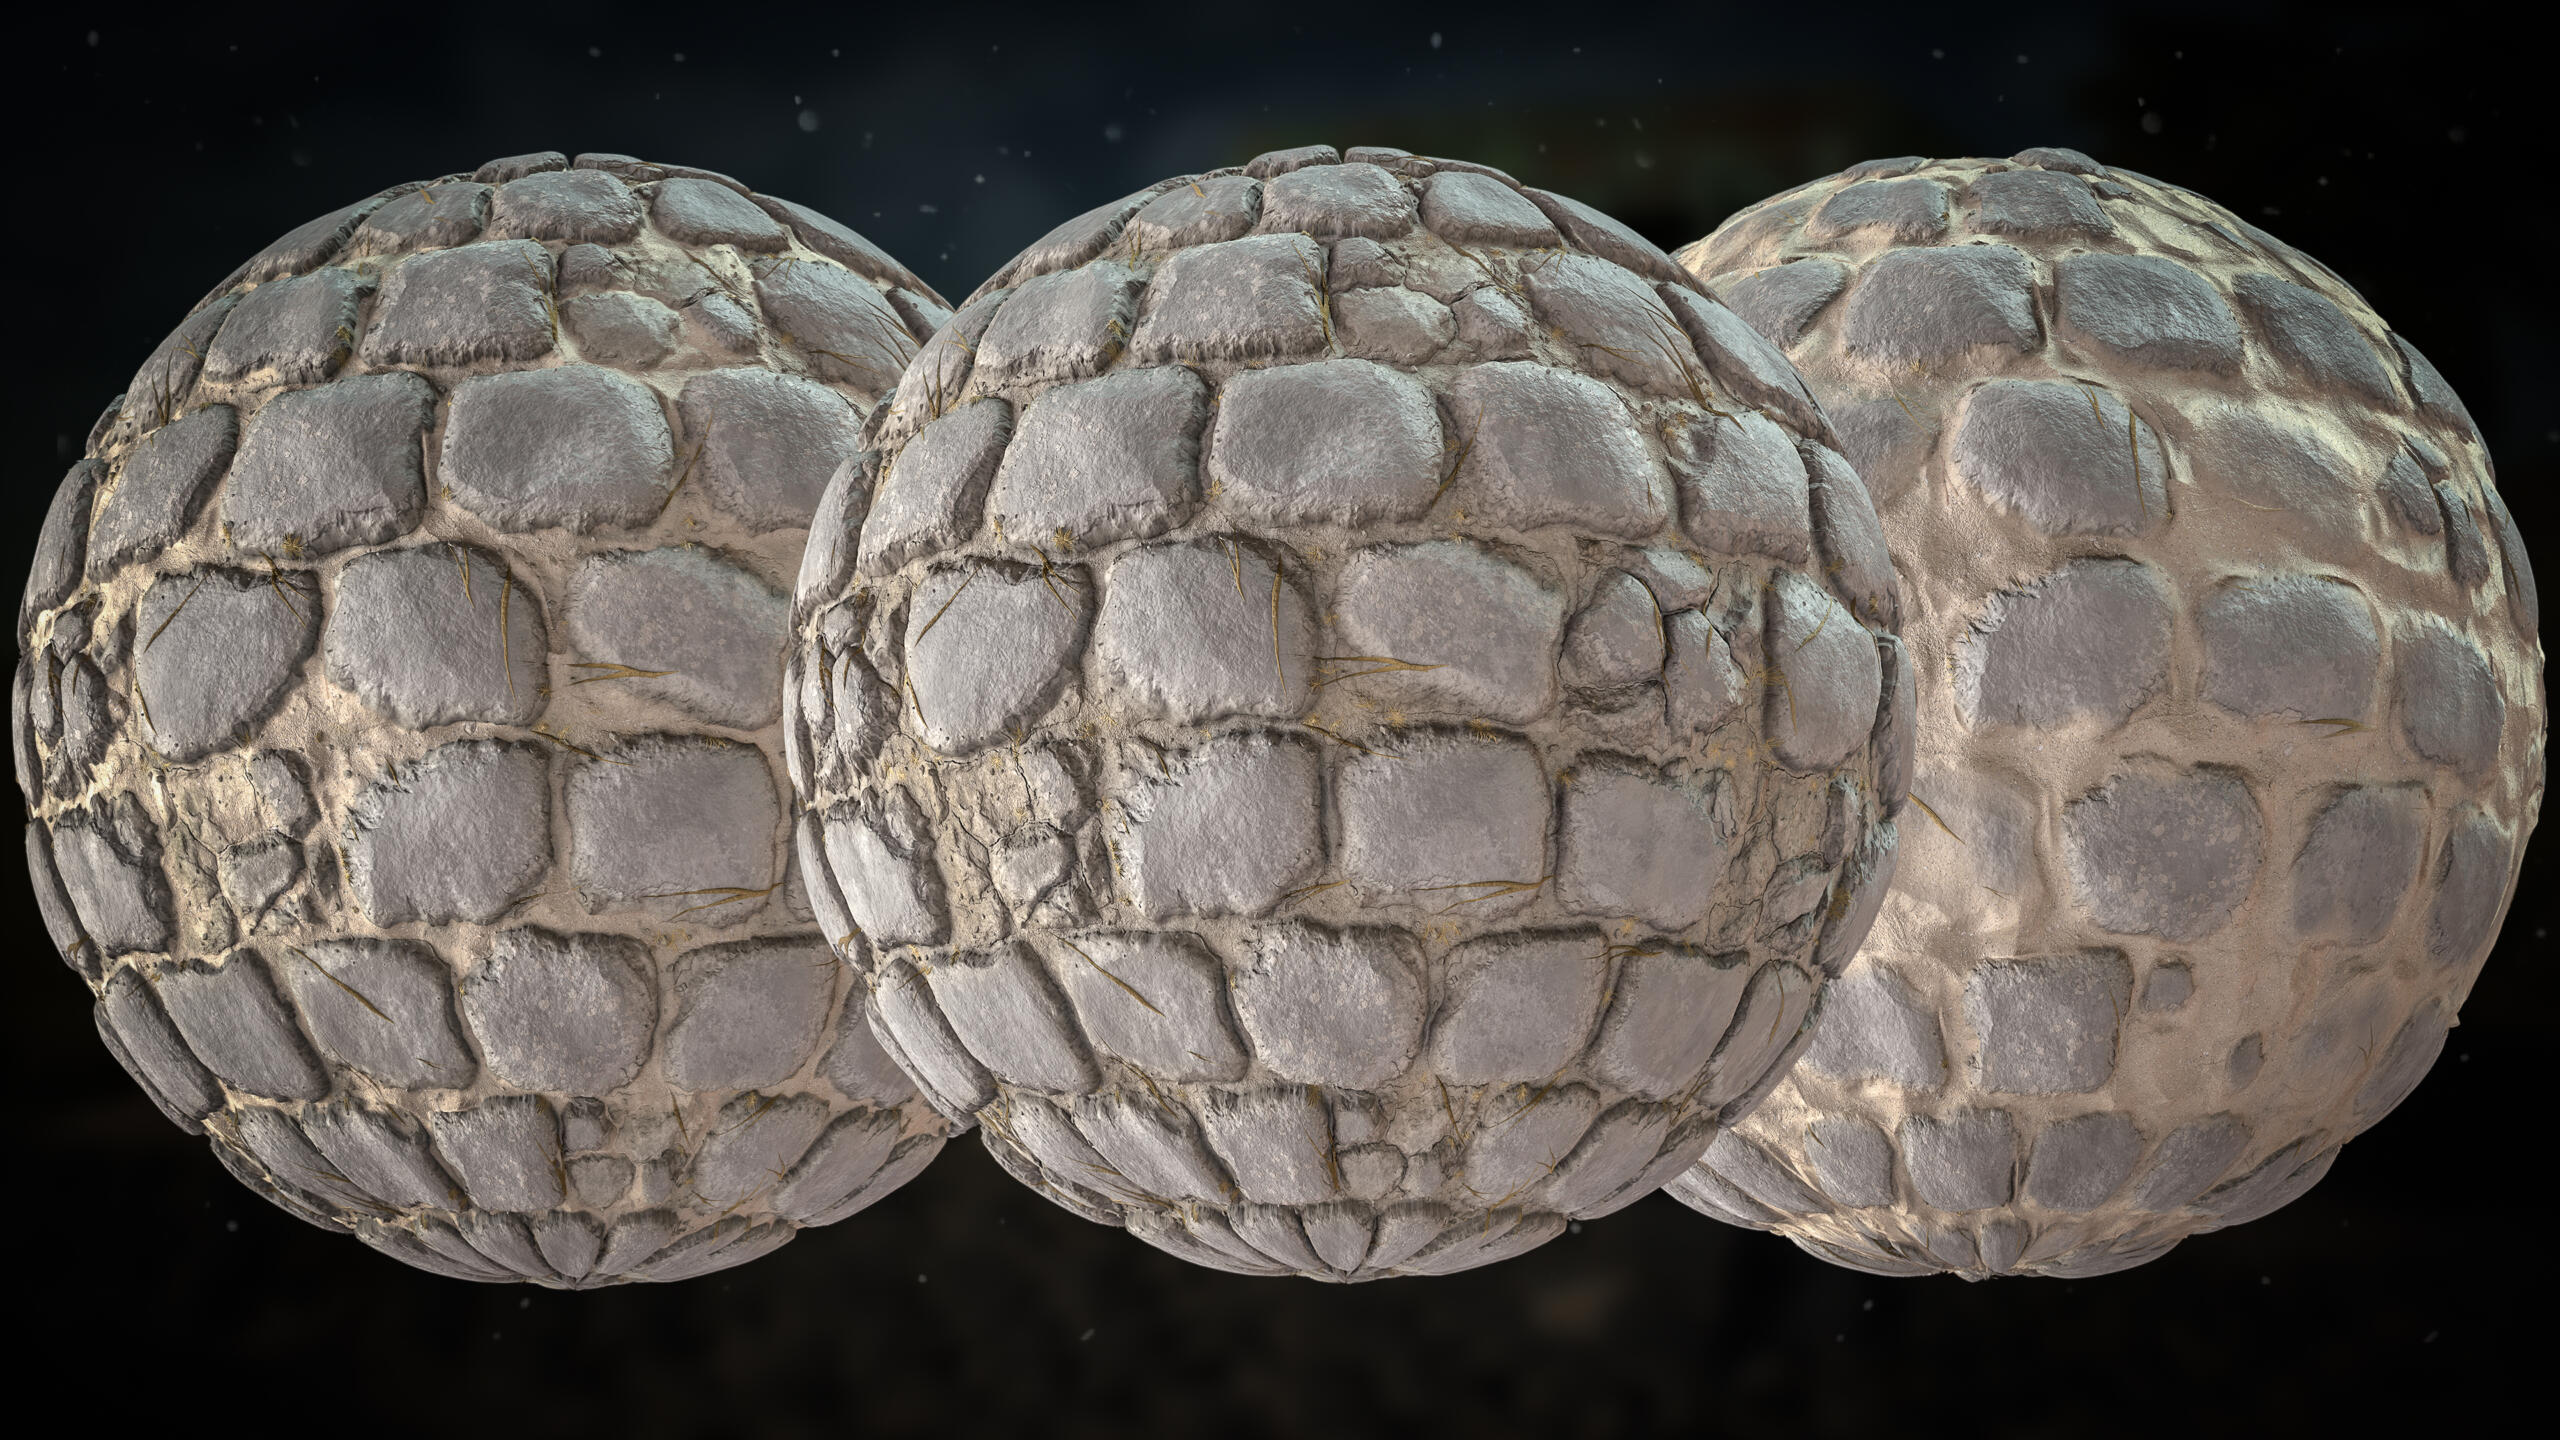
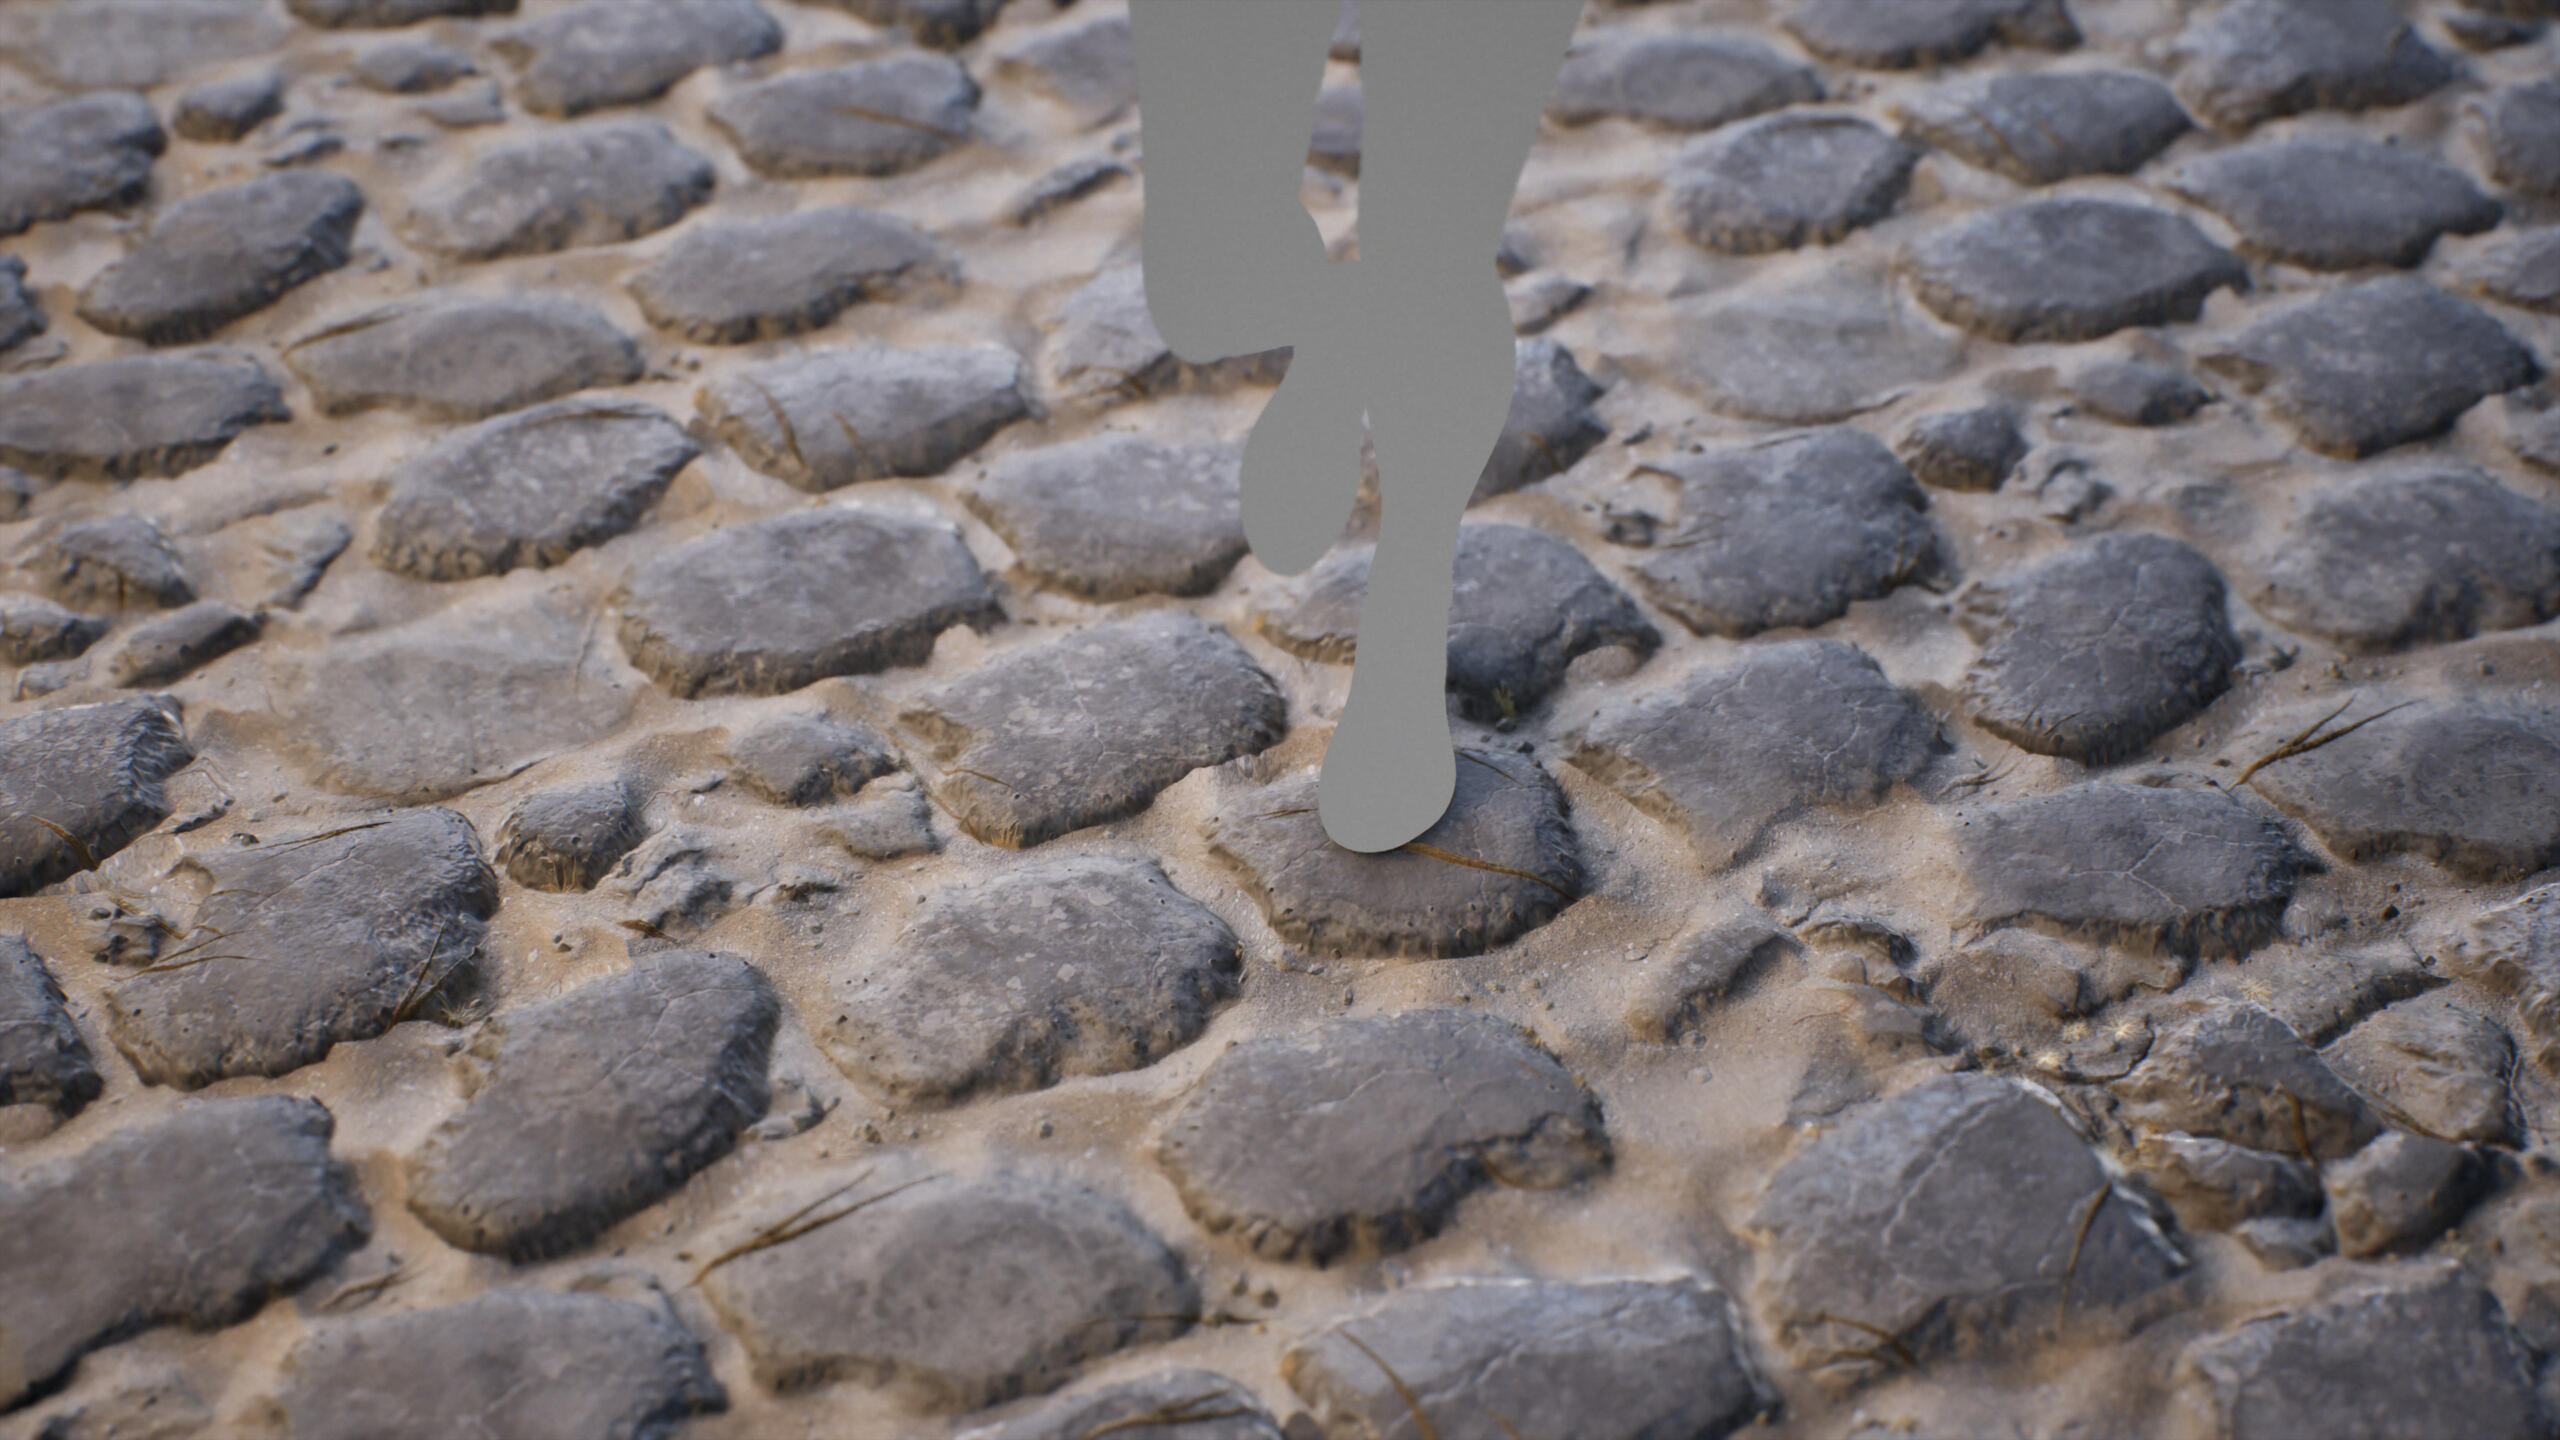
Rock Pavement: Iterating Toward Believability
The rock pavement was one of the most iterative materials in the entire project.
Pass One: Visually Correct, Functionally Wrong
The first version had overly sharp silhouettes, exaggerated low-frequency height, and aggressive edge definition. Technically, they read as rocks. Artistically, they were interesting. But they were not walkable. That was the issue.
The surface felt closer to a cliff face than a ground plane. It was mathematically compelling, but physically implausible. That was the moment I realized I was still thinking in terms of visual drama instead of environmental logic.
Based on feedback, I softened the height transitions and introduced sand filling in the crevices. This immediately grounded the material.
Rocks rarely exist in isolation, especially in pavements. Dust, sand, and sediment settle naturally in gaps. Adding that layer wasn’t just aesthetic; it added realism through environmental storytelling.
Color and blending improved, but something still felt restrained. The surface lacked variation in scale.
Pass Three: Frequency & Scale Correction
The next iteration focused on breaking uniformity.
Previously, most stones were similar in size. That uniformity subtly broke believability. Real stone pavements contain scale variation, larger structural blocks, medium stones, and smaller fillers.
I began merging tiles, introducing varied rock shapes, and adjusting frequency distribution. Reference gathering became more deliberate at this stage. Instead of designing from imagination, I grounded the material in observed structure.
Eventually, the surface reached a balanced state:
- Controlled height
- Walkable transitions
- Varied stone scale
- Natural sediment distribution
From there, I authored three blending states:
- No sand (clean rock pavement)
- Partial sand fill in crevices
- Heavily sand-covered version
These states allowed smooth transitions into the sand material using vertex blending. The pavement was no longer an isolated surface; it was designed to merge. That was the real goal.
Sand: A Conscious Compromise
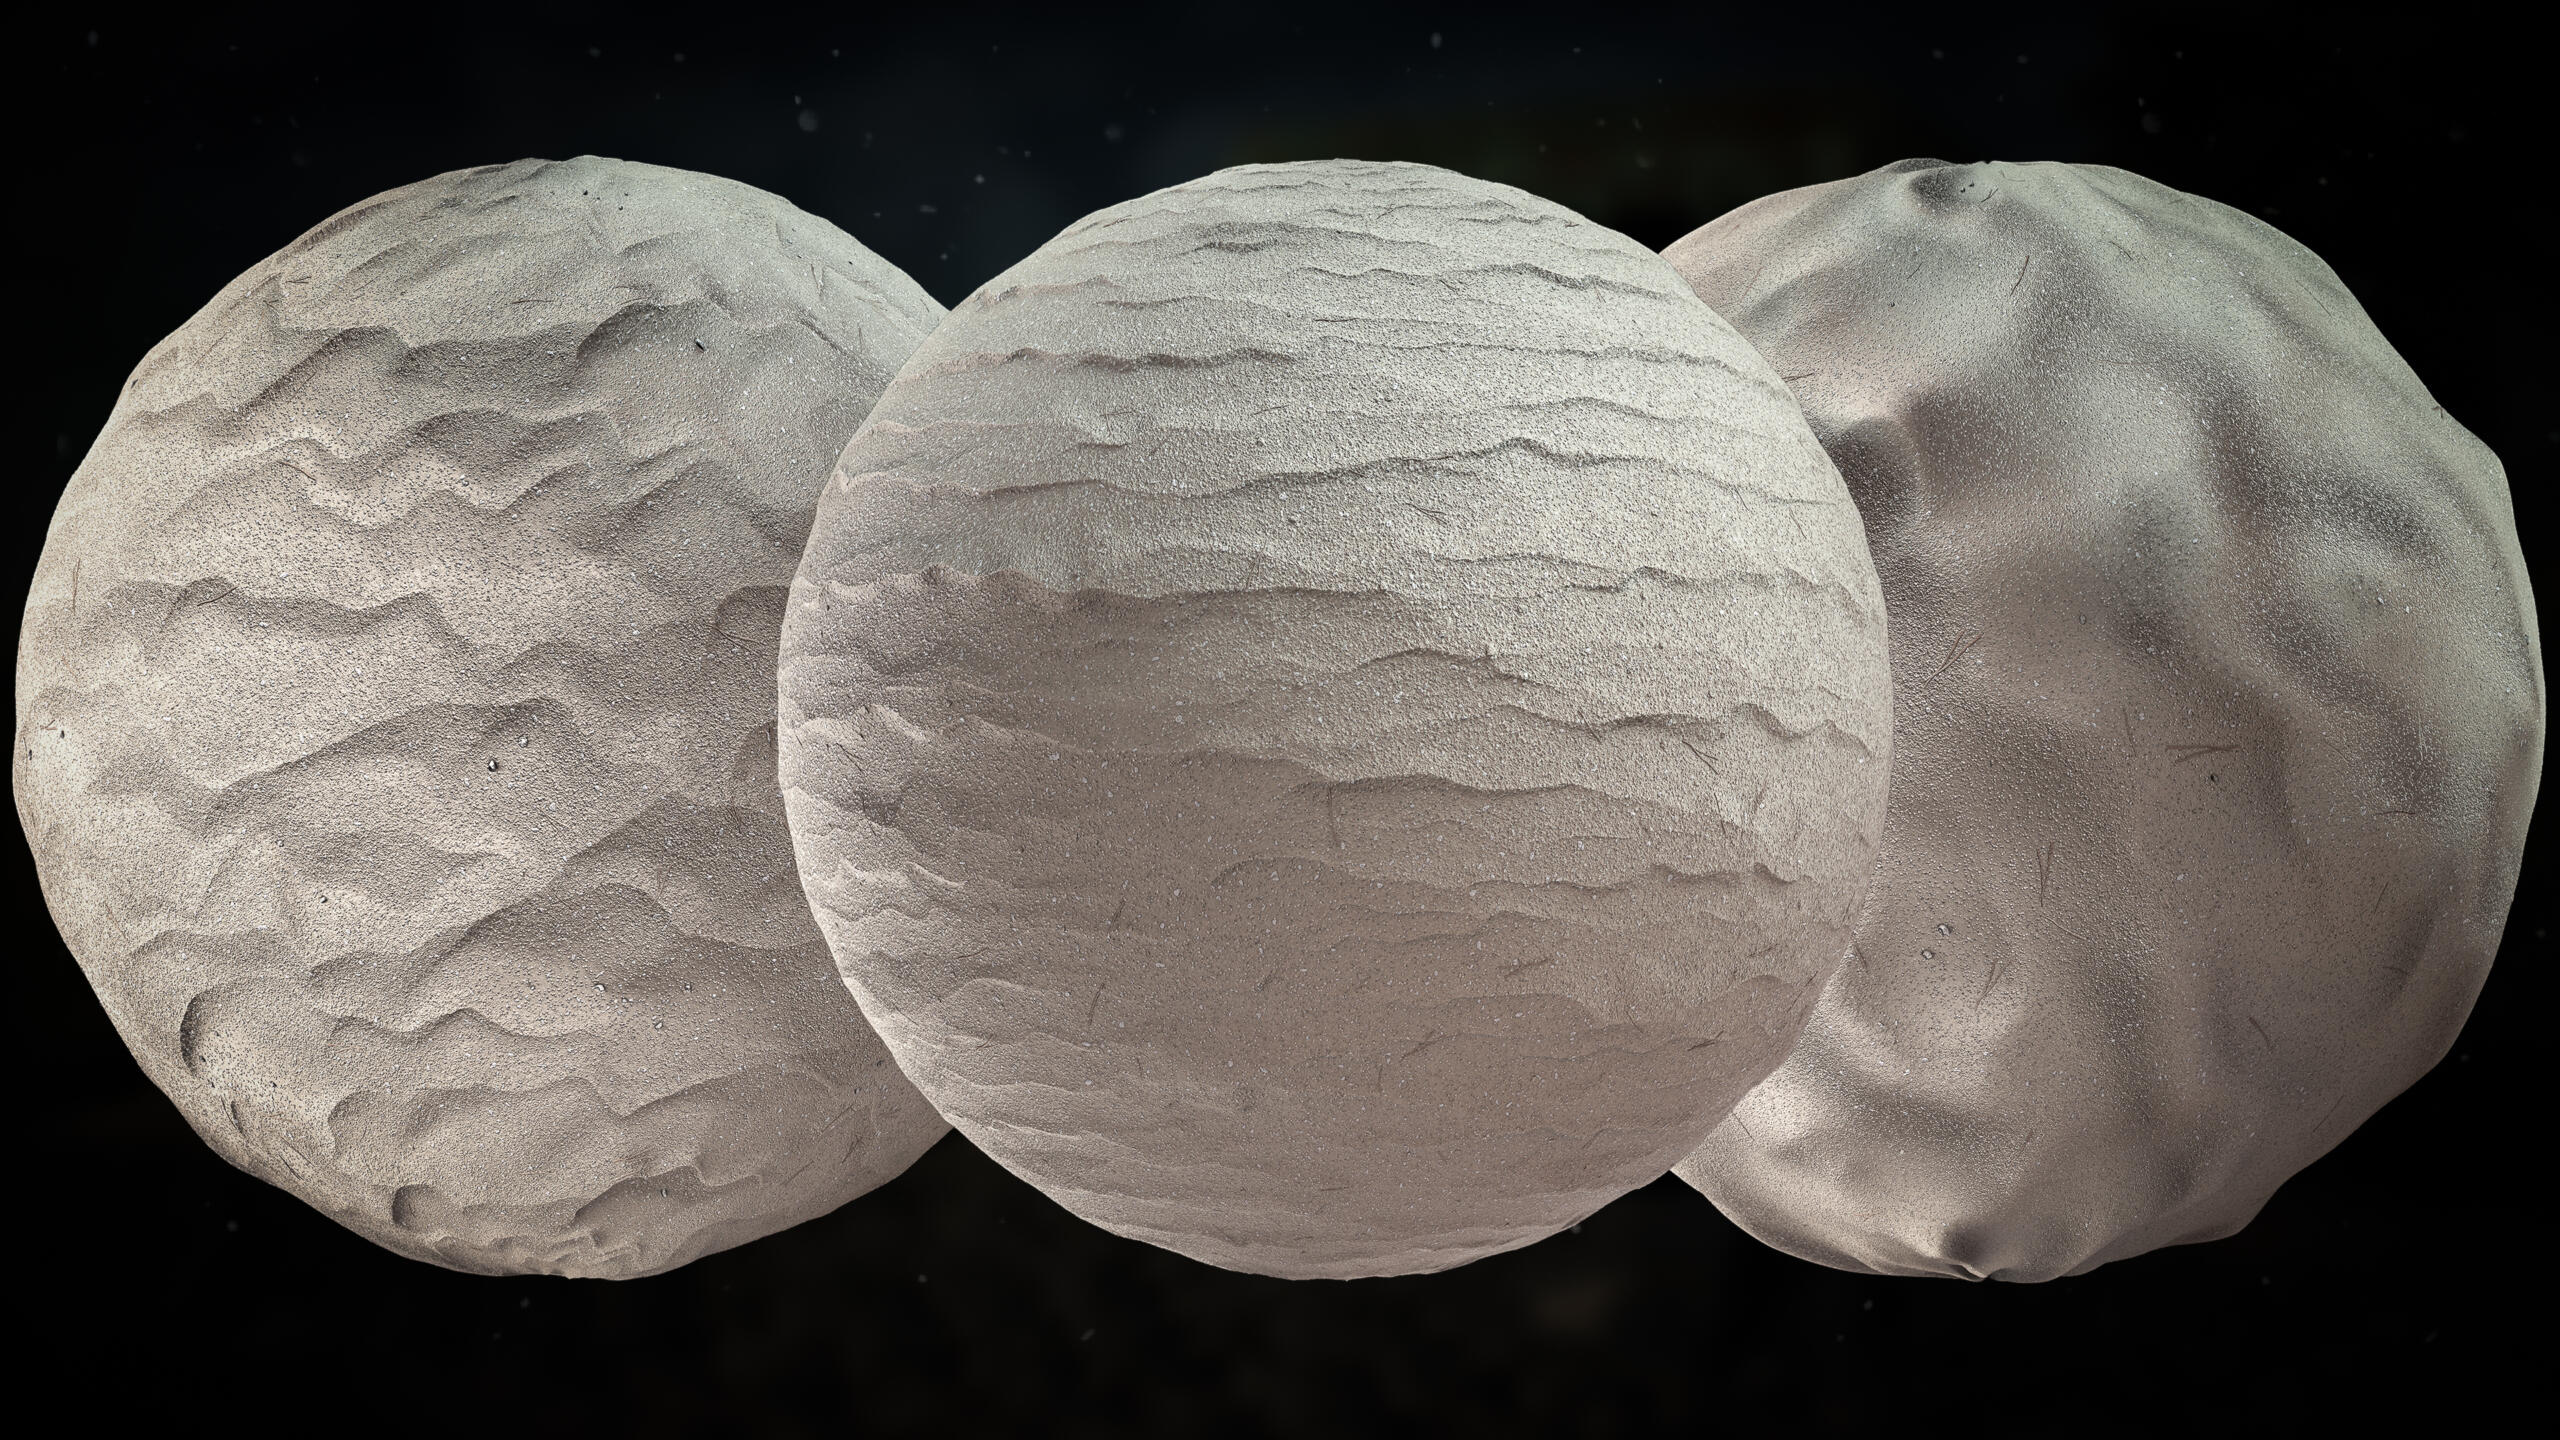
Sand was an interesting challenge.
Achieving believable sparkle typically requires shader-level control. Due to time constraints, I relied on carefully tuned roughness micro-variation rather than building a custom anisotropic solution.
Would I build a custom shader if this were production? Absolutely. But within the scope of this project, the roughness-driven solution achieved sufficient surface credibility without unnecessarily increasing shader cost. Tradeoffs are part of production.

Shader Architecture & Performance Considerations
Previously, I approached materials as individual showcases. In Sunstone Villa, every material was authored with awareness of:
- What it blends with
- How close the player would get
- How readable it needs to be at a distance
- How aggressive should the noise frequency be
- How it contributes to overall scene saturation and balance
No single material was allowed to dominate visually at the expense of cohesion.
Tiling was treated seriously. Surfaces were designed to survive scrutiny at close range without obvious repetition. Detail was applied where it mattered and restrained where it didn’t. I stopped building materials to look impressive in isolation. I started building them to function as part of a living environment.
Closing Thoughts
Sunstone Villa represents a shift in how I think about materials.
Not as decorative assets.
Not as standalone renders.
But as modular, scalable systems that need to interact, blend, and perform.
The biggest lesson wasn’t how to create better noise patterns or sharper normals. It was learning to design with context.
And once you start thinking that way, you don’t go back. Thanks to Jonathan for the constant feedback, patience and support in helping me complete this project.
Thank you for your time.
Share & follow
For any inquiries, please contact Mandar Warde at: mandar.s.warde@gmail.com
ArtStation: https://www.artstation.com/war_dae
LinkedIn: https://www.linkedin.com/in/mandarwarde
Thank you for reading from the Vessel Forge Team! Mandar took our Material Art Mentorship with Jonathan Benainous. Take a look at the program below: