In this Mentee Showcase, get to know Sage Park, an Asset Artist at The Planar Danse.
Sage shares how a love of film led her to video game art, why she chose a Vessel Forge Mentorship, and a full breakdown of her project “The Fallen TIE Fighter”.
Q: What is your area of focus? And which Vessel Forge program did you enroll in?
My area of focus is environment art for games, with a strong emphasis on cinematic storytelling, composition, and hard surface modeling. I was enrolled in both the Environment Art & Material Art Mentorships at Vessel Forge under Jonathan Benainous.
Q: Tell us about your background. Where did you learn your craft?
I studied Animation & VFX at the Academy of Art University in San Francisco, with an emphasis in modeling. During my time there, I built a strong foundation in core 3D tools and workflows, which became the starting point for my work in environment art.
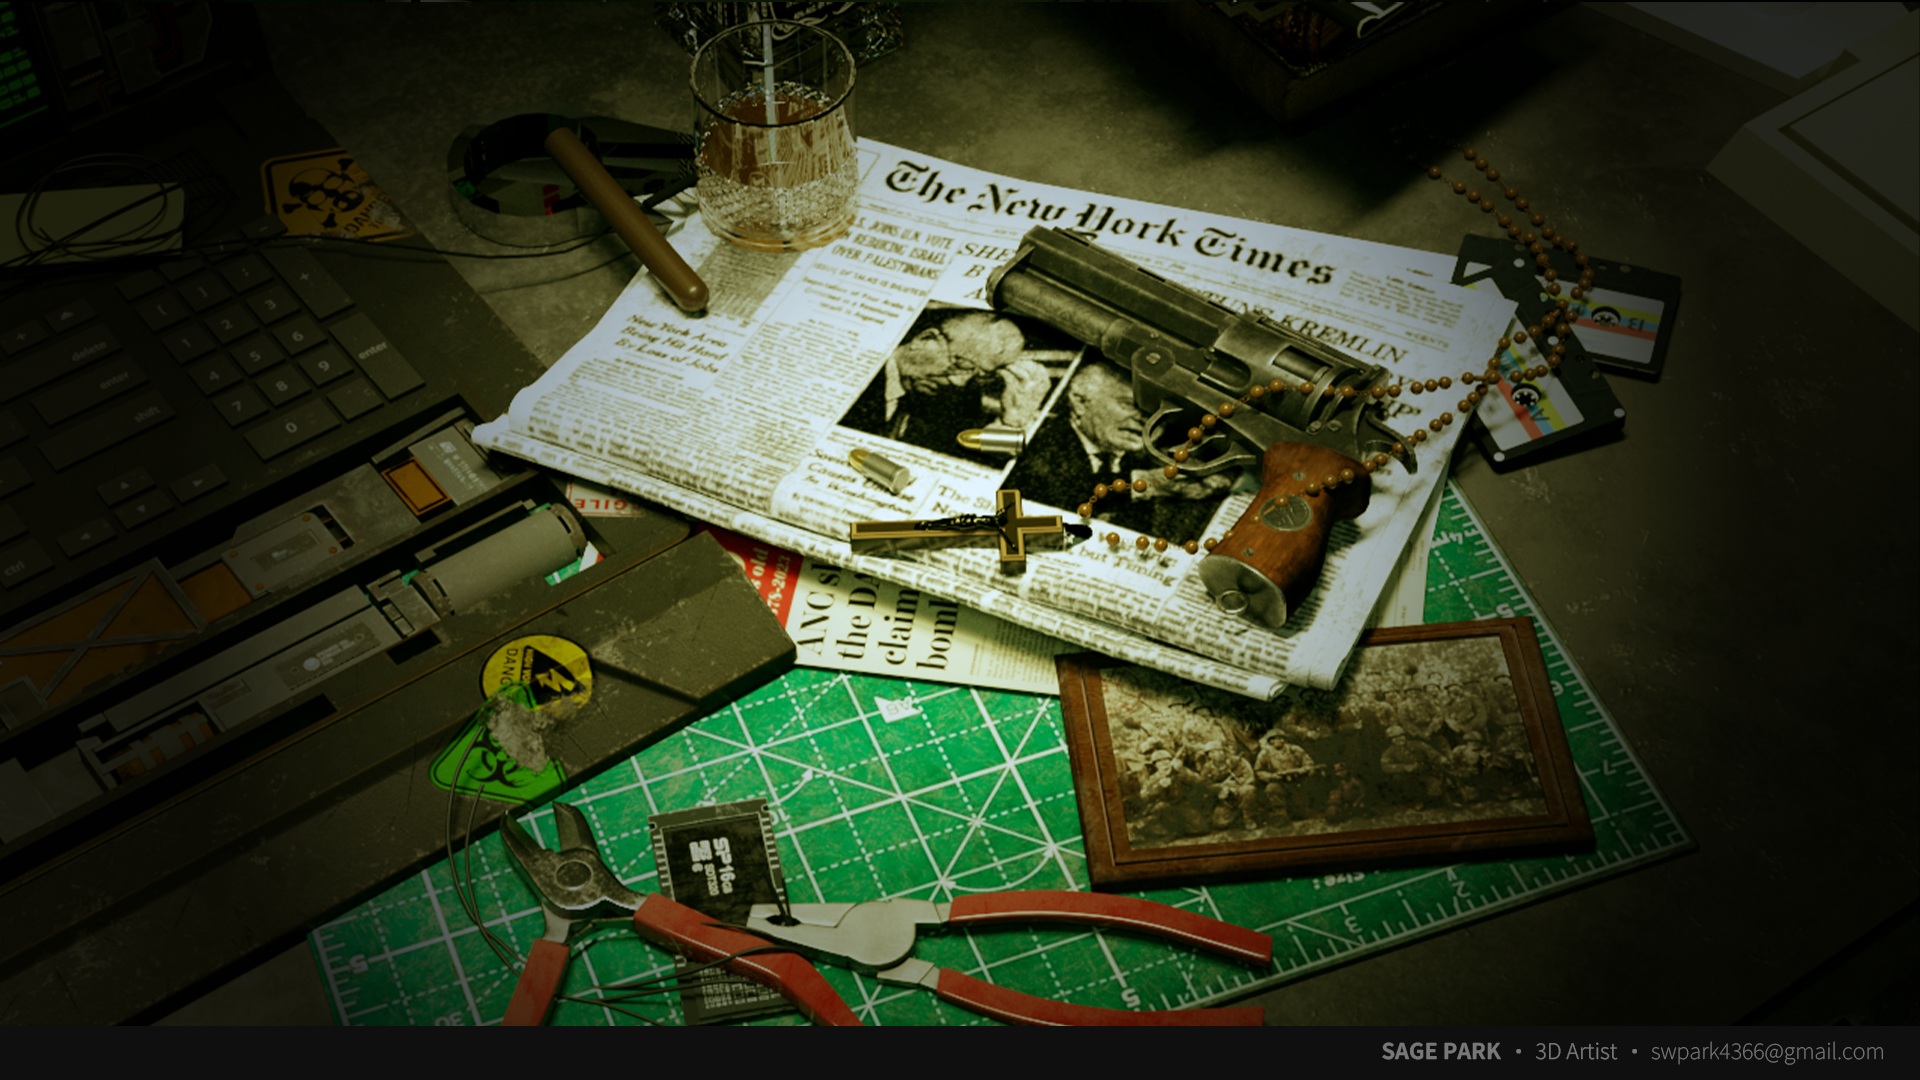
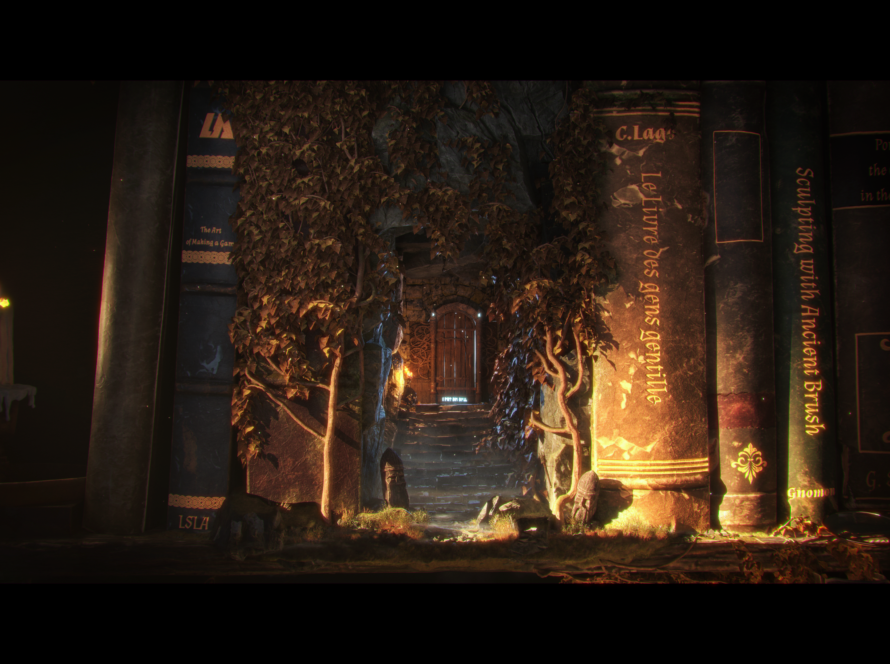
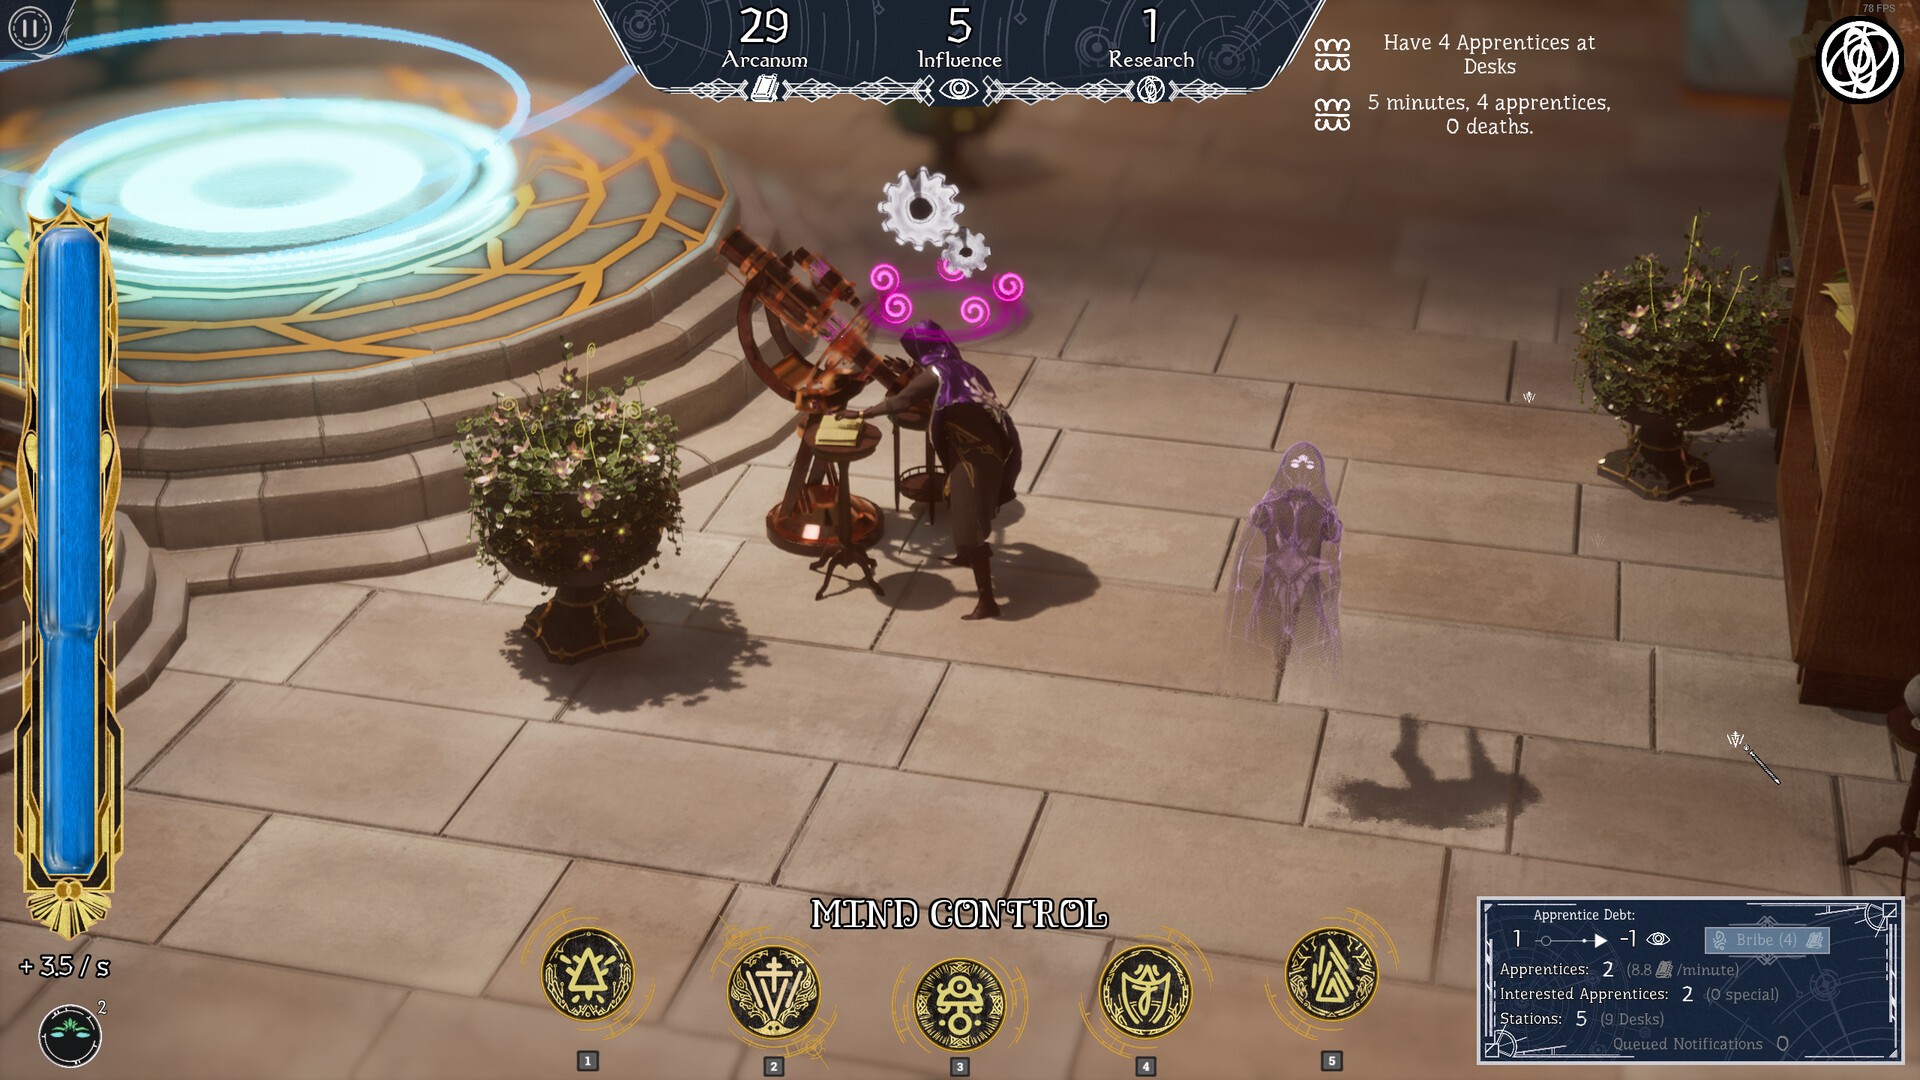
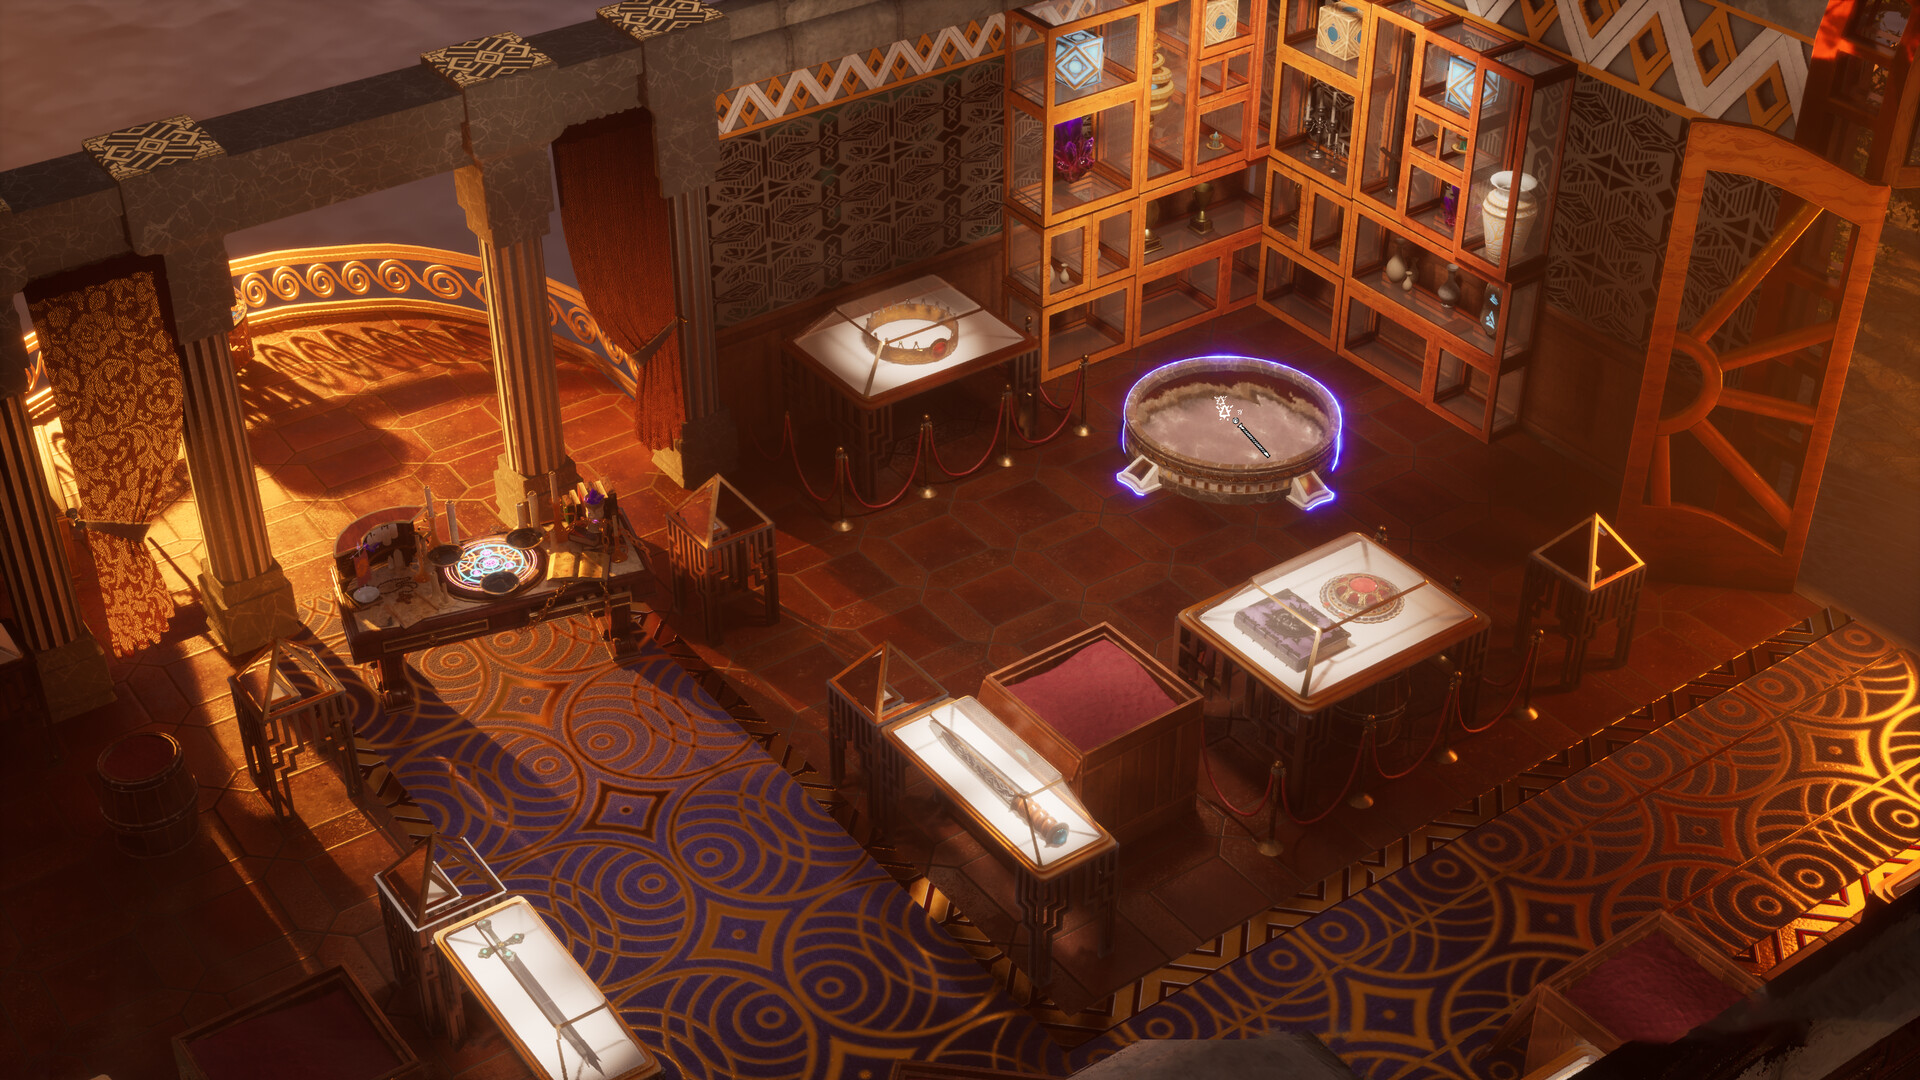
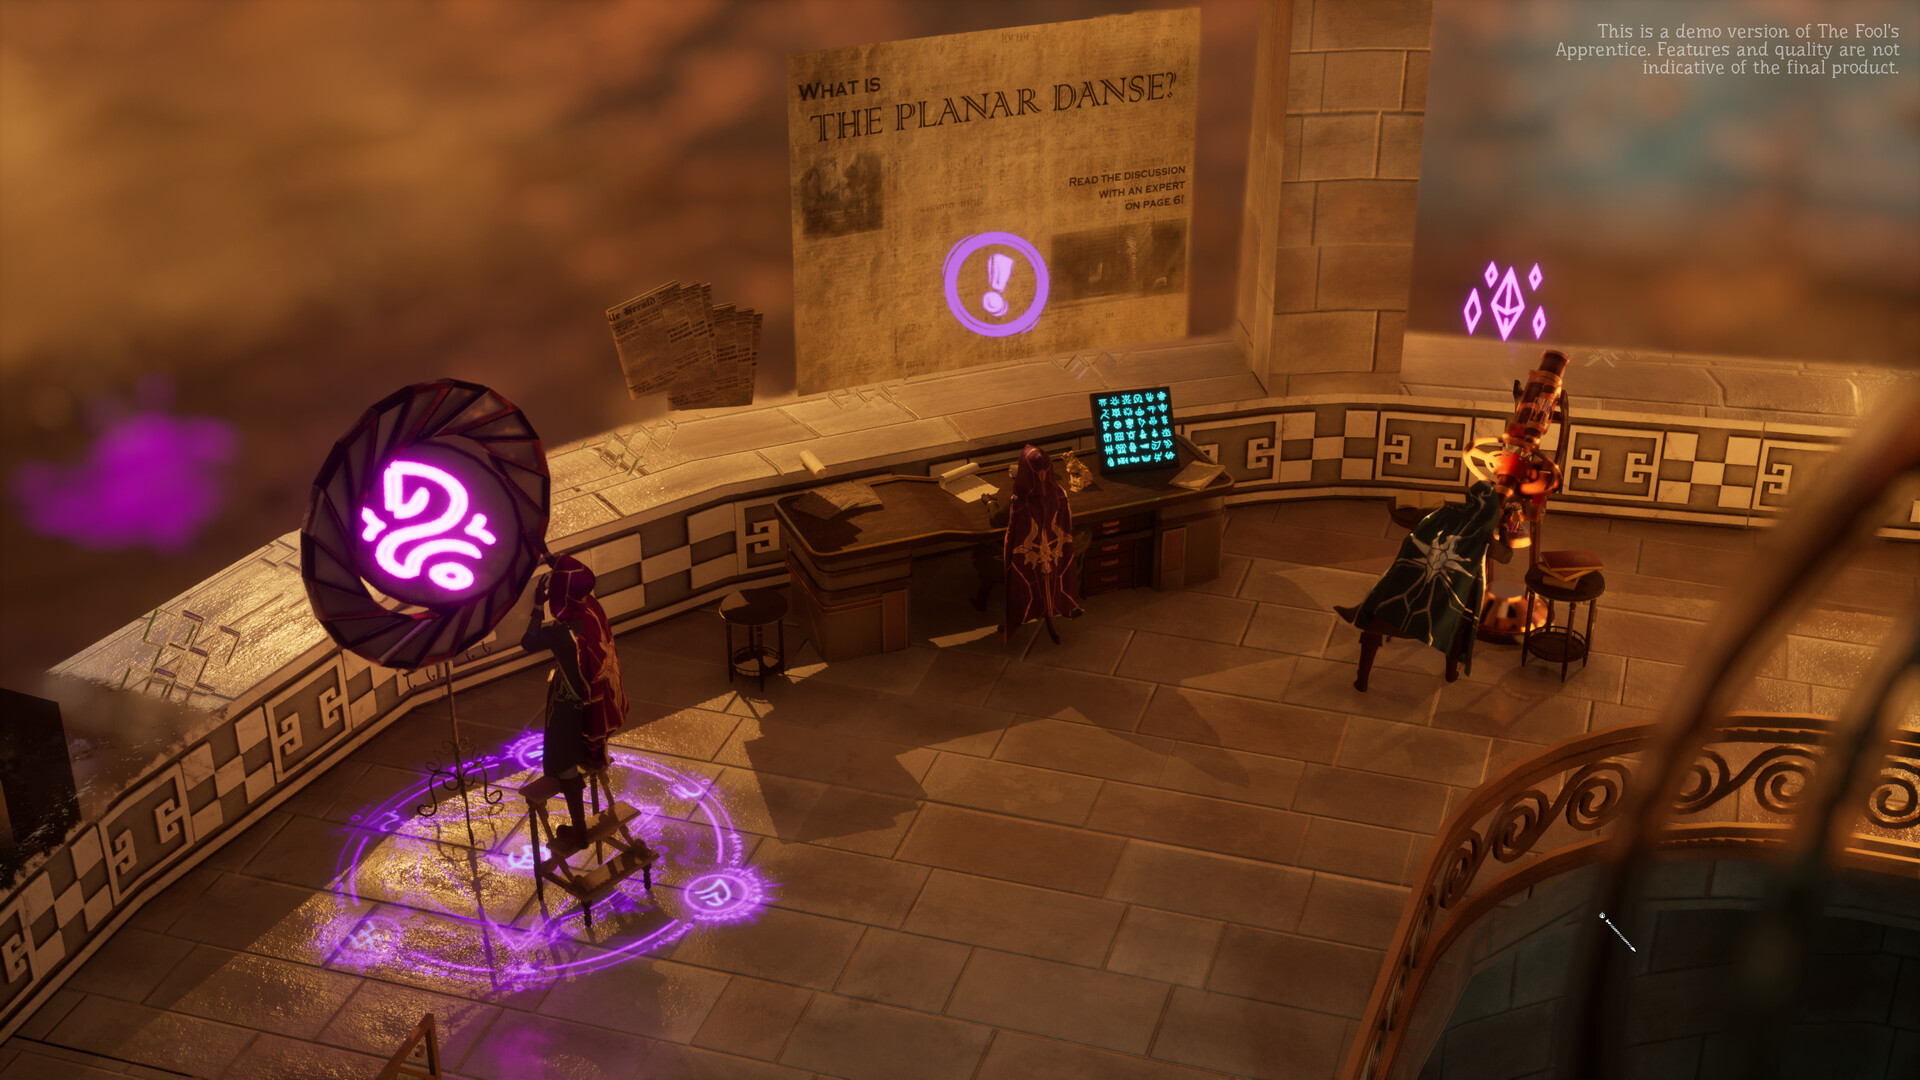
Currently, I’ve been working as an Asset Artist at an indie game studio called The Planar Danse. I contributed to The Fool’s Apprentice, a wizard school strategy simulation game, where I focused on designing and creating assets from modeling through texturing. My work primarily centred on developing hero props and supporting assets, as well as contributing to environment set dressing.
I was involved with the project from early production through its release, which gave me valuable hands-on experience with the full game development pipeline.
Q: What led you to pursue a career in video game art?
I graduated from the Academy of Art University in San Francisco, where I studied Animation & VFX with a focus on modeling. For a long time, my primary interest was in film. I was deeply drawn to cinematic storytelling and even considered becoming a film director at one point. I didn’t grow up playing many games. Coming from a more traditional background, gaming wasn’t really encouraged, so my exposure was fairly limited.
That began to change during college, and more significantly during the pandemic. Like many people, I suddenly had more time at home, and I started exploring games more seriously. One of the first experiences that truly stood out to me was The Last of Us. That experience completely shifted my perspective. I realized that games could deliver emotional depth and storytelling on the same level as film—while also allowing players to actively engage with the world. What stood out to me most was how environments played a crucial role in that storytelling.
From that point on, I became increasingly interested in environment art for games. Coming from a film background, I’ve always been curious about the elements within a shot—the details that make a scene feel believable. Over time, that curiosity expanded beyond the frame. I became interested in the spaces outside of what the camera shows, and the world that exists around it.
At the same time, I became increasingly interested in the interactive aspect of games. How environments are not just framed for a single perspective, but explored and experienced by the player. That shift in perspective naturally led me toward environment art.
Q: What do you enjoy about creating art for video games?
I enjoy the ability to build worlds that players can actively experience, not just observe. I’m especially drawn to how environments can carry narrative. Through details like lighting, material wear, and composition, it’s possible to communicate history, mood, and emotion without any dialogue. I find it very rewarding to create spaces that feel lived-in and intentional, where every element contributes to a larger story.
I also enjoy the balance between artistic expression and technical problem-solving. Working within real-time constraints (while still aiming for strong visual quality) pushes me to think more creatively and be intentional with my decisions.

Q: What were some of your biggest takeaways from your Vessel Forge program?
The mentorship challenged me significantly as I was in the middle of transitioning from a film-based pipeline into real-time environment art for games. Coming from an animation and VFX background, I was familiar with a more linear, cinematic workflow, but not with the game development pipeline. Because of that, this mentorship represented both a major career shift and a meaningful personal challenge for me.
What I appreciated most about my experience with Vessel Forge was the exceptional guidance and support from my mentor, Jonathan. He patiently guided me through the environment art and game production workflow step by step, not only providing technical direction but also explaining the reasoning behind each artistic and production decision. This helped me develop a much deeper understanding of how to think like a game artist.
Technically, I was pushed to adapt to real-time constraints—thinking about modularity, and how assets function within a playable environment. At the same time, I was challenged to shift my mindset from focusing on individual assets to building cohesive environments where composition, lighting, and storytelling all work together.
I gained a strong appreciation for an iterative workflow. Instead of working in a strictly linear way, I learned to constantly revisit and refine different aspects of the environment—adjusting composition, lighting, and materials as the piece developed. This approach helped me achieve a more polished and intentional final result.
Beyond technical skills, the mentorship helped me develop a more professional mindset. I became more intentional in my decision-making, critical of my own work, and aware of the importance of presentation and clarity when communicating ideas. Overall, it gave me a much clearer understanding of what it means to create production-ready work as an environment artist.
There were also moments where I felt uncertain about my direction. During those times, Jonathan’s consistent and thoughtful feedback helped me regain clarity and confidence, pushing me to approach my work with more intention and purpose.
The structured nature of the mentorship played a key role in my growth. Using tools like weekly Miro boards allowed me to clearly track my progress and understand the full production pipeline step by step. Additionally, being exposed to the high-quality work of other mentees motivated me to push my own work to a higher standard.
Communication was also incredibly seamless. Being able to exchange feedback through Discord made the learning process much more dynamic and efficient, especially when I encountered challenges.
Overall, this experience challenged me not just technically, but also in terms of mindset, helping me grow into a more well-rounded environment artist.
Q: Why did you decide to apply for a Vessel Forge mentorship, and what is your plan going forward in your career?
I applied because I wanted structured guidance from industry professionals and a deeper understanding of real-time environment workflows. Vessel Forge stood out because of its strong focus on storytelling, high-quality work, and production-oriented mentorship.
I first heard about Vessel Forge in 2025 when I saw Jonathan Benainous, who is now my mentor, sharing a post on LinkedIn that he was starting the mentorship. It immediately caught my attention, as I was already looking for ways to transition into game environment art.
After seeing the post, I reached out, and we ended up scheduling a time to meet during GDC 2025. That initial connection and conversation at GDC became the starting point of my journey with Vessel Forge.
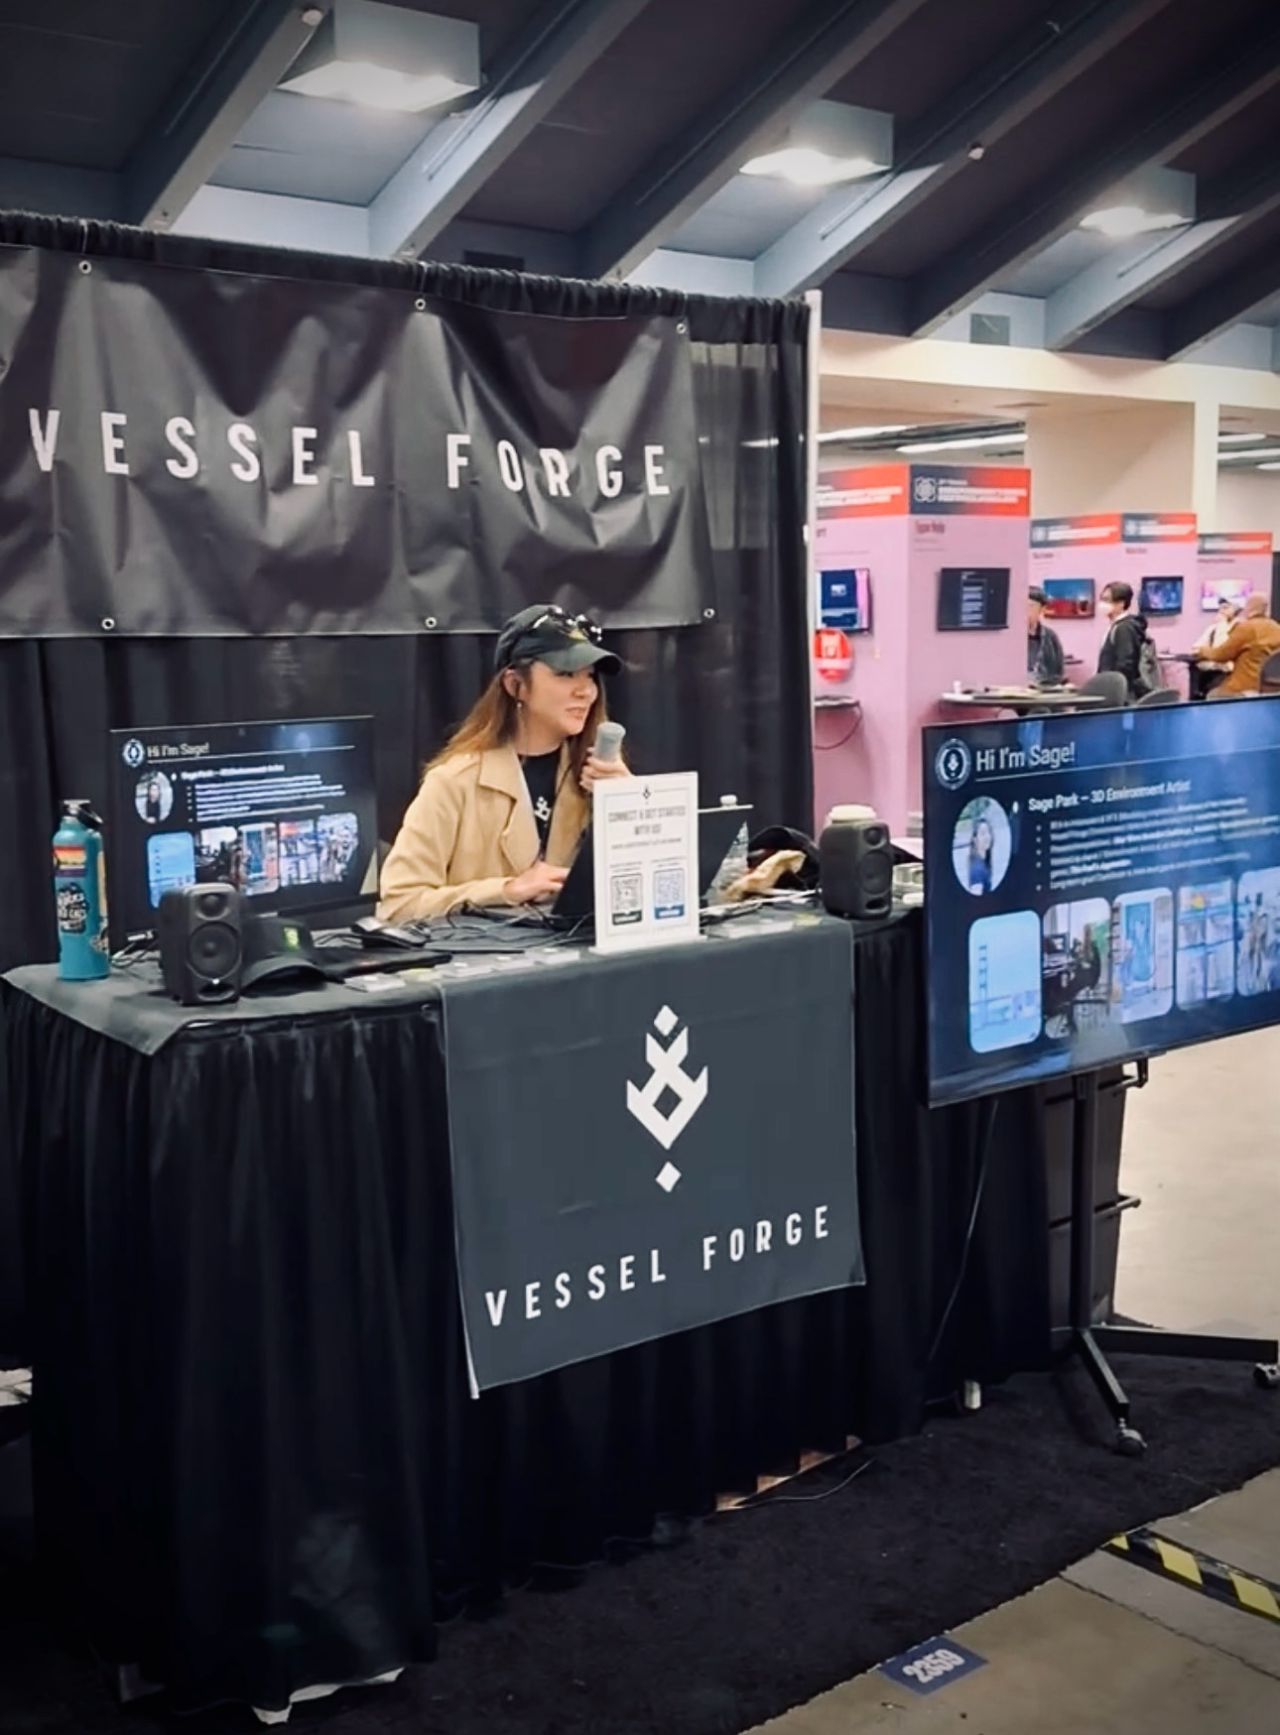
The following year, in 2026, I had the amazing opportunity to present at the Vessel Forge booth at GDC, which was a truly meaningful and rewarding experience. It felt like a full-circle moment, and I’m incredibly grateful for the opportunity to be part of the community in that way.
I plan to continue building high-quality environment work in Unreal Engine while applying the storytelling and iterative mindset I developed during the mentorship.
My goal is to grow into a mid-to-senior environment artist role at a AAA studio, where I can take ownership of larger parts of an environment and collaborate closely with a team. Long-term, I aspire to become an art director and mentor others as well.
Q: Where can people find your art?
ArtStation: https://www.artstation.com/sagepark

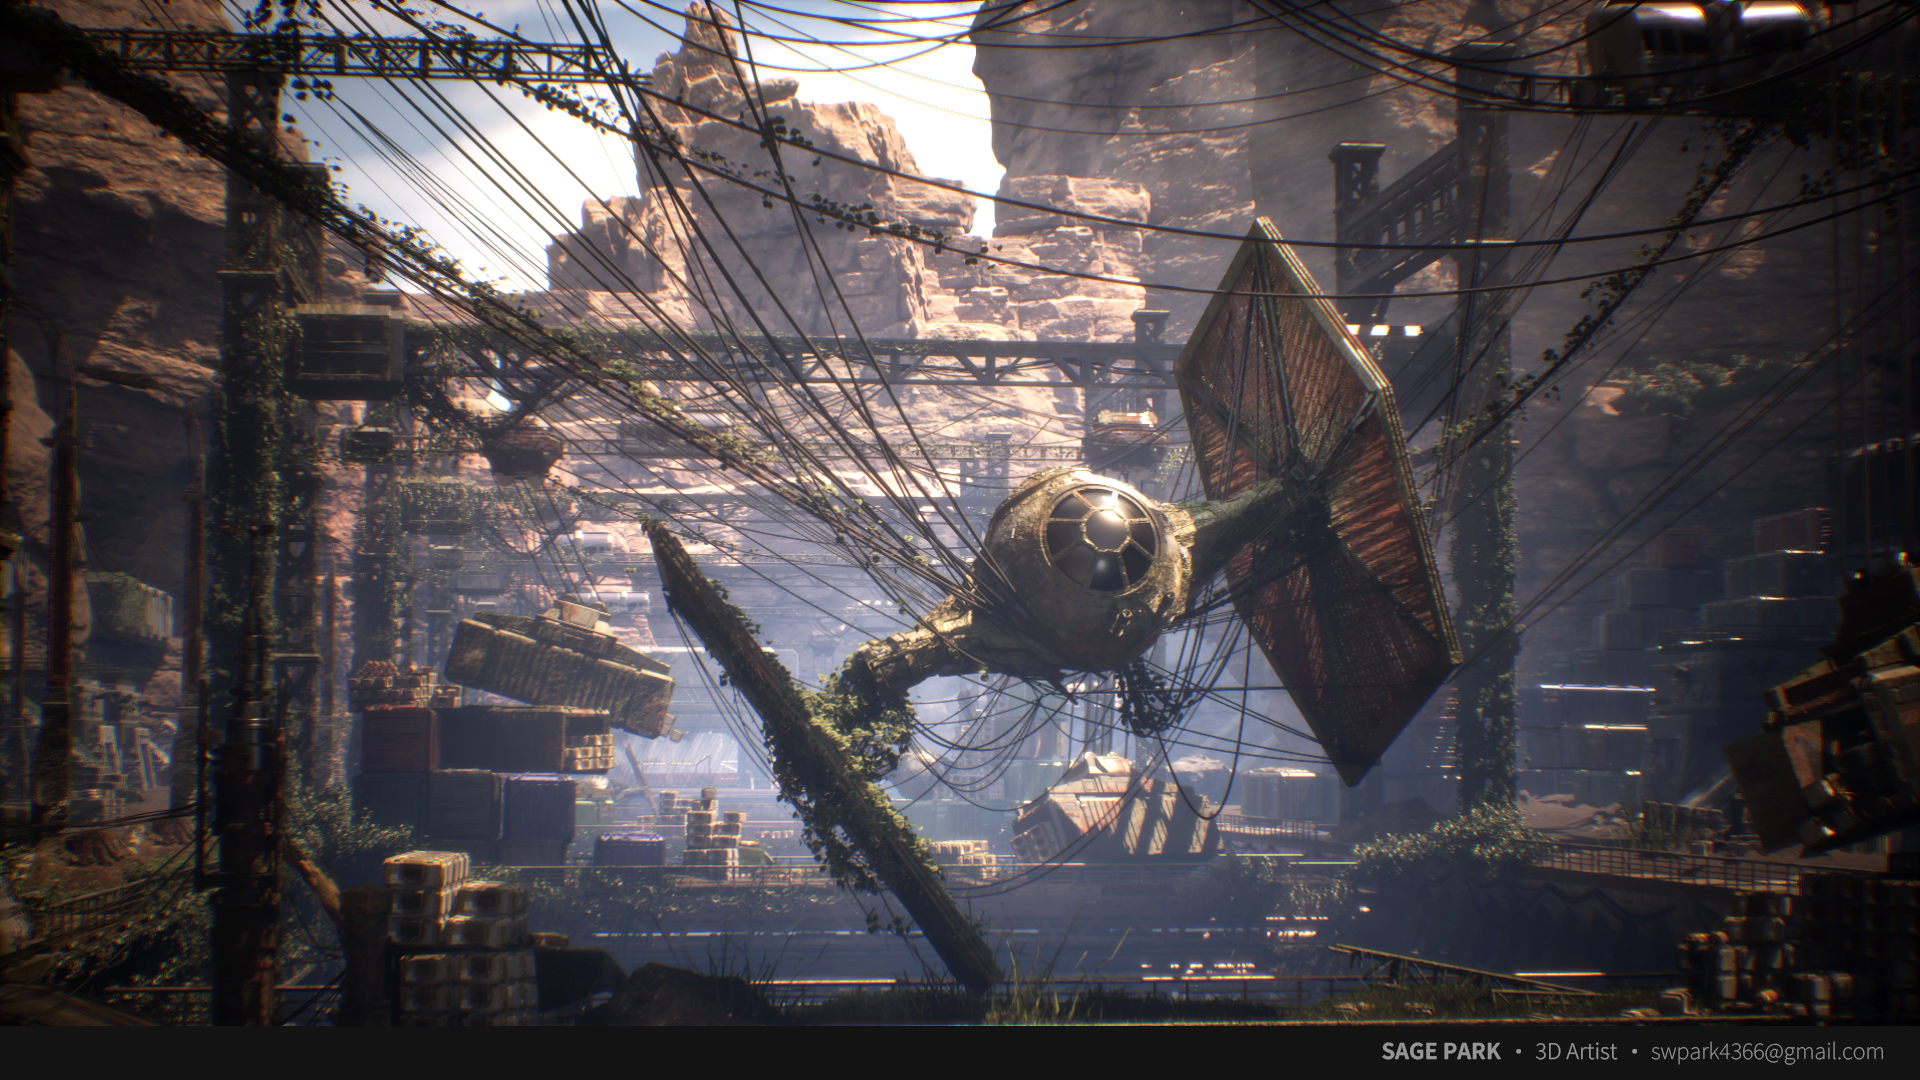
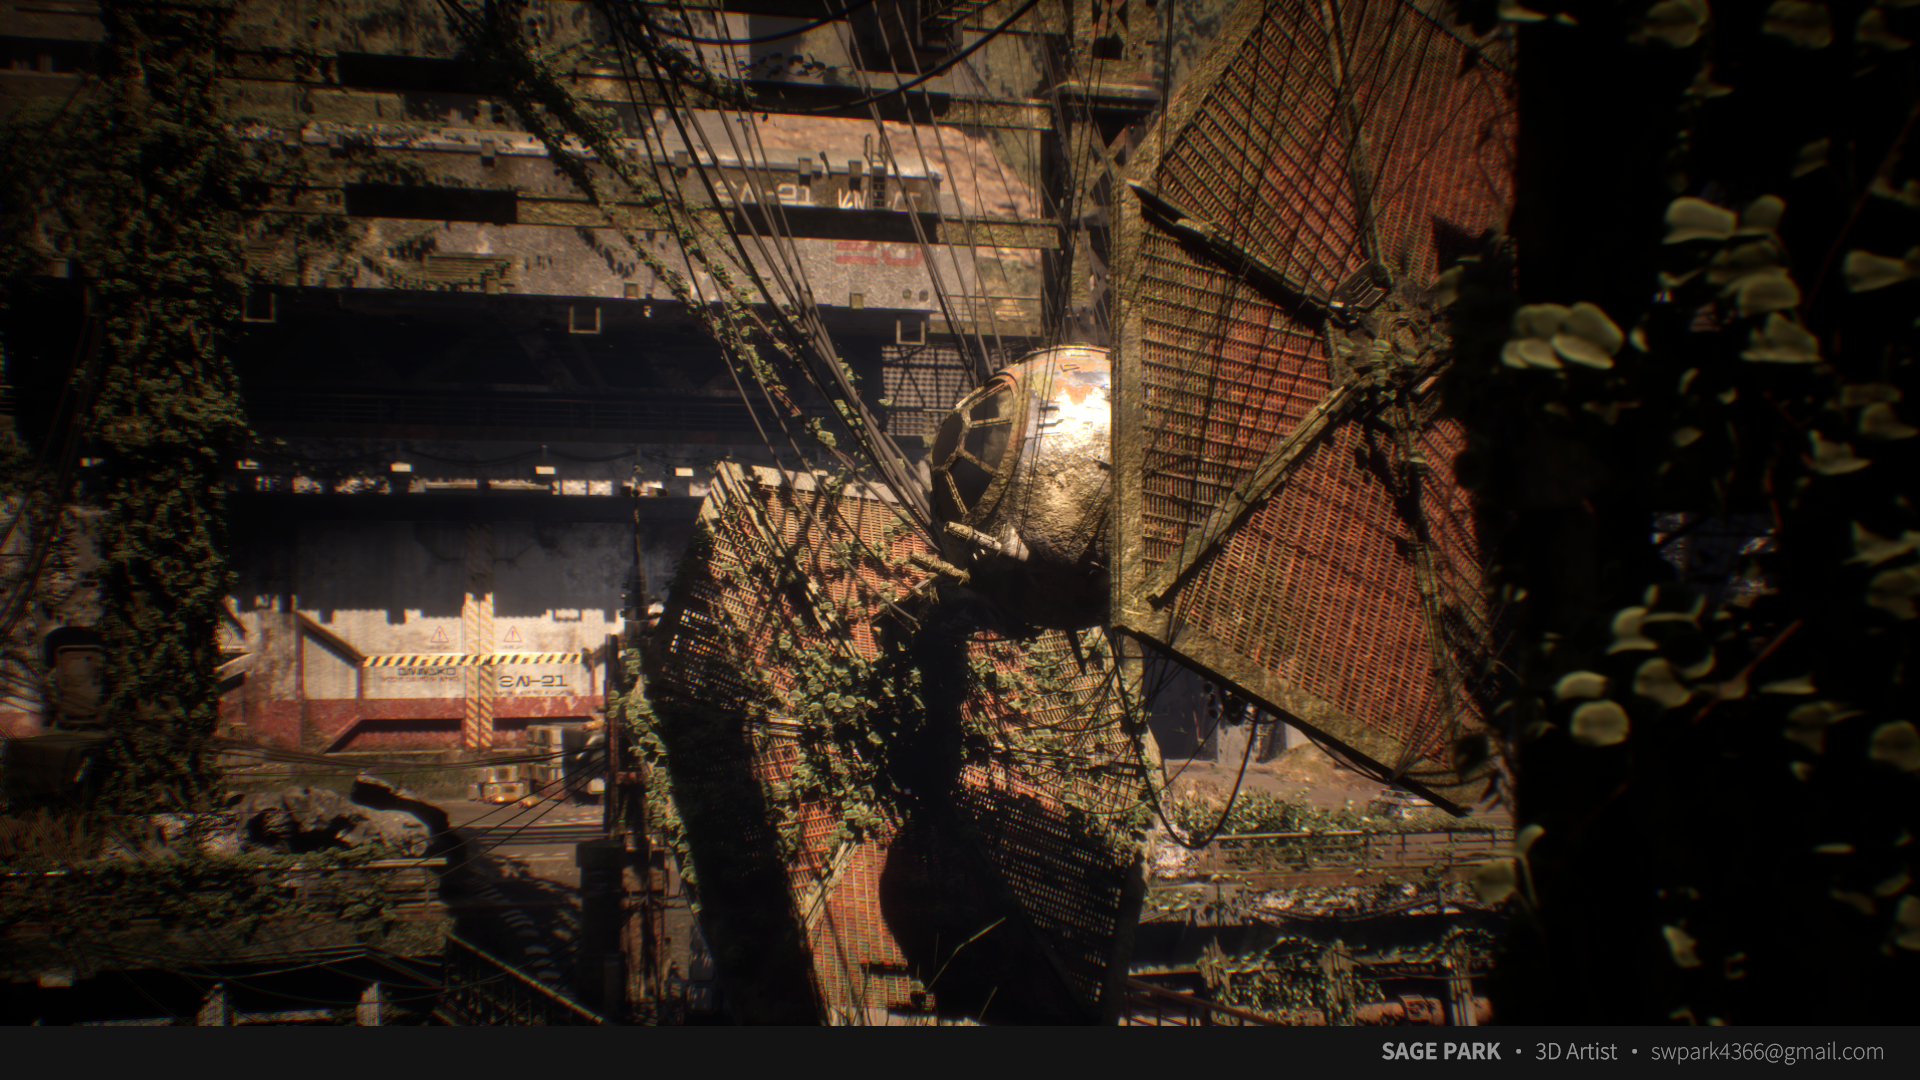
The Fallen TIE Fighter
For my Vessel Forge project, I wanted to create a scene that would push my portfolio further and better reflect the kind of work I want to do as an environment artist. Coming from a film background, I was especially interested in building a space that felt cinematic, but also fully realized and explorable within a game environment.
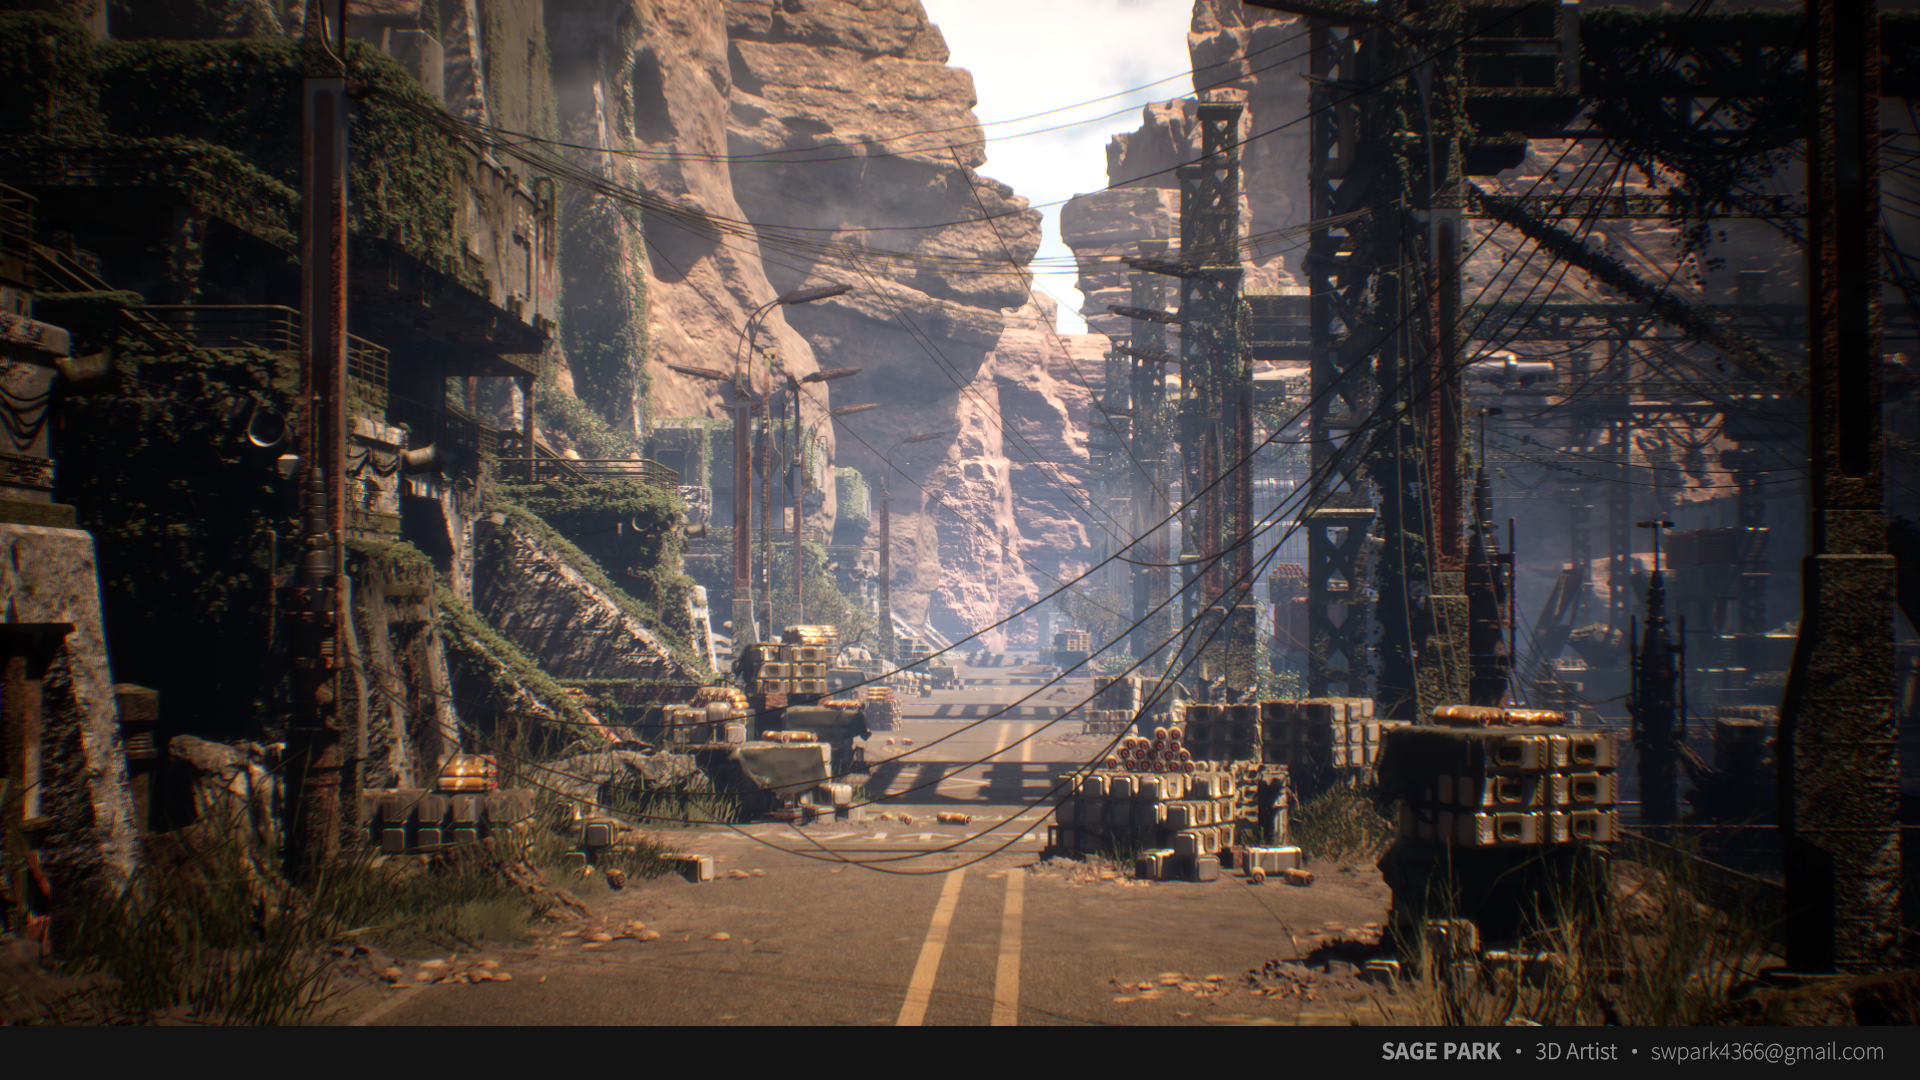
I decided to create a Star Wars inspired environment centered around a crashed TIE fighter, focusing on the contrast between rigid, industrial structures and organic elements taking over the space. From the beginning, I was drawn to the idea of telling a story through the environment; something that felt abandoned, with a sense of time having passed.
My first step was gathering references, focusing on materials, lighting, mood, and the balance between man-made and natural elements. I also studied how to break down the environment into a modular and efficient structure, while still maintaining strong visual composition and storytelling.
Throughout the process, I aimed to create a scene that not only looks visually compelling from a cinematic perspective but also feels grounded and believable as a real-time game environment.
Project Overview
One of the most important realizations during the project was that environment creation is rarely linear. Rather than treating modeling, materials, lighting, and composition as separate stages, I found that each element continuously influenced the others. As a result, the workflow became highly iterative, with constant adjustments based on lighting, atmosphere, and overall visual balance.
Instead of fully finalizing assets early on, I worked with initial versions and refined them progressively as the environment developed. This approach allowed the scene to evolve more naturally and remain cohesive.
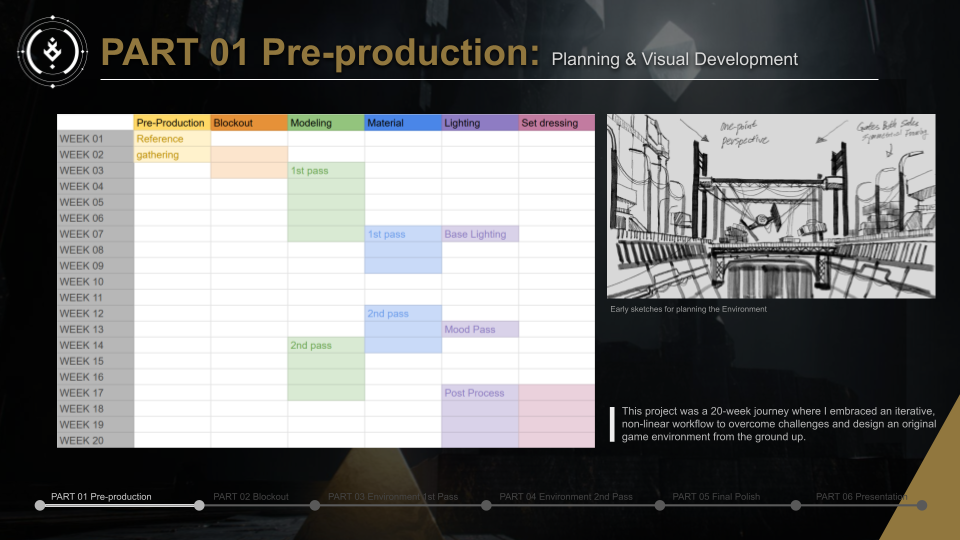
This project took approximately 20 weeks to complete and marked my first time building an environment at this scale. The key challenge was that the project was not based on existing concept art. Designing and building an original environment from scratch required multiple iterations, experimentation, and navigating moments of uncertainty. However, working through these challenges became one of the most valuable aspects of the project, ultimately strengthening both my creative decision-making and overall workflow.
Reference & Ideation
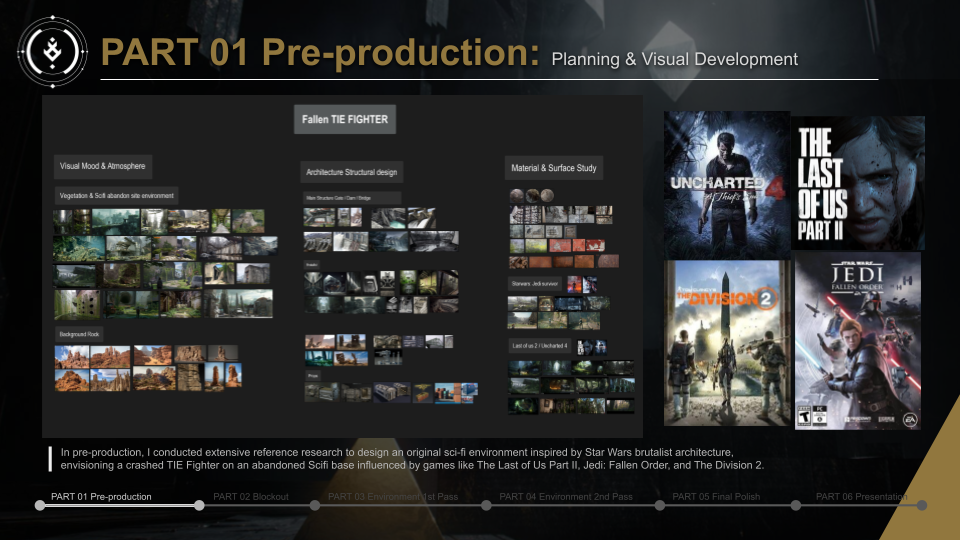
Like most pre-production stages, the process began with gathering a wide range of references. This was especially important since the project was not based on existing concept art, but instead aimed to build an original environment from the ground up. It required extensive visual research to establish a clear direction before moving into production.
As a longtime fan of the Star Wars universe, I was particularly drawn to its brutalist-inspired sci-fi architecture and heavy industrial design language. I wanted to create an environment that could naturally exist within that kind of world.
The starting point for the scene came from a TIE Fighter, a vehicle I had previously modeled and always found visually compelling. From there, I began to explore what kind of environment would support its story. This led to the idea of a crash-landed TIE Fighter on an alien planet, near an abandoned sci-fi structure.
A key goal was to convey the passage of time—a once functional environment, but has since been left behind and gradually overtaken by nature. To develop this mood and storytelling approach, I studied references from games known for their environmental storytelling, such as The Last of Us Part II, Star Wars Jedi: Fallen Order, Star Wars Jedi: Survivor, and Tom Clancy’s The Division 2. Their ability to depict lived-in, decayed spaces became a major influence on the atmosphere of the scene.

Blockout & Layout
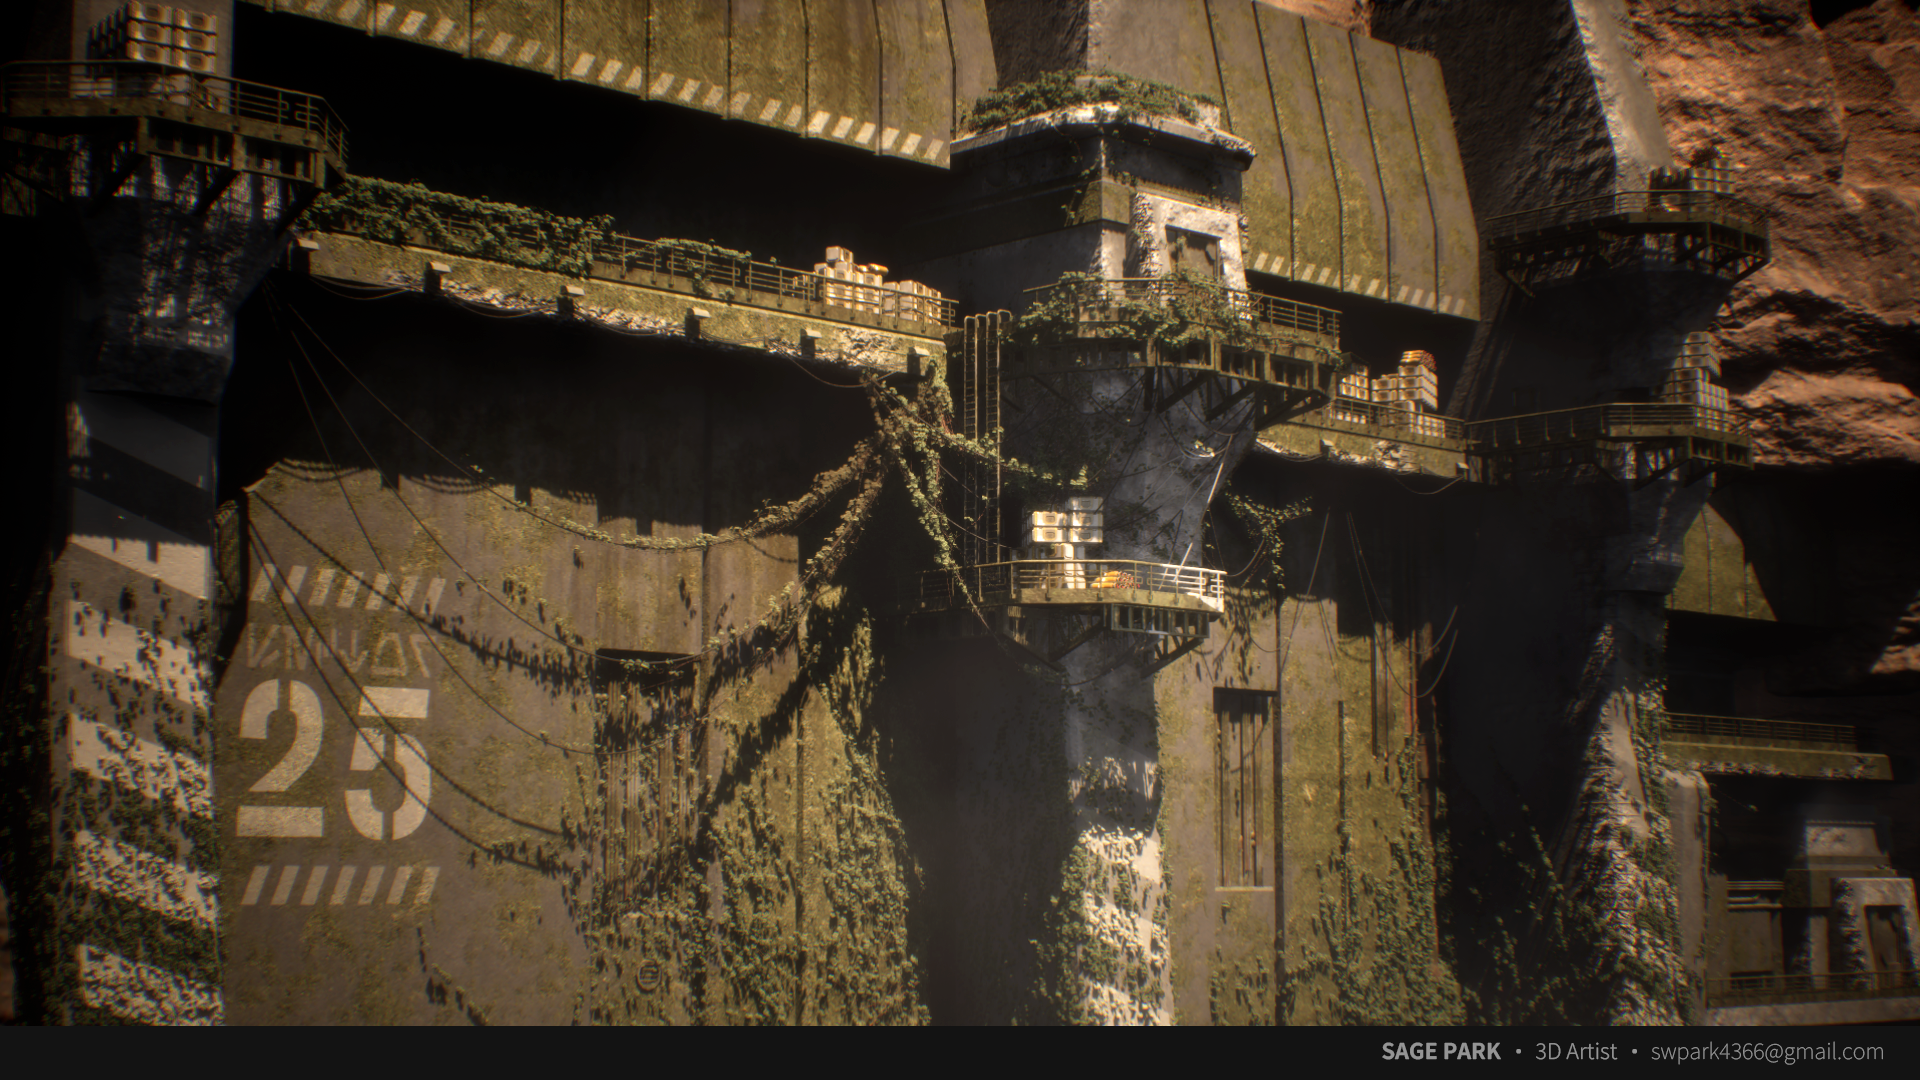
After gathering references and exploring initial ideas, I moved into Unreal Engine to begin the blockout phase. At this stage, the focus was on establishing scale, composition, and layout using very simple geometry. Keeping the scene rough early on helped avoid unnecessary rework and allowed for faster iteration. I also set up temporary cameras to frame key shots and guide the overall composition while building out the environment. As the project progressed, the layout evolved significantly. What started as a narrow, canyon-like space gradually transformed into a larger scene centered around a dam with a river running through it, resulting in a more dynamic silhouette and a stronger sense of environmental storytelling.
Since the project was not based on existing concept art, there were moments of uncertainty during development. In those situations, feedback played a crucial role—especially guidance from my mentor, Jonathan, which helped steer the project in the right direction.
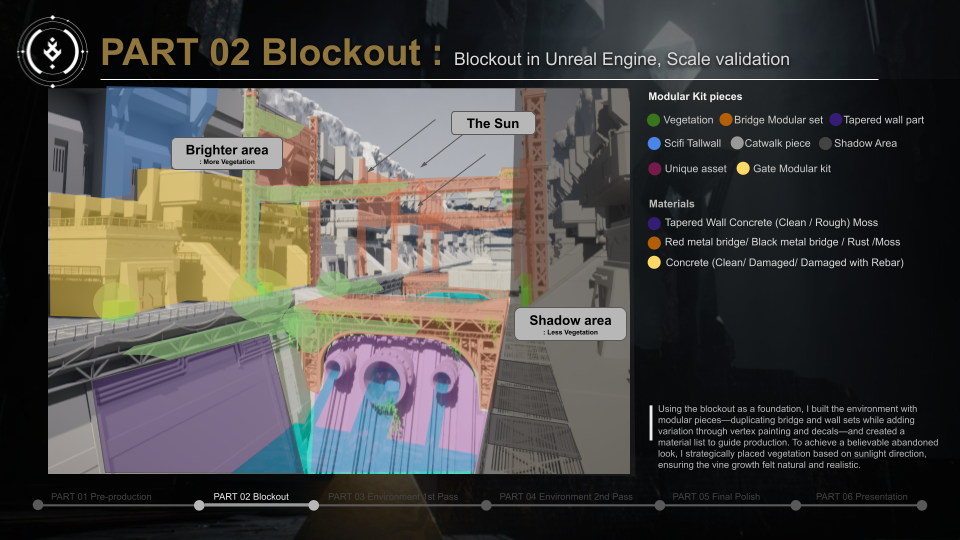
Before diving into details, I laid out a clear plan for the environment. Each color represents a specific type of asset, such as modular bridge structures, walls, vegetation areas, and unique elements. This approach helped me identify what modular kits were needed before moving into detailed modeling and texturing.
Lighting direction was also considered early on. By defining areas that receive more sunlight versus those in shadow, I was able to plan vegetation placement in a more intentional way. Brighter areas were designed to have denser plant growth, while shadowed regions remained more exposed, reinforcing the contrast between natural and industrial elements.
Also at this blockout stage, I began thinking about material variation. Separating clean surfaces, damaged areas, and sections with moss helped establish a foundation for environmental storytelling and guided later texturing decisions.
Modeling – First Pass
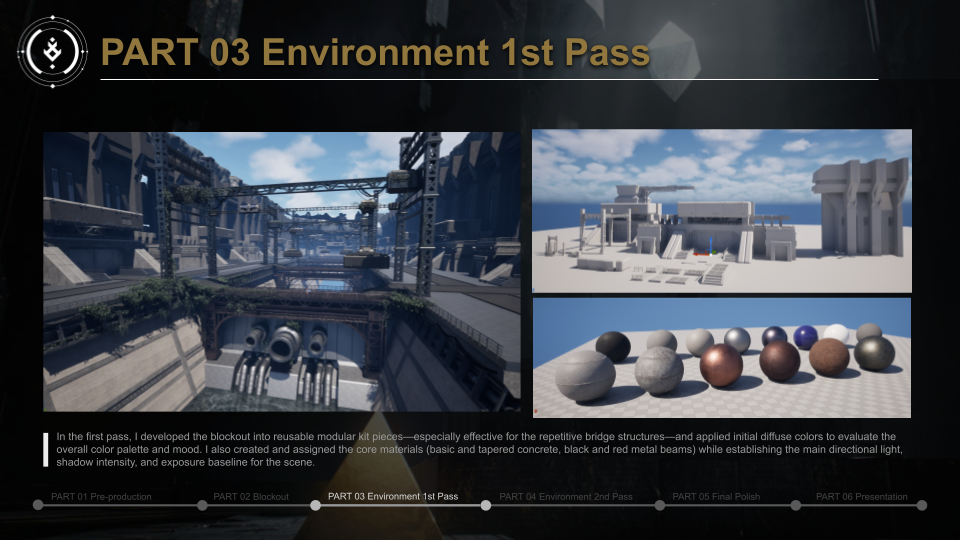
After completing the blockout, I moved into the first modeling pass. Rather than building every asset as a unique model, I focused on developing reusable modular kits to construct the environment. Once the initial modeling pass was complete, I applied simple diffuse colors to the assets to establish an early sense of the scene’s overall color palette and mood.
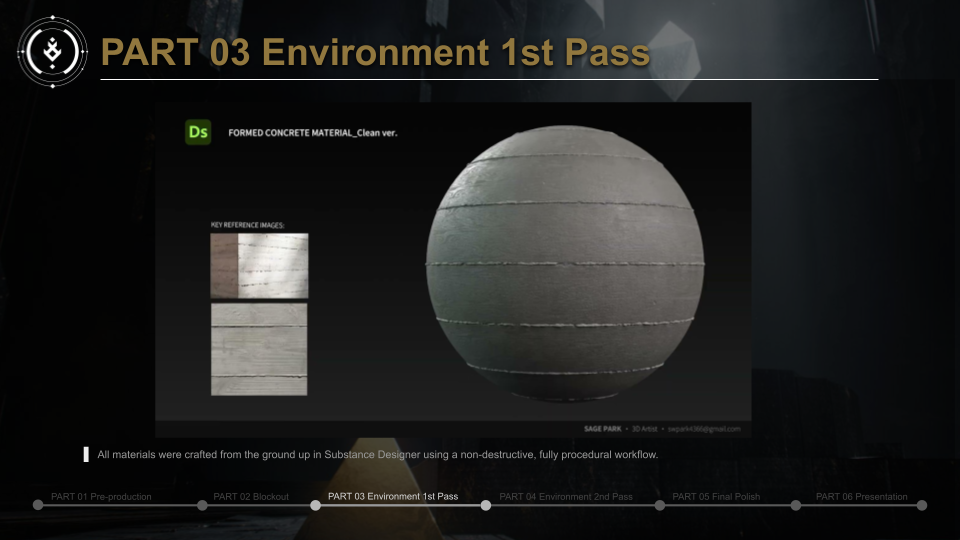

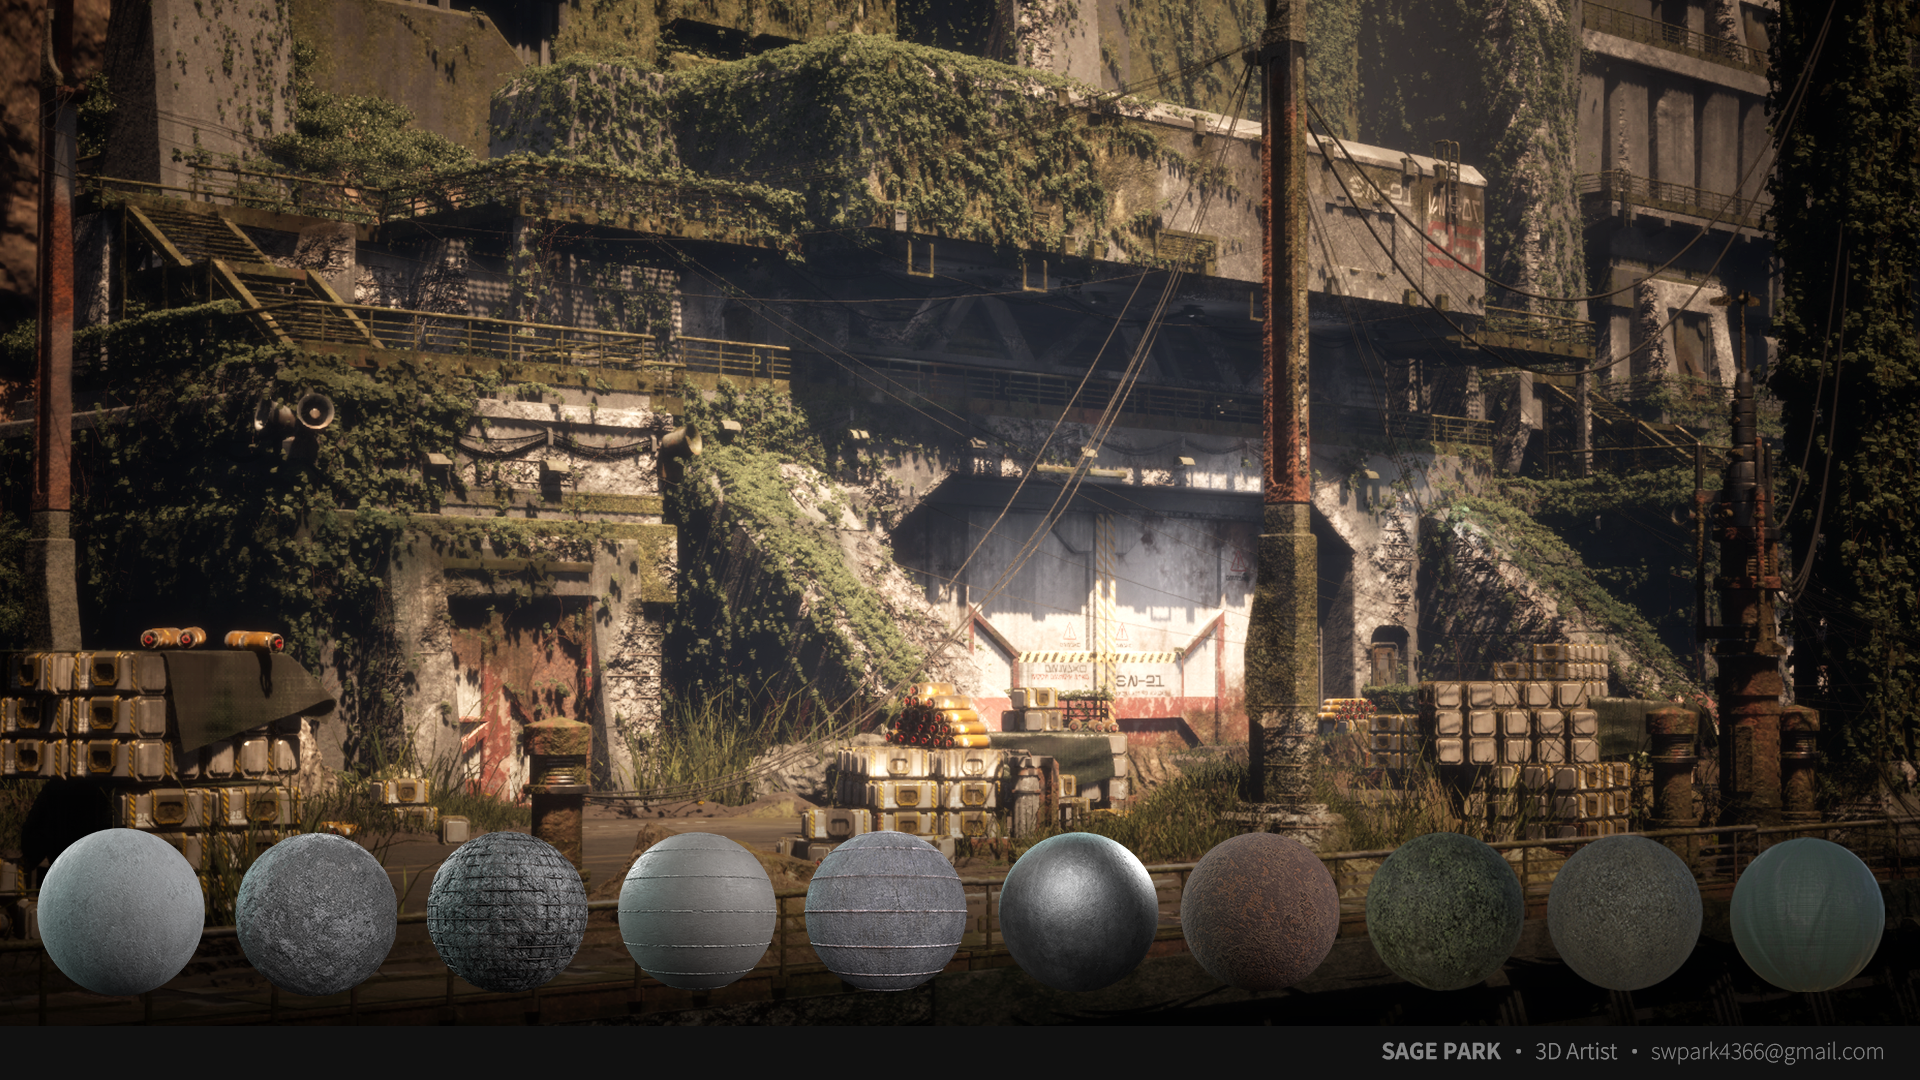
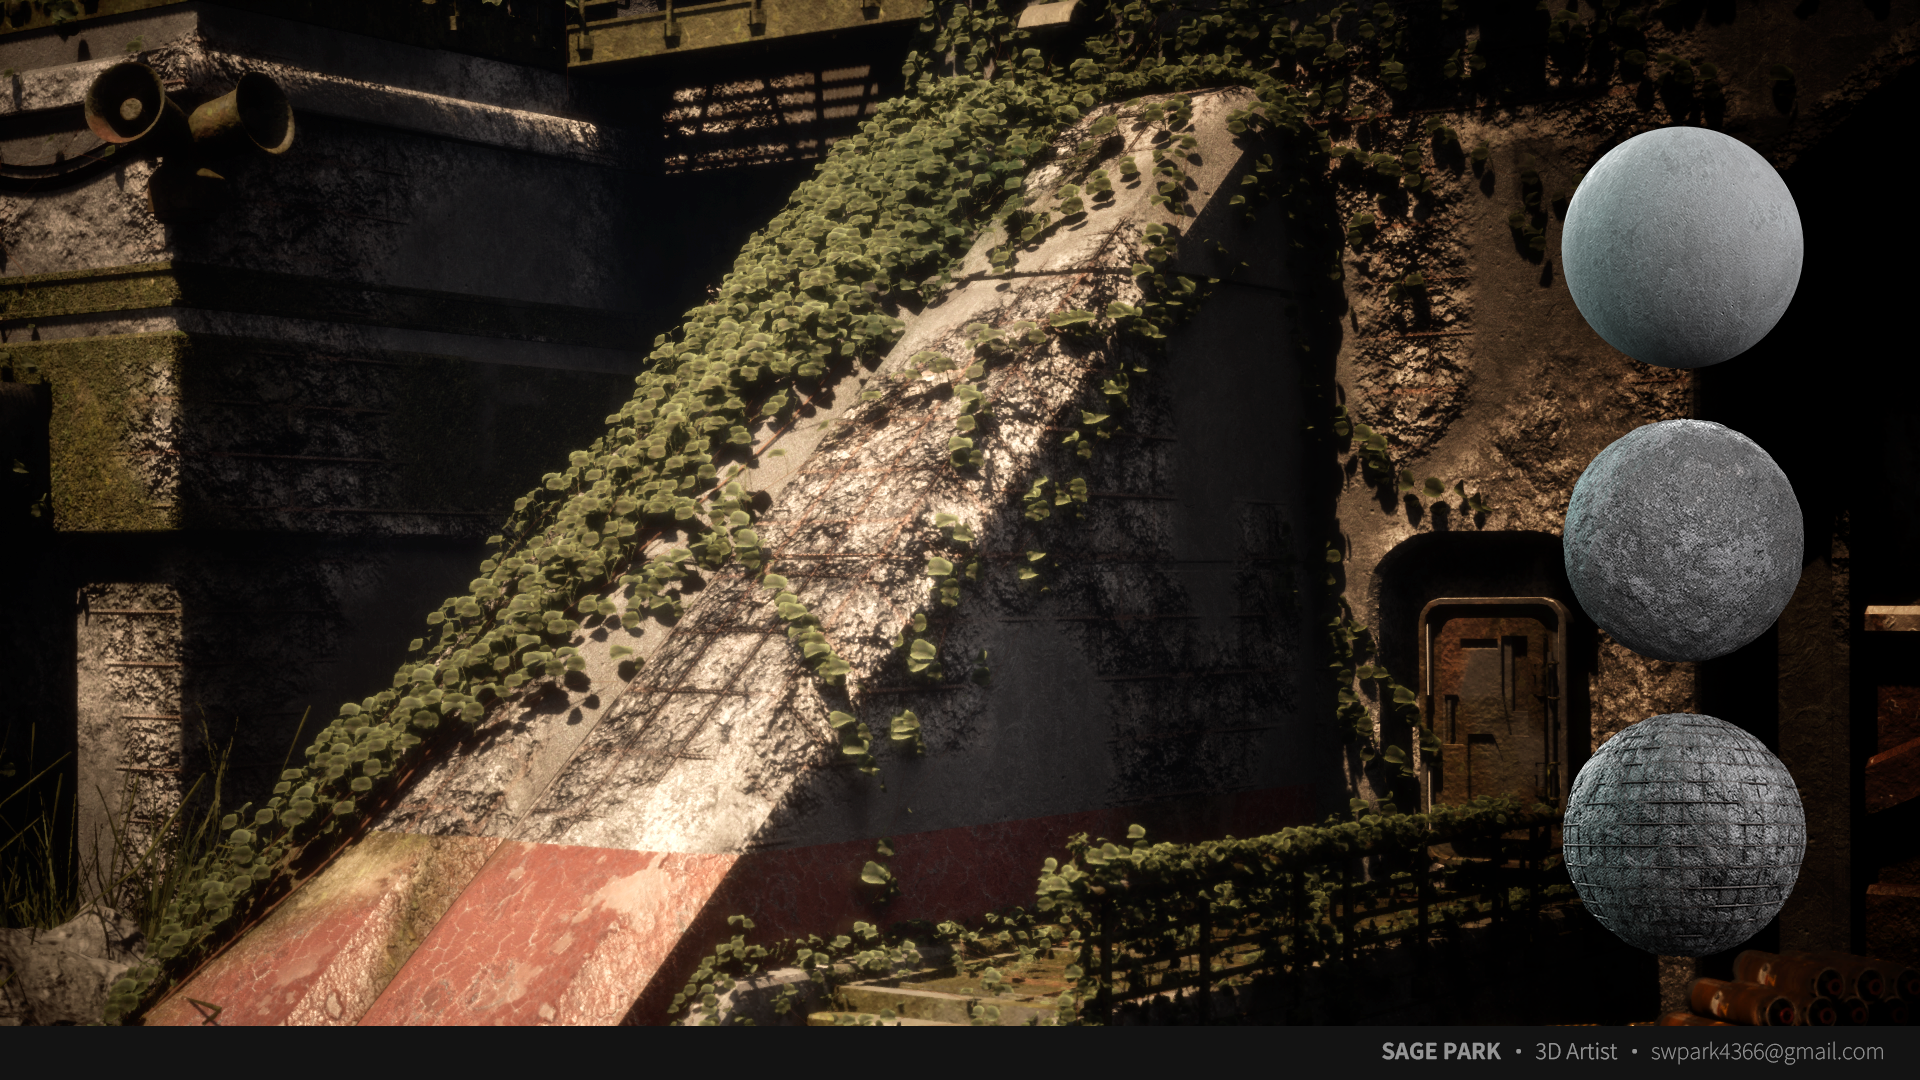
At this stage, I also created several key materials that would define the visual identity of the environment, including base concrete, tapered wall concrete, and metal materials for the black and red structural beams. All materials were built from the ground up in Substance Designer using a fully procedural, non-destructive workflow.
Scale Check & Texel Density
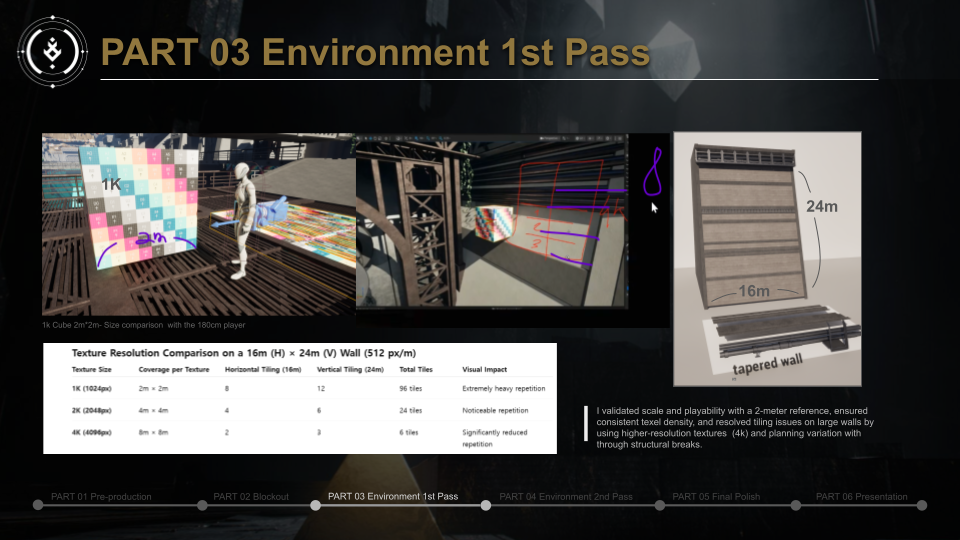
Before moving into the second modeling pass, I wanted to ensure that the overall scale of the environment felt believable and functional. To do this, I placed a human-scale character in the scene to evaluate whether the space felt natural and playable—particularly in relation to the bridge structures. I also used a simple 2-meter cube as a reference to verify proportions and maintain consistent texel density across assets.
One of the main challenges during this stage was the tapered wall. Due to its large size—approximately 16 meters wide and 24 meters tall—the initial 2K tileable texture resulted in noticeable repetition across the surface. While the texel density target of 512 pixels per meter was technically correct, the scale of the asset made the tiling pattern visually distracting.
To address this, I selectively used 4K textures in key areas to reduce repetition. At the same time, I avoided relying solely on higher resolution textures by planning additional techniques such as structural segmentation, decals, and vertex painting. These approaches helped break up repetition and maintain visual interest across large surfaces while keeping the scene efficient for real-time rendering.
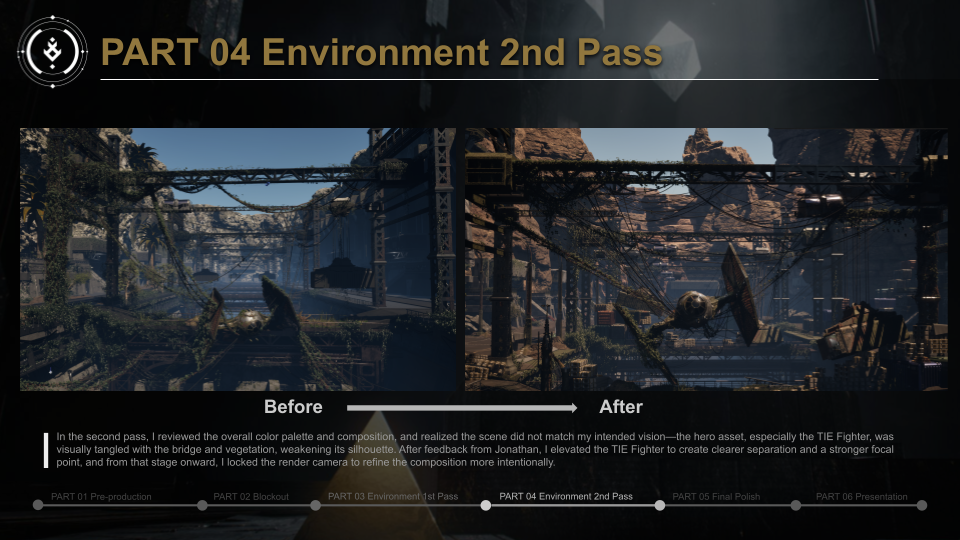
Second Pass – Composition & Readability
In the second pass, I shifted my focus toward refining the overall color palette and composition of the environment. By this stage, most of the base materials were already in place, which allowed me to get a clearer sense of how the final scene might come together. However, the initial result was far from successful. The silhouette of the hero asset—the TIE Fighter—was getting lost among the surrounding vegetation, bridge structures, and background elements. As a result, the main focal point lacked clarity and visual impact.
During a mentorship session with Jonathan, we explored ways to improve readability. One key solution was to slightly suspend the TIE Fighter in the air, as if it had been caught mid-crash. This adjustment immediately clarified its silhouette and restored its role as the focal point of the scene.
Another issue was the lack of separation between the concrete structures and the background rocks, which caused the scene to feel visually flat. To address this, I replaced the background with hoodoo-style rock formations from Quixel Megascans. Their simpler forms and warmer, reddish tones helped create better contrast and depth, while still maintaining cohesion with the overall environment.
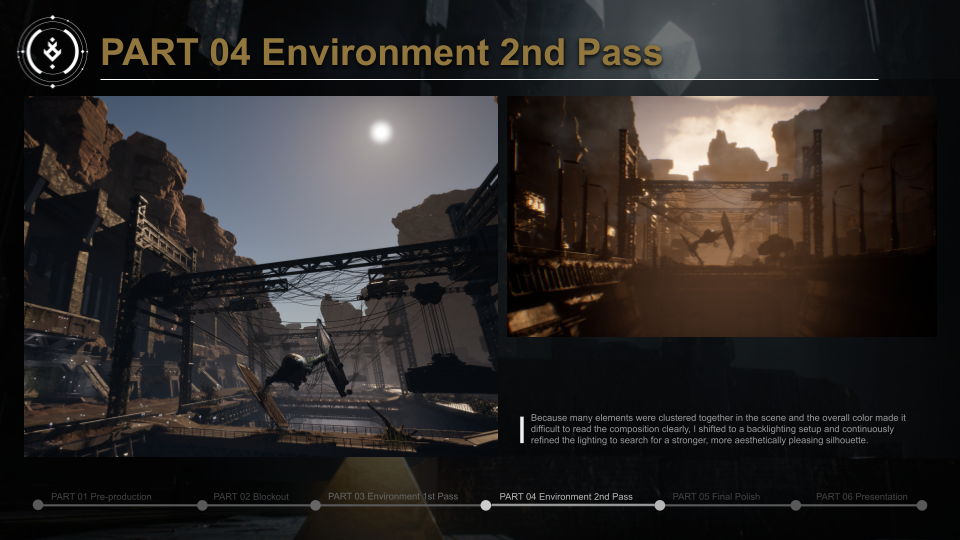
Composition Check – Backlighting
One technique I often use to evaluate composition is switching the scene to strong backlighting. In complex environments with many elements and varied colors, it can be difficult to judge overall readability. By pushing the lighting into a backlit setup, the scene simplifies into silhouettes. This makes it much easier to assess whether the shapes and composition are working effectively from a visual standpoint.
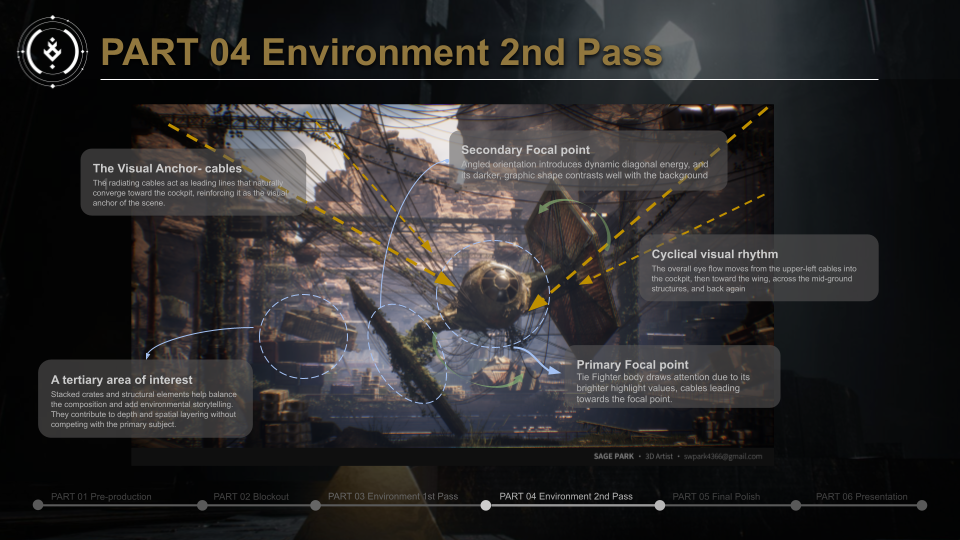
Composition Breakdown
Starting from the second pass, I locked in the main render camera to establish a clear and intentional composition. Coming from a film background, I tend to approach environments from a cinematic perspective, treating each shot as a carefully framed scene. The final composition centers around the TIE Fighter cockpit as the primary focal point, positioned slightly off-center. Its strong value contrast and clean circular silhouette help it stand out against the surrounding linear structures.
To guide the viewer’s eye, several cables were arranged to subtly converge toward the cockpit, creating natural leading lines. The right-wing panel serves as a secondary focal point, introducing a dynamic diagonal element that adds visual tension while remaining distinct from the background.
Supporting elements, such as the structures and props on the left side, act as tertiary points of interest. These were intentionally kept at a lower contrast to avoid competing with the main subject, while still helping to balance the frame and enrich the environment.
Overall, the composition is driven by silhouette clarity, value contrast, and controlled eye flow. Diagonal elements add energy to the scene, while clear foreground, midground, and background layers reinforce depth and scale.
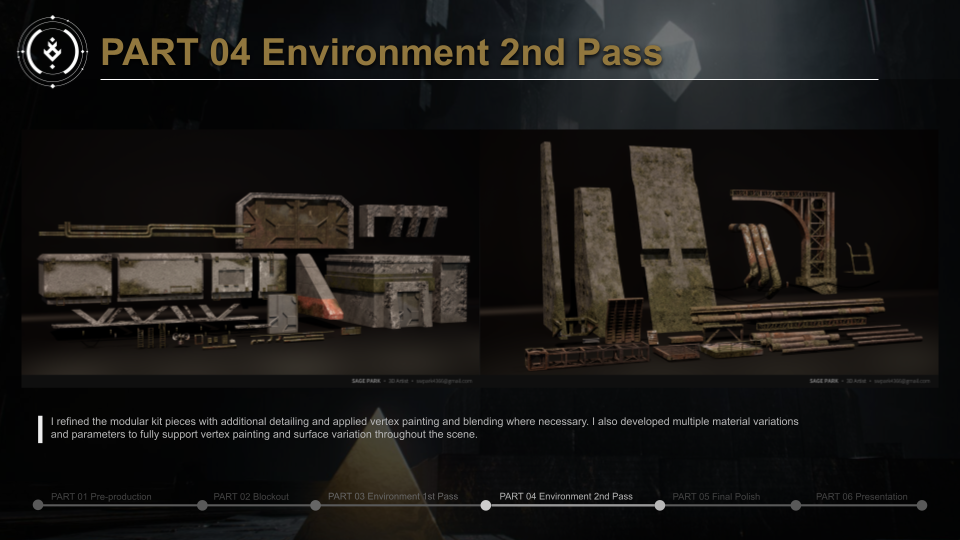
Detailing & Material Development
From the second pass onward, I began refining the environment by adding more detail to the modular kits, focusing on vertex painting and material blending to increase variation and visual richness.
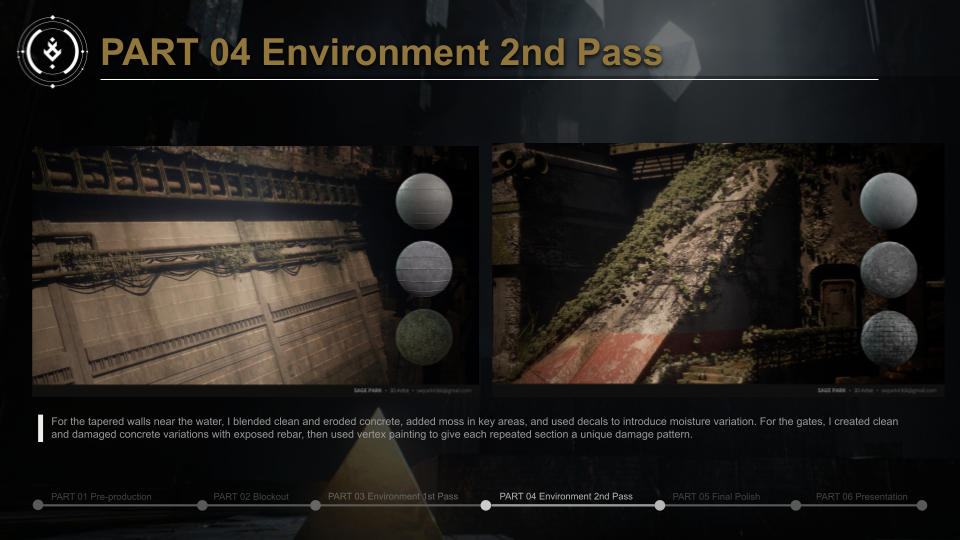
For the gate structures, I created several concrete variations, including: clean concrete, damaged concrete, and versions with exposed rebar. These were blended using vertex painting, allowing each repeated structure to have unique wear patterns and helping reduce visible repetition across the scene.
In addition, I developed supporting materials such as painted concrete and peeled paint variations to further diversify the environment. All materials were created from scratch in Substance Designer using a fully procedural, non-destructive workflow, which made it easier to iterate and adjust as needed.
For the tapered wall sections near the water, I blended clean and eroded concrete materials, layering moss on top to suggest long-term environmental wear and exposure.
Vertex painting played a key role in bringing these elements together, enabling smooth transitions between materials and helping achieve a more natural, worn, and cohesive look throughout the environment.
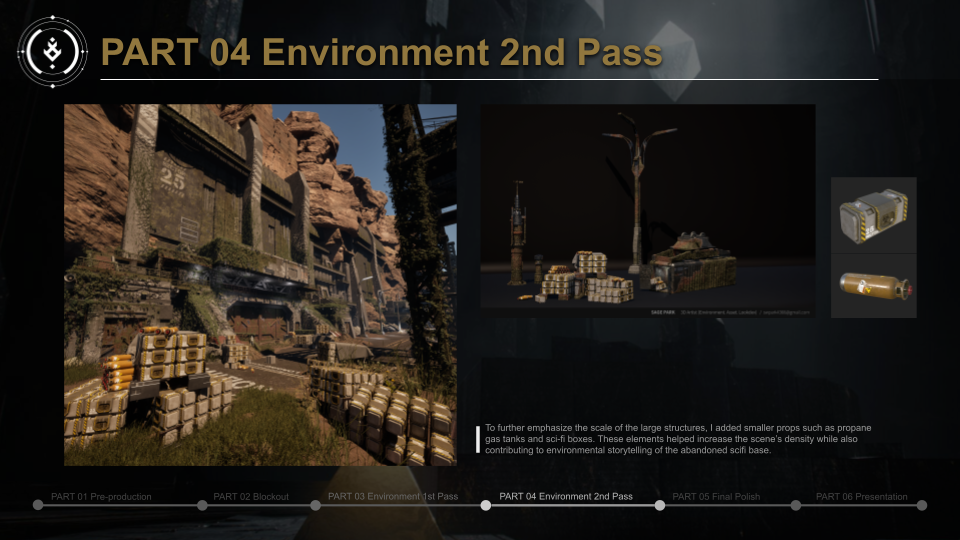
To further reinforce the sense of scale, I introduced smaller props such as propane tanks and sci-fi crates. These elements help increase environmental density while subtly enhancing the storytelling of the space.
Post-Processing & Final Polish
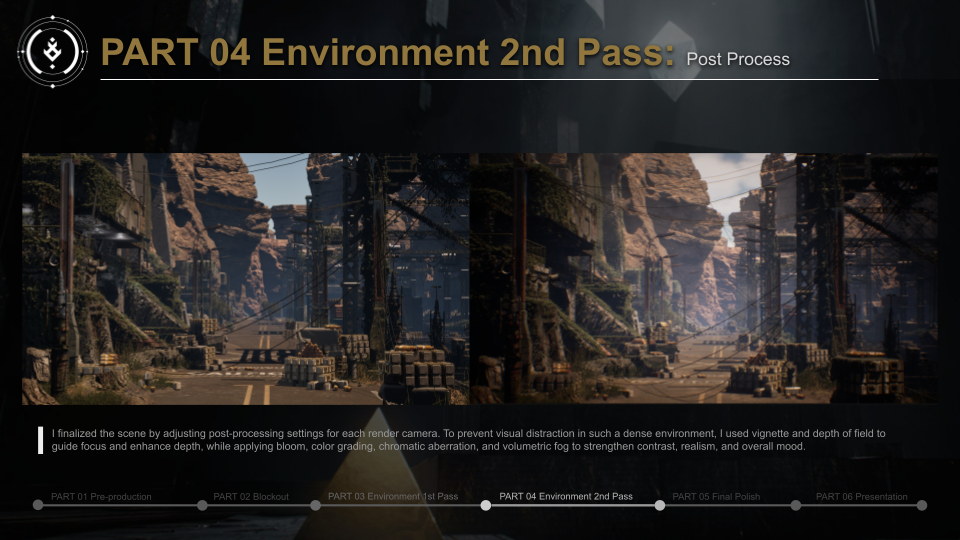
Once the environment elements were in place, I moved into post-processing within Unreal Engine to refine the final renders. Because the scene contains a high level of visual detail, I used several techniques to better guide the viewer’s focus. Subtle vignette and depth of field were applied to reinforce depth and keep attention on the primary focal areas. I also utilized bloom, color grading, chromatic aberration, and volumetric fog to enhance the overall realism and atmosphere, helping unify the scene and elevate the final presentation.
Final Value Check
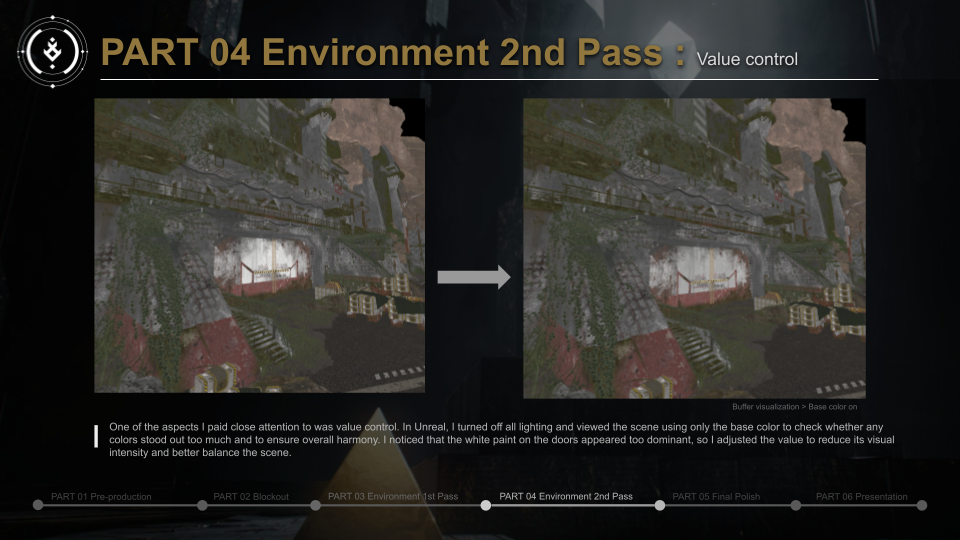
As a final step, I focused on evaluating the overall value balance of the scene. Inside Unreal Engine, I temporarily disabled most rendering features and viewed the environment using only base color. This made it easier to identify any areas that were visually too dominant or out of harmony. During this process, I noticed that the white paint on the doors was drawing too much attention, so I toned down its brightness to maintain a more balanced and cohesive look across the scene.
Final Polish
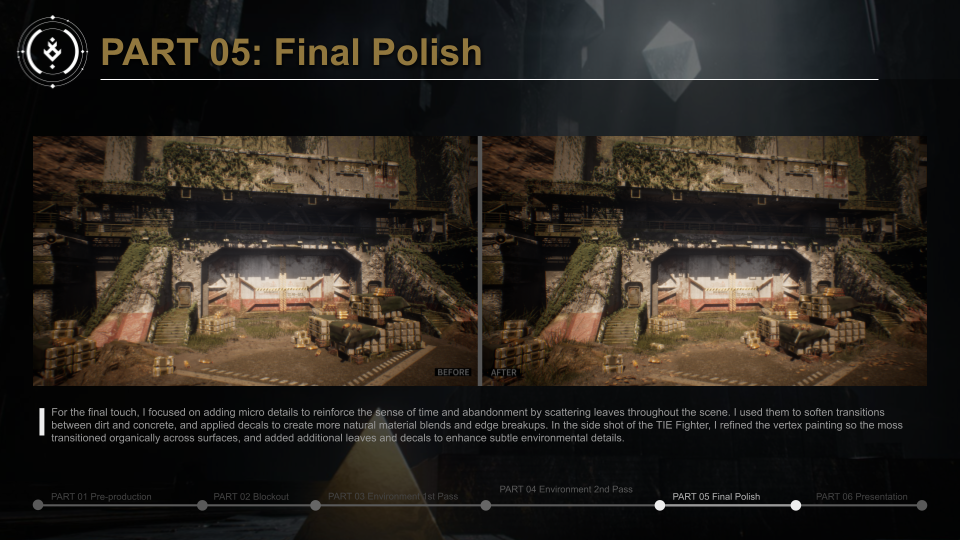
At the final stage, I focused on subtle details to enhance realism and reinforce the sense of time passing within the environment. To add micro variation and visual richness, I scattered fallen leaves throughout the scene.
I also worked on softening transitions between different materials—especially where soil meets concrete. The leaves helped bridge these surfaces, making the transitions feel more natural and less abrupt. In addition, I applied extra decals to further blend material boundaries, contributing to a more cohesive and grounded final result.
Presentation & Portfolio
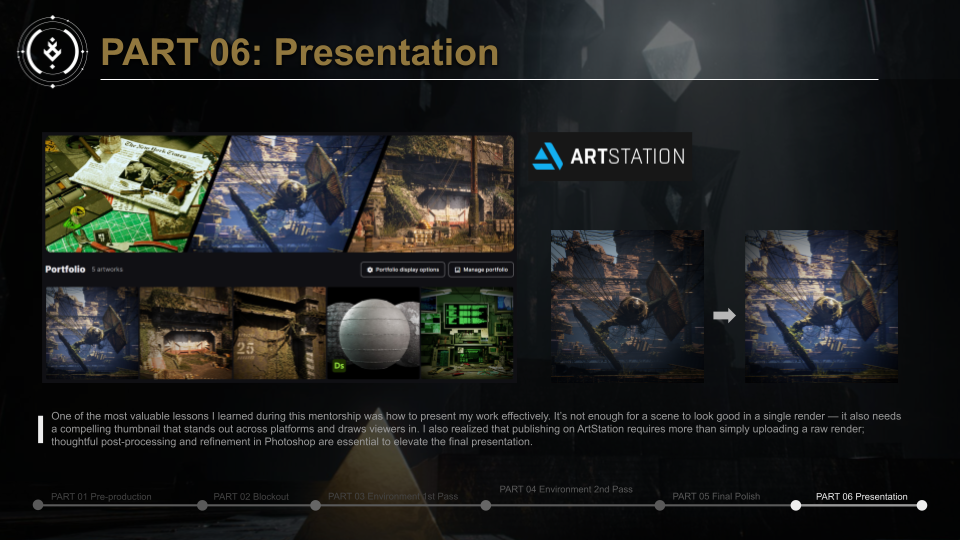
One of the most valuable lessons I gained from this mentorship wasn’t just how to build an environment, but how to present it effectively. A strong portfolio goes beyond creating visually appealing renders—it’s about making sure the work stands out and captures attention across different platforms.
I learned the importance of creating compelling thumbnails that immediately draw the viewer in and encourage them to engage with the project. This was something I hadn’t fully considered before. I realized that simply exporting renders directly from the engine is often not enough. Applying final adjustments in Photoshop—such as refining contrast, guiding the viewer’s focus, and enhancing overall clarity—can significantly elevate the presentation and make the work feel more polished and intentional.
Thank you for reading! You can follow my ArtStation here: https://www.artstation.com/sagepark
Thank you for reading from the Vessel Forge Team! Sage took our Environment Art and Material Art Mentorships with Jonathan Benainous. Take a look at the programs below: